Spring Boot Rest API Unit Testing with JUnit 5
In this tutorial, we are going to cover in-depth how to unit test a Spring Boot Rest API using JUnit 5, Mockito, MockMvc, and TestRestTemplate.
First, we will start by creating a basic restful API with Spring Boot. Then, we will illustrate how to test each layer of the API using practical examples.
Build Spring Boot Rest API
Unit testing is an important process of building robust applications. It ensures the quality and reliability of any software product.
Before diving deep into the detail, let’s create a simple Spring Boot application.
To do so, we will need:
Java IDE such as IntelliJ IDEA or Eclipse
Bootstrap Spring Boot Project
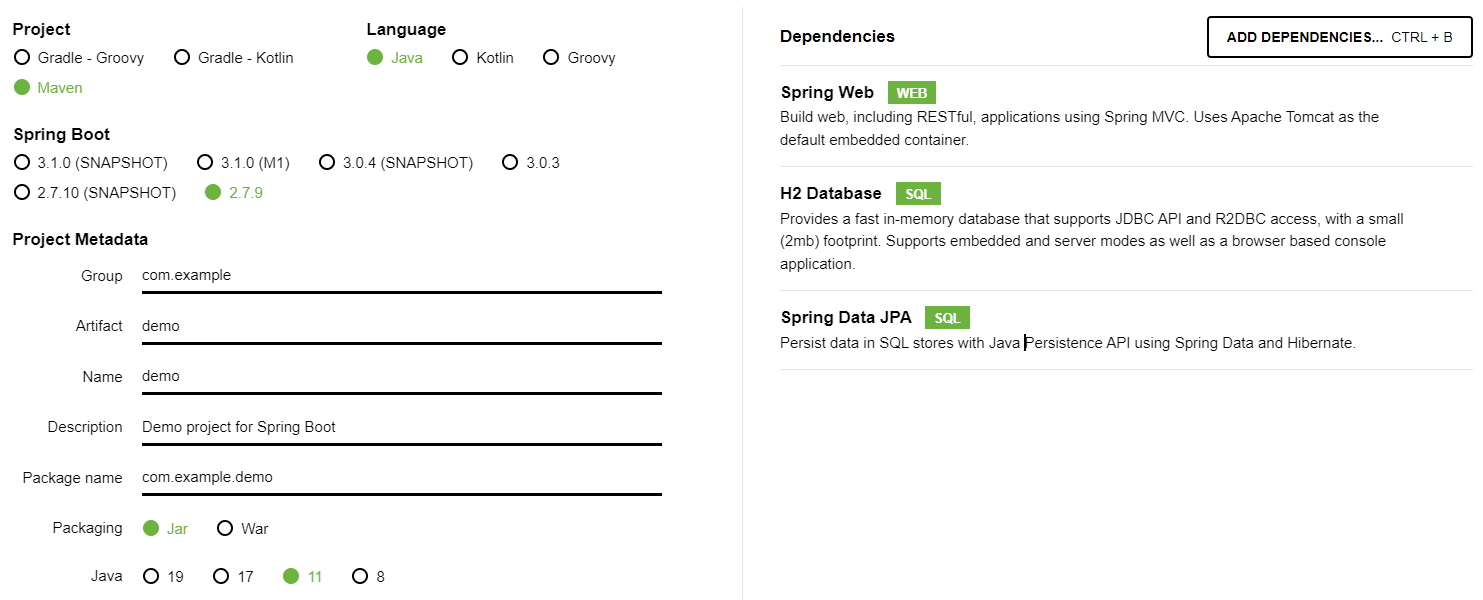
We are going to use Spring Initializr to generate our Spring Boot project with just the dependencies we need.
So, for this tutorial, we will need:
Spring Web
Spring Data JPA
H2 Database
Now that we generate the project, let’s start working on our API implementation.
As a matter of fact, the API will be basic with simple endpoints to handle a list of employee:
GET /api/employees |
get employee list |
GET /api/employees/{id} |
get an employee by id |
POST /api/employees |
add a new employee |
PUT /api/employees/{id} |
update an employee |
DELETE /api/employees/{id} |
delete an employee by id |
This is how our project structure will look like:

Configure H2 Datasource
H2 is an in-memory relational database. The best part of this embedded database is that we don’t need to install any SGBD to work with.
By default, Spring Boot configures H2 with the username “sa” and an empty password.
So, let’s add the data source configuration in the application.properties file:
        spring.datasource.url=jdbc:h2:mem:testdb
        spring.datasource.driverClassName=org.h2.Driver
        spring.datasource.username=sa
        spring.datasource.password=password
        spring.jpa.database-platform=org.hibernate.dialect.H2Dialect
        spring.jpa.hibernate.ddl-auto=none
spring.jpa.hibernate.ddl-auto=none ensures that the H2 database is initialised using the SQL scripts data.sql and schema.sql.
This is a good practice to seed the database with data for testing purposes.
        ## schema.sql
        DROP TABLE IF EXISTS employee;
        CREATE TABLE employee(
            id INT AUTO_INCREMENT PRIMARY KEY,
            first_name VARCHAR(200),
            last_name VARCHAR(200)
        )
        ## data.sql
        INSERT INTO employee (first_name, last_name) VALUES('Azhrioun', 'Abderrahim');
        INSERT INTO employee (first_name, last_name) VALUES('Brian', 'Wheeler');
        INSERT INTO employee (first_name, last_name) VALUES('Dave', 'Anderson');
        INSERT INTO employee (first_name, last_name) VALUES('Stella', 'Sherman');
Create JPA Entity
Since our API is about employees management, let’s start by creating the main entity class Employee:
        @Entity
        public class Employee {
            @Id
            @GeneratedValue(strategy = GenerationType.IDENTITY)
            private int id;
            private String firstName;
            private String lastName;

            public int getId() {
                return id;
            }
            public void setId(int id) {
                this.id = id;
            }
            public String getFirstName() {
                return firstName;
            }
            public void setFirstName(String firstName) {
                this.firstName = firstName;
            }
            public String getLastName() {
                return lastName;
            }
            public void setLastName(String lastName) {
                this.lastName = lastName;
            }
        }
As shown above, we are using JPA annotations to handle the object-relational mapping.
Create JPA Repository
Secondarily, we will create a repository to manage data access and storage in the H2 database:
        @Repository
        public interface EmployeeRepository extends JpaRepository<Employee, Integer> {
        }
JpaRepository comes with all the basic CRUD operations. So, we don’t need to add anything else here.
@Repository marks and register EmployeeRepository as a Spring bean
Create a Business Service
Now, let’s add a service to define the business logic of our API. For instance, let’s consider the EmployeeService interface:
        public interface EmployeeService {
            List<Employee> findAll();
            Optional<Employee> findById(int id);
            Employee save(Employee emp);
            void deleteById(int id);
        }
Next, we are going to create a class implementation for our interface:
        @Service
        public class EmployeeServiceImpl implements EmployeeService {
            private final EmployeeRepository employeeRepository;
            EmployeeServiceImpl(EmployeeRepository employeeRepository) {
                this.employeeRepository = employeeRepository;
            }

            @Override
            public List<Employee> findAll() {
                return this.employeeRepository.findAll();
            }
            @Override
            public Optional<Employee> findById(int id) {
                return this.employeeRepository.findById(id);
            }
            @Override
            public Employee save(Employee emp) {
                return this.employeeRepository.save(emp);
            }
            @Override
            public void deleteById(int id) {
                this.employeeRepository.deleteById(id);
            }
        }
Please notice that we injected EmployeeRepository as a dependency implicitly using the constructor injection strategy.
Create a Rest Controller
Lastly, we will create a Spring controller to handle the API endpoints in a restful manner:
        @RestController
        @RequestMapping("/api/employees")
        public class EmployeeApi {
            private final EmployeeService employeeService;
            EmployeeApi(EmployeeService employeeService) {
                this.employeeService = employeeService;
            }

            @GetMapping
            List<Employee> getAll() {
                return this.employeeService.findAll();
            }
            @GetMapping(value = "/{id}")
            Optional<Employee> getById(@PathVariable int id) {
                return this.employeeService.findById(id);
            }
            @PostMapping
            Employee add(@RequestBody Employee emp) {
                return this.employeeService.save(emp);
            }
            @PutMapping
            Employee update(@RequestBody Employee emp) {
                return this.employeeService.save(emp);
            }
            @DeleteMapping(value = "/{id}")
            void delete(@PathVariable int id) {
                this.employeeService.deleteById(id);
            }
        }
Similarly, we dependency injected employeeService to do all the heavy lifting of handling business logic.
@RestController is a combination of @Controller and @ResponseBody. So, every handler method will automatically serialize the returned objects directly into the HttpResponse.
Please bear in mind that we didn’t handle any type of exception here. However, it’s always a good practice to handle exceptions when building rest APIs.
Unit Testing Rest API using JUnit 5
Now that we have finished the Spring Boot API implementation, let’s see how to unit test it using JUnit 5 and Mockito.
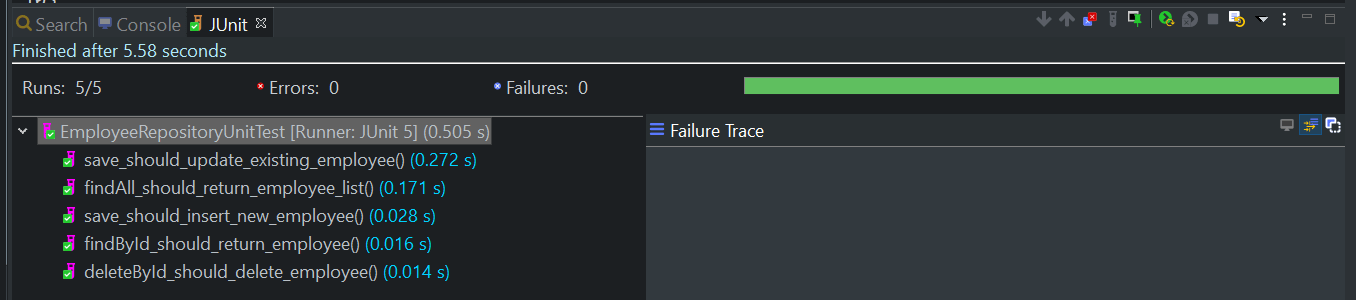
Test JPA Repository using @DataJpaTest
First, let’s begin with EmployeeRepository. Spring Boot provides the @DataJpaTest annotation to enhance testing functionality for JPA repositories.
We can tell Spring to automatically configure JPA repositories by annotating the unit test class with @DataJpaTest.
        @DataJpaTest
        class EmployeeRepositoryUnitTest {
            @Autowired
            private EmployeeRepository employeeRepository;
        }
As we can see, we autowired employeeRepository directly without adding any extra configuration.
By default, @DataJpaTest uses an embedded in-memory database under the hood.
Please note that with JUnit 5, test classes and test methods are not required to be public.
Now, let’s create a test case for each method:
        @Test
        void findAll_should_return_employee_list() {
            // When
            List<Employee> employees = this.employeeRepository.findAll();
            // Then
            assertEquals(4, employees.size());
        }

        @Test
        void findById_should_return_employee() {
            // When
            Optional<Employee> employee = this.employeeRepository.findById(2);
            // Then
            assertTrue(employee.isPresent());
        }

        @Test
        void save_should_insert_new_employee() {
            // Given
            Employee newEmployee = new Employee();
            newEmployee.setFirstName("FIRST_NAME");
            newEmployee.setLastName("LAST_NAME");
            // When
            Employee persistedEmployee = this.employeeRepository.save(newEmployee);
            // Then
            assertNotNull(persistedEmployee);
            assertEquals(5, persistedEmployee.getId());
        }

        @Test
        void save_should_update_existing_employee() {
            // Given
            Employee existingEmployee = new Employee();
            existingEmployee.setId(3);
            existingEmployee.setFirstName("FIRST_NAME");
            existingEmployee.setLastName("LAST_NAME");
            // When
            Employee updatedEmployee = this.employeeRepository.save(existingEmployee);
            // Then
            assertNotNull(updatedEmployee);
            assertEquals("FIRST_NAME", updatedEmployee.getFirstName());
            assertEquals("LAST_NAME", updatedEmployee.getLastName());
        }

        @Test
        void deleteById_should_delete_employee() {
            // When
            this.employeeRepository.deleteById(2);
            Optional<Employee> employee = this.employeeRepository.findById(2);
            // Then
            assertFalse(employee.isPresent());
        }
As shown above, we used JUnit 5 assertions to verify that everything works as expected for each method.
Test Service Layer using Mockito
Next, we are going to test our service EmployeeService. Since it uses EmployeeRepository as a dependency, we will need to mock it first.
Simply put, Mockito is a powerful mocking framework that takes testing to the next level.
Fortunately, JUnit 5 comes with a ready-to-use extension model that supports Mockito.
To enable Mockito integration, we need to annotate our test class with the @ExtendWith(MockitoExtension.class) annotation:
        @ExtendWith(MockitoExtension.class)
        class EmployeeServiceUnitTest {
            @Mock
            private EmployeeRepository employeeRepository;

            @InjectMocks
            private EmployeeServiceImpl employeeService;
        }
@Mock allows us to create and inject a mock of EmployeeRepository
@InjectMocks is used to create an instance of our service EmployeeServiceImpl so that we can test it
Now, let’s exemplify the use of Mockito and JUnit 5 to test our service:
        @Test
        void findAll_should_return_employee_list() {
            // Given
            Employee employee = this.buildTestingEmployee();
            // When
            when(employeeRepository.findAll()).thenReturn(List.of(employee));
            List<Employee> employees = this.employeeService.findAll();
            // Then
            assertEquals(1, employees.size());
            verify(this.employeeRepository).findAll();
        }

        @Test
        void findById_should_return_employee() {
            // Given
            Employee employee = this.buildTestingEmployee();
            // When
            when(employeeRepository.findById(1)).thenReturn(Optional.of(employee));
            Optional returnedEmployee = this.employeeService.findById(1);
            // Then
            assertEquals(employee.getId(), returnedEmployee.get()
                .getId());
            verify(this.employeeRepository).findById(1);
        }

        @Test
        void save_should_insert_new_employee() {
            // Given
            Employee employee = this.buildTestingEmployee();
            // When
            this.employeeService.save(employee);
            // Then
            verify(this.employeeRepository).save(employee);
        }

        @Test
        void deleteById_should_delete_employee() {
            // When
            this.employeeService.deleteById(1);
            // Then
            verify(this.employeeRepository).deleteById(1);
        }

        private Employee buildTestingEmployee() {
            Employee employee = new Employee();
            employee.setId(1);
            employee.setFirstName("FIRST_NAME");
            employee.setLastName("LAST_NAME");
            return employee;
        }
We used verify() alongside JUnit 5 assertions to check that employeeRepository methods are successfully invoked when calling employeeService methods.

Testing Rest API Endpoints
Now that we tested everything related to the JPA repository and the service layer, it’s time to test the Spring controller.
There are several ways to implement testing for a rest API. Let’s take a close look at each option.
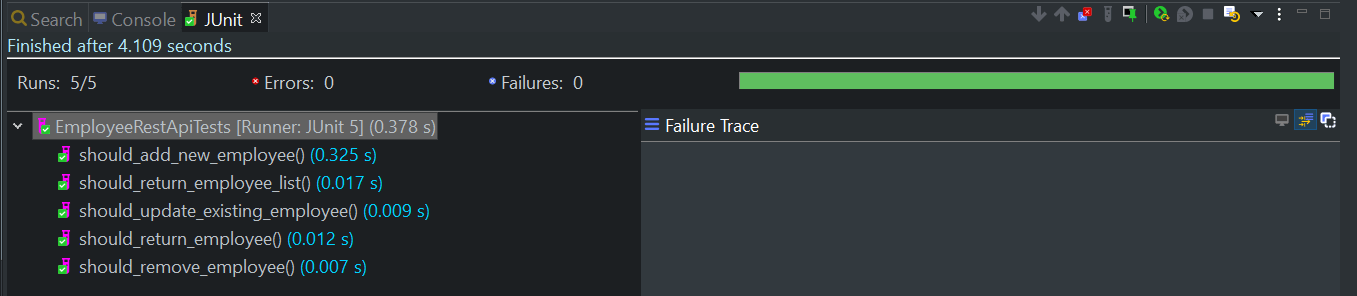
Using @WebMvcTest
Spring Boot offers @WebMvcTest to focus only on testing Spring MVC web components such as Rest APIs.
By default, tests annotated with @WebMvcTest will automatically configure MockMvc.
As the name implies, MockMvc provides mocking and testing support for Spring web controllers.
So, let’s see how we can use it to test our API:
        @WebMvcTest(EmployeeApi.class)
        class EmployeeRestApiTests {
            @MockBean
            private EmployeeService employeeService;

            @Autowired
            private MockMvc mockMvc;
        }
As we can see, @WebMvcTest lets us specify the controller we want to test.
Please note also that we used @MockBean to create a mock of EmployeeService and add it into the application context.
Now, let’s add a test case for each API’s endpoint:
        @Test
        void should_return_employee_list() throws Exception {
            Employee employee = this.buildTestingEmployee();
            when(employeeService.findAll()).thenReturn(List.of(employee));

            mockMvc.perform(get("/api/employees"))
                .andExpect(status().isOk())
                .andExpect(jsonPath("$", hasSize(1)))
                .andExpect(jsonPath("$[0].id", is(1)))
                .andExpect(jsonPath("$[0].firstName", is("FIRST_NAME")))
                .andExpect(jsonPath("$[0].lastName", is("LAST_NAME")));
        }

        @Test
        void should_return_employee() throws Exception {
            Employee employee = this.buildTestingEmployee();
            when(employeeService.findById(2)).thenReturn(Optional.of(employee));

            mockMvc.perform(get("/api/employees/2"))
                .andExpect(status().isOk())
                .andExpect(jsonPath("$.id", is(1)))
                .andExpect(jsonPath("$.firstName", is("FIRST_NAME")))
                .andExpect(jsonPath("$.lastName", is("LAST_NAME")));
        }

        @Test
        void should_add_new_employee() throws Exception {
            Employee employee = this.buildTestingEmployee();
            when(employeeService.save(any(Employee.class))).thenReturn(employee);

            mockMvc.perform(post("/api/employees")
                .contentType(MediaType.APPLICATION_JSON)
                .content("{ \"firstName\": \"FIRST_NAME\", \"lastName\": \"LAST_NAME\" }"))
                .andExpect(status().isOk())
                .andExpect(jsonPath("$.firstName", is("FIRST_NAME")))
                .andExpect(jsonPath("$.lastName", is("LAST_NAME")));
        }

        @Test
        void should_update_existing_employee() throws Exception {
            Employee employee = this.buildTestingEmployee();
            when(employeeService.save(any(Employee.class))).thenReturn(employee);

            mockMvc.perform(put("/api/employees")
                .contentType(MediaType.APPLICATION_JSON)
                .content("{ \"id\": 1 , \"firstName\": \"FIRST_NAME\", \"lastName\": \"LAST_NAME\" }"))
                .andExpect(status().isOk());
        }

        @Test
        void should_remove_employee() throws Exception {
            mockMvc.perform(delete("/api/employees/1"))
                .andExpect(status().isOk());

        }
MockMvc comes with the perform() method that we can use to test web request methods such as GET, POST, PUT, and DELETE
andExpect allows us to assert the returned HTTP response
Using TestRestTemplate and @SpringBootTest
TestRestTemplate is an HTTP client that provides a convenient and concise way to test restful web services.
We can use the @SpringBootTest annotation to make TestRestTemplate available in the context. That way, we can auto-wire and inject it into our test class.
Without further ado, let’s illustrate the use of TestRestTemplate with a practical example:
        @SpringBootTest(webEnvironment = WebEnvironment.RANDOM_PORT)
        class EmployeeRestApiV2Tests {
            @Autowired
            private TestRestTemplate restTemplate;
            @LocalServerPort
            private int randomServerPort;
        }
- @LocalServerPort injects the HTTP server port that was generated at runtime
Now that we put all the pieces together, let’s test each API endpoint using TestRestTemplate:
        @Test
        void should_return_employee_list() {
            Employee[] employees = restTemplate.getForObject("http://localhost:" + randomServerPort + "/api/employees", Employee[].class);

            assertEquals(4, employees.length);
            assertEquals("Azhrioun", employees[0].getFirstName());
        }

        @Test
        void should_return_employee() {
            Employee employee = restTemplate.getForObject("http://localhost:" + randomServerPort + "/api/employees/4", Employee.class);

            assertEquals(4, employee.getId());
            assertEquals("Stella", employee.getFirstName());
            assertEquals("Sherman", employee.getLastName());
        }

        @Test
        void should_add_new_employee() throws Exception {
            Employee newEmployee = new Employee();
            newEmployee.setFirstName("Adrien");
            newEmployee.setLastName("Miller");
            ResponseEntity response = restTemplate.postForEntity("http://localhost:" + randomServerPort + "/api/employees", newEmployee, Employee.class);

            assertEquals(200, response.getStatusCodeValue());
            assertEquals("Adrien", response.getBody()
                .getFirstName());
            assertEquals("Miller", response.getBody()
                .getLastName());
        }

        @Test
        void should_update_existing_employee() throws Exception {
            Employee updatedEmployee = new Employee();
            updatedEmployee.setId(1);
            updatedEmployee.setLastName("Abdo");
            HttpEntity requestUpdate = new HttpEntity<>(updatedEmployee);
            ResponseEntity response = restTemplate.exchange("http://localhost:" + randomServerPort + "/api/employees", HttpMethod.PUT, requestUpdate, Employee.class);

            assertEquals("Abdo", response.getBody()
                .getLastName());
        }

        @Test
        void should_remove_employee() throws Exception {
            restTemplate.delete("http://localhost:" + randomServerPort + "/api/employees/2");
            Employee employee = restTemplate.getForObject("http://localhost:" + randomServerPort + "/api/employees/2", Employee.class);

            assertNull(employee);
        }
Simply put, TestRestTemplate provides a set of built-in methods to send HTTP web requests.
We used getForObject() to perform GET requests in order to test getAll() and getById() endpoints
postForEntity() allows to test POSTing a new Employee object. We used exchange() to test the PUT method
Lastly, we tested the deleteById() web service using the delete() method
Conclusion
In this tutorial, we explained in detail how to use JUnit 5 for unit testing Spring Boot rest APIs.
First, we demonstrated how to test the JPA repositories using @DataJpaTest.
Then, we showed how to mock objects using Mockito to implement testing for business services.
Finally, we illustrated how to test API’s endpoints using MockMvc and TestRestTemplate.