Build RESTful API with Spring Boot, Spring Data JPA and MySQL
In this post, we will discuss what is exactly REST API and demonstrate how to build from scratch a REST API for products managment with Spring Boot, Spring Data JPA, Lombok and MySQL!
Our simple application will be designed around one single domain model: Product, which encapsulates the following properties: id, name and price!
We will try to bootstrap our application using Spring Initializr! After that, we will configure MySQL database and create all the required classes and interfaces one by one.
Finally, we will play around with our Spring Boot RESTful API and test some of its endpoints with Postman!
Let’s get started!
What is REST API ?
Sharing data between two or more applications has always been a vital and essential requirement of software development!
So, to fulfill that we need some specific standards and services to orchestrate inter-machine communication!
This is where RESTful APIs come into picture! REST API as a concept is defined around two aspects: REST and API!
Application Programming Interface
Don’t let the acronym scare you! API stands for Application Programming Interface. The most important word here is interface!
Let’s talk a little bit about interfaces in general! A common example of an interface is the remote control of your television!
This interface allows you to interact with your television, right? You don’t have to dive into the wires and circuits of your TV!

We use a lot of interfaces in our daily life without realizing it! Another example of an interface is the menu of a restaurant. The menu provides you with everything you need to know (list of detailed meals) to order your preferred meal!
Websites and applications need the same thing in order to communicate and exchange data between each others!
This is where API acronym comes from: API is a simple interface for applications, because programs have no hands or eyes to interact with other applications!
Simple put, APIs make life easier for developers, you can imagine an API as a list of detailed operations with descriptions, called endpoints, that we, as developers, can use in our programs to implement some logic!
Representational State Transfer
REST is an architectural style created in 2000 by Roy Fielding for inter-machine communication! It is organized around HTTP protocol and web standards!
HTTP, Hypertext Transfer Protocol, is at the heart of the web! It is a protocol that defines a set of rules to be followed to transfer data over the web!
REST follows some important key constraints:
Client/server architecture : clients and servers should act and evolve independently!
Statelessness : means that each request is made independently of other requests!
Uniform interface: keep the same interface between clients and the server!
Cacheable : defines implicitly or explicitly whether the response is cacheable or not!
Layered system : there might be several layers (security, caching…) and each layer should have one single responsabiliy!
Simple put, data are considered as resources in REST! Each resource is identified by an unique URI.
A client sends a request to access a specific resource, the server generates a response (in multiple formats: JSON, XML…)! This client-server exchange is orchestrated by HTTP protocol!
RESTful APIs example!
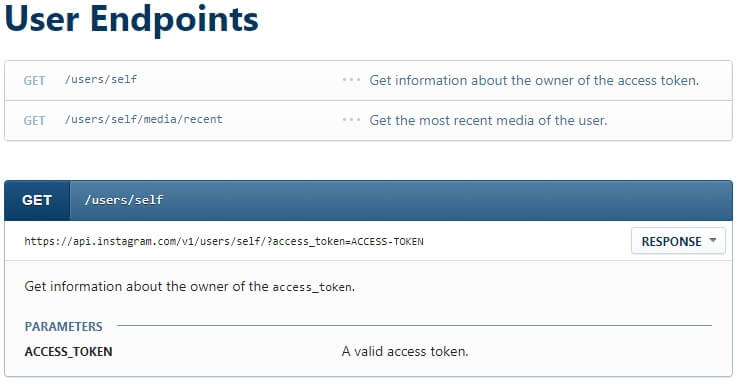
Instagram API provides many endpoints to allow your application or program access user accounts, photos, tags and even more…
Another great example is GitHub which is a code hosting platform widely used by many companies of all sizes.
Github API offers many features and functionalities, it lets you for example create, manage and track your repositories… https://developer.github.com/v3/repos/
Project overview
What we will use ?
To fulfill this tutorial, you will need the following software and resources installed on your system:
JDK 1.8 (or newer)
MySQL Database
Java IDE
Postman
What we will build ?
We will try to build a RESTful API for products management using the following technologies and patterns:
Spring Boot
Spring Data JPA
Hibernate
JPA auditing
MySQL
Loose coupling
Data Transfer Object (DTO)
So, let’s get down into business!
Create Spring Boot project!
In this tutorial, we are going to lean on Spring Initializr to bootstrap and generate our project!
To get started, visit https://start.spring.io and follow these steps:
1- Select Maven Projet, Java and Spring Boot version.
2- Enter project’s metadata as follows:
Group :
com.restapiArtifact :
msproductsName :
msproducts
3- Add the following dependencies: Web, Data JPA, MySQL and Lombok!
4- Click on “Generate” button to create and download your project as a ZIP file!
5- Extract the downloaded zip file. It should be called msproducts.zip if you used the same metadata details as me!
6- Import the extrated project into your favorite IDE!
Abra Cadabra! You got everything you need to start working on your Spring Boot REST API project right away :)
Project directory structure
The following is the directory structure of our project:
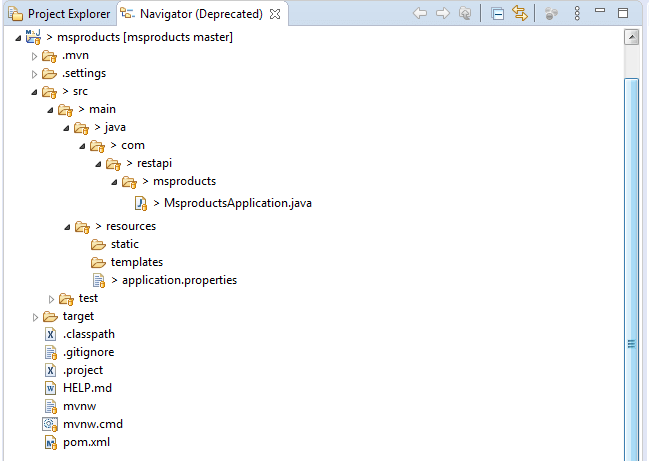
We will create the required packages and classes one by one in the coming sections!
Now, let’s try to study in detail some of the important key elements of our tree structure!
pom.xml
        <modelVersion>4.0.0</modelVersion>
        <parent>
            <groupId>org.springframework.boot</groupId>
            <artifactId>spring-boot-starter-parent</artifactId>
            <version>2.2.6.RELEASE</version>
            <relativePath/> <!-- lookup parent from repository -->
        </parent>
        <groupId>com.restapi</groupId>
        <artifactId>msproducts</artifactId>
        <version>0.0.1-SNAPSHOT</version>
        <name>msproducts</name>
        <description>Spring Boot Products Management</description>

        <properties>
            <java.version>1.8</java.version>
        </properties>

        <dependencies>
            <dependency>
                <groupId>org.springframework.boot</groupId>
                <artifactId>spring-boot-starter-data-jpa</artifactId>
            </dependency>
            <dependency>
                <groupId>org.springframework.boot</groupId>
                <artifactId>spring-boot-starter-web</artifactId>
            </dependency>

            <dependency>
                <groupId>mysql</groupId>
                <artifactId>mysql-connector-java</artifactId>
                <scope>runtime</scope>
            </dependency>
            <dependency>
                <groupId>org.projectlombok</groupId>
                <artifactId>lombok</artifactId>
                <optional>true</optional>
            </dependency>
            <dependency>
                <groupId>org.springframework.boot</groupId>
                <artifactId>spring-boot-starter-test</artifactId>
                <scope>test</scope>
                <exclusions>
                    <exclusion>
                        <groupId>org.junit.vintage</groupId>
                        <artifactId>junit-vintage-engine</artifactId>
                    </exclusion>
                </exclusions>
            </dependency>
        </dependencies>

        <build>
            <plugins>
                <plugin>
                    <groupId>org.springframework.boot</groupId>
                    <artifactId>spring-boot-maven-plugin</artifactId>
                </plugin>
            </plugins>
        </build>
Simple put, you can find all imported dependencies under “Maven Dependencies”:
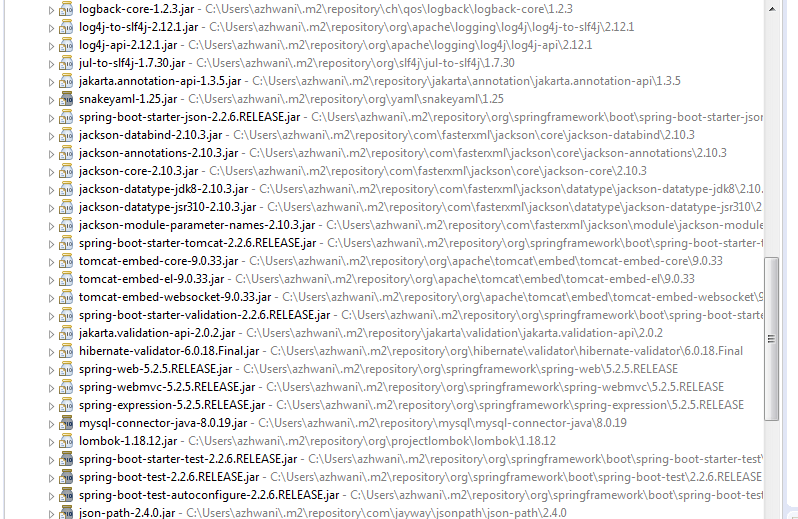
As you can see, the list contains all the dependencies you need to build a REST API:
Jackson: maps JSON data to Java objects.Tomcat: helps to run an application without deploying it into a real application server.Spring web: provides set of annotations that can be used to develop Spring Boot REST APIs!Hibernate: for ORM purpose, it helps manage mapping between database tables and Java classes!
application.properties
This file is your friend, yes just like Google! It lets you easily modify and override Spring Boot related configuration!
For example: You can change the default port of Tomcat (which is 8080), update the location of your log files, set database connection properties, etc …
MsproductsApplication class
MsproductsApplication.java is automatically generated by Spring Boot, it is the starting point of your application!
You can check this Spring Boot entry class example for more details!
Building REST API with Spring Boot
We will build a simple Spring Boot web application that exposes a RESTful API capable of managing a list of products!
The following are the most important endpoints of our API:
GET /products: display all the products!GET /products/{id}: retrieve single product by IDPUT /products/{id}: update product detailsPOST /products: create new productDELETE /products/{id}: remove one product by ID
So, we will need to create CRUD operations for our main domain model Product. We we will use MySQL database to store Product records!
Define database configuration
First thing to do is configure our MySQL database as the main DataSource bean of our application.
Easy! All you need to do is just adding MySQL database connection properties in application.properties file:
        ## MySQL DataSource
        spring.datasource.url=jdbc:mysql://localhost:3306/productsdb?allowPublicKeyRetrieval=true&useSSL=false&serverTimezone=UTC
        spring.datasource.username=root
        spring.datasource.password=admin@2020@

        ## JPA/Hibernate
        spring.jpa.show-sql=true
        spring.jpa.hibernate.ddl-auto=update
        spring.jpa.properties.hibernate.dialect=org.hibernate.dialect.MySQLDialect

        ## Port
        server.port=8000
By default, Spring Boot uses Hibernate as the default JPA provider!
spring.jpa.hibernate.ddl-auto=update, as the value implies, updates the database schema at startup everytime there are new changes in your domain models.
spring.jpa.properties.hibernate.dialect property is set to MySQLDialect, that way Hibernate will generate SQL queries optimized for MySQL database!
Note that, I have set server.port to 8000. This property lets us change the default port of the embedded server!
Create JPA Entity class
The next step is to create the entity class that maps to our MySQL table products! Our class has the following properties:
id: represents the primary key.name: name of the product.price: Price of the product.createdDate: Time at which a new Product is created.updatedDate: Time at which a Product is updated.
Now, let’s create Product.java inside a new package com.restapi.msproducts.model!
        package com.restapi.msproducts.model;

        import java.io.Serializable;
        import java.time.LocalDateTime;
        import javax.persistence.Column;
        import javax.persistence.Entity;
        import javax.persistence.EntityListeners;
        import javax.persistence.GeneratedValue;
        import javax.persistence.GenerationType;
        import javax.persistence.Id;
        import javax.persistence.Table;
        import org.springframework.data.annotation.CreatedDate;
        import org.springframework.data.annotation.LastModifiedDate;
        import org.springframework.data.jpa.domain.support.AuditingEntityListener;
        import com.fasterxml.jackson.annotation.JsonIgnoreProperties;
        import lombok.Getter;
        import lombok.NoArgsConstructor;
        import lombok.Setter;
        import lombok.experimental.Accessors;

        @Getter
        @Setter
        @Accessors(chain = true)
        @NoArgsConstructor
        @Entity
        @Table(name = "products")
        @EntityListeners(AuditingEntityListener.class)
        public class Product implements Serializable {
            private static final long serialVersionUID = 1L;

            @Id
            @GeneratedValue(strategy = GenerationType.IDENTITY)
            private int id;
            private String name;
            private int price;
            @Column(nullable = false, updatable = false)
            @CreatedDate
            private LocalDateTime createdDate;
            @Column(nullable = false)
            @LastModifiedDate
            private LocalDateTime updatedDate;
        }
Product.java is well optimized, organized and concise, right? That’s because we have used Lombok annotations to reduce the amount of code required to implement JavaBean specs such as getters, setters, no-args constructor …
@Entity indicates that the decorated class is a JPA entity class, created to map a specfic table in our database!
@Table specifies some details about the table our entity class is mapped to!
Note that, id field is marked with both @Id and @GeneratedValue annotations.
@Id indicates that the field respresent the primary key.
@GeneratedValue defines primary key generation strategy.
GenerationType.IDENTITYmeans that the primary key values will be generated using an AUTO INCREMENT column.
Database Auditing with Spring Data JPA
Auditing, as a concept, means keeping a track of every change we do in our database!
Spring Data JPA comes with a great automatic auditing feature and provides some set of useful annotations to persist audit related columns automatically!
We have annotated createdDate and updatedDate fields of our entity class with @CreatedDate and @LastModifiedDate respectively.
That way, when you will insert or update a Product record, CreatedDate and updatedDate properties will automatically get saved!
Cool, right ?
To enable Spring Data JPA auditing mechanism, we need to do two more things:
Annotate our
Product.javaclass with@EntityListeners(AuditingEntityListener.class)annotation!Enable JPA Auditing at main class level! Open
MsproductsApplication.javaand add@EnableJpaAuditingannotation!
        package com.restapi.msproducts;
        import org.springframework.boot.SpringApplication;
        import org.springframework.boot.autoconfigure.SpringBootApplication;
        import org.springframework.data.jpa.repository.config.EnableJpaAuditing;

        @SpringBootApplication
        @EnableJpaAuditing
        public class MsproductsApplication {
            public static void main(String[] args) {
                SpringApplication.run(MsproductsApplication.class, args);
            }
        }
Create DTO class
Data Transfer Object is a design pattern that can be used to pass data from a client to a server in RESTful APIs! From technical point of view, DTO is typically implemented as a simple serializable POJO class with getters and settes methods... It is a good practice to use DTO objects as parameters for handler methods instead of using Entity class objects! Now, let's create our DTO classProductDTO.java under com.restapi.msproducts.dto package:
        package com.restapi.msproducts.dto;

        import javax.validation.constraints.Min;
        import javax.validation.constraints.NotBlank;
        import javax.validation.constraints.NotNull;
        import javax.validation.constraints.Positive;
        import com.restapi.msproducts.validation.NamePrefix;
        import lombok.Getter;
        import lombok.NoArgsConstructor;
        import lombok.Setter;
        import lombok.experimental.Accessors;

        @Getter
        @Setter
        @Accessors(chain = true)
        @NoArgsConstructor
        public class ProductDTO {
            @NamePrefix(message = "Name must start with PRD")
            @NotBlank(message = "Name is required!")
            private String name;
            @NotNull
            @Min(value = 20)
            @Positive(message = "Price cannot be Zero or negative")
            private int price;
        }
Notice that, we have used some JavaBean validation annotations to apply some validation rules upon our DTO fields:
@NotBlank indicates that the annotated field must be not null and not empty!
@Min to make sure that the field value must be higher or equal to the specified value.
@Positive used to indicate that the marked field must be a positive number.
Custom annotation @NamePrefix
Generally speaking, JSR-303 (Bean Validation) offers many built-in annotations that can be used to validate user inputs.
However, sometimes we come across a situation where we need to implement our own validation logic! This is where custom annotations come to rescue!
For example, we want that Product names must be prefixed with three letters PRD!
@NamePrefix is the name of our custom annotation! It will be used to validate the name attribute of our domain model Product.
So, let’s create a new @interface to define @NamePrefix annotation:
        package com.restapi.msproducts.validation;
        import java.lang.annotation.*;
        import javax.validation.Constraint;
        import javax.validation.Payload;

        @Documented
        @Constraint(validatedBy = NameConstraintValidator.class)
        @Target({ ElementType.METHOD, ElementType.FIELD })
        @Retention(RetentionPolicy.RUNTIME)
        public @interface NamePrefix {
            String message() default "Name must be prefixed with PRD";
            Class<?>[] groups() default {};
            Class<? extends Payload>[] payload() default {};
        }
@Constraint(validatedBy = NameConstraintValidator.class) specifies the class that is going to validate the “name” field!
Now, let’s define the validator class NameConstraintValidator.java that encapsulates the logic of our custom validation.
        package com.restapi.msproducts.validation;
        import javax.validation.ConstraintValidator;
        import javax.validation.ConstraintValidatorContext;
        import org.springframework.stereotype.Component;

        @Component
        public class NameConstraintValidator implements ConstraintValidator<NamePrefix, String> {
            @Override
            public boolean isValid(String value, ConstraintValidatorContext context) {
                // TODO Auto-generated method stub
                return value.startsWith("PRD");
            }
        }
Create DTO to Entity mapper
Now, what we are going to do is create a mapper class that will help us convert DTO objects to Entity class objects and vice versa.
DtoToEntity()is the method used to map ProductDTO object to Product object.EntityToDto()converts Product object to ProductDTO object.
        package com.restapi.msproducts.mapper;
        import com.restapi.msproducts.dto.ProductDTO;
        import com.restapi.msproducts.model.Product;

        public class ProductMapper {
            public static Product DtoToEntity(ProductDTO prd) {
                return new Product().setName(prd.getName())
                                   .setPrice(prd.getPrice());
            }
            public static ProductDTO EntityToDto(Product prd) {
                return new ProductDTO().setName(prd.getName())
                                    .setPrice(prd.getPrice());
            }
        }
Create JPA repository class
This step is about creating the repository layer to hold the logic of accessing data from our MySQL database! Repository provides a simple abstraction to database access.
        package com.restapi.msproducts.repository;
        import org.springframework.data.jpa.repository.JpaRepository;
        import org.springframework.stereotype.Repository;
        import com.restapi.msproducts.model.Product;

        @Repository
        public interface ProductRepository extends JpaRepository<Product, Integer> {
        }
That’s all we need to do here! Awesome, right? ProductRepository extends CrudRepository interface which offers many build-in methods for performing CRUD operations and more!
@Repository annotation tells Spring that the annotated interface is a repository used to get data from database!
Create service class
Now, we are going to develop the service layer of our Spring Boot REST API! This layer will be on top of the repository layer and will hold the business side of our app!
To promote good Loose coupling, we need to create a new interface with the following details:
        package com.restapi.msproducts.service;
        import java.util.List;
        import java.util.Optional;
        import com.restapi.msproducts.model.Product;

        public interface Iproduct {
            List<Product> getAllProducts();
            Optional<Product> findById(int id);
            Product save(Product prd);
            void delete(int id);
        }
Next, we are going to create an implementation for our Iproduct interface with the following code:
        package com.restapi.msproducts.service;
        import java.util.List;
        import java.util.Optional;
        import org.springframework.beans.factory.annotation.Autowired;
        import org.springframework.stereotype.Service;
        import com.restapi.msproducts.model.Product;
        import com.restapi.msproducts.repository.ProductRepository;

        @Service
        public class ProductService implements Iproduct {
            @Autowired
            private ProductRepository productRepository;
            @Override
            public List<Product> getAllProducts() {
                // TODO Auto-generated method stub
                return productRepository.findAll();
            }
            @Override
            public Optional<Product> findById(int id) {
                // TODO Auto-generated method stub
                return productRepository.findById(id);
            }
            @Override
            public Product save(Product prd) {
                // TODO Auto-generated method stub
                return productRepository.save(prd);
            }
            @Override
            public void delete(int id) {
                // TODO Auto-generated method stub
                productRepository.deleteById(id);
            }
        }
Note that, ProductService class calls ProductRepository methods in order to access data from database!
@Service is used to specify that the decorated class is a business class! Spring will pick it up and register it as a spring bean during component scan!
Create RESTful Spring controller
We are almost done! Now, let’s create a Spring controller that will expose our REST API for the Product resource!
        package com.restapi.msproducts.controller;

        import org.springframework.web.bind.annotation.RestController;
        import org.springframework.web.bind.annotation.RequestMapping;
        import org.springframework.beans.factory.annotation.Autowired;
        import com.restapi.msproducts.service.ProductService;

        @RestController
        @RequestMapping("/api")
        public class ProductController {

            @Autowired
            private ProductService productService;

            // Get all products GET /api/products

            // Get single product by ID  GET /api/products/{id}

            // Create new poduct POST /api/products

            // Update product details PUT /api/products/{id}

            // Delete product by ID DELETE /api/products/{id}

        }
Notice that, ProductController acts as a gateway and delegates to ProductService service to execute business logic!
Use ResponseEntity
ResponseEntity is a class that extends HttpEntity! It offers several methods that can be used to manipulate HTTP responses easily!
We will use this class in handler methods to return HTTP responses with convenient headers, body and status code!
Handle Spring Boot RESTful API errors
To handle REST API related exceptions, we are going to create a custom exception class! For example, we can throw this custom exception if a Product with a given ID is not found in database!
        package com.restapi.msproducts.exception;
        import org.springframework.http.HttpStatus;
        import org.springframework.web.bind.annotation.ResponseStatus;

        @ResponseStatus(value = HttpStatus.NOT_FOUND)
        public class ProductNotFoundException extends RuntimeException {
            private String message;

            public ProductNotFoundException(String message) {
                this.message = message;
            }
            public String getMessage() {
                return message;
            }
            public void setMessage(String message) {
                this.message = message;
            }
        }
When Spring boot catches ProductNotFoundException, it will generate an HTTP response with the status code specified in @ResponseStatus annotation!
Filter REST API response
Jackson provides @JsonIgnoreProperties annotation that can be used at class level to ignore some fields during JSON serialization and deserialization!
If we want for example to exclude createdDate and updatedDate properties, we need to add @JsonIgnoreProperties(value = {“createdDate”, “updatedDate”}) to our entity class Product.java!
REST API endpoints:
Now, we are going to take a closer look at controller’s handler methods associated with our API endpoints:
1) Get All products GET /api/products
        @GetMapping(value="/products")
        List<Product> getAll(){
            return productService.getAllProducts();
        }
2) Get single product by ID GET /api/products/{id}
        @GetMapping(value="/products/{id}")
        ResponseEntity<Product> getById(@PathVariable("id") @Min(1) int id) {
            Product prd = productService.findById(id)
                                        .orElseThrow(()->new ProductNotFoundException("No Product with ID : "+id));
            return ResponseEntity.ok().body(prd);
        }
3) Create new Product POST /api/products
        @PostMapping(value="/products")
        ResponseEntity<?> createProduct(@Valid @RequestBody ProductDTO inprod) {
            Product prd      = ProductMapper.DtoToEntity(inprod);
            Product addedprd = productService.save(prd);
            URI location = ServletUriComponentsBuilder.fromCurrentRequest()
                                            .path("/{id}")
                                            .buildAndExpand(addedprd.getId())
                                            .toUri();
            return ResponseEntity.created(location).build();
        }
4) update an existing Product details PUT /api/products/{id}
        @PutMapping(value="/products/{id}")
        ResponseEntity<Product> updateProduct(@PathVariable("id")  @Min(1) int id, @Valid @RequestBody ProductDTO inprod) {
            Product prd = productService.findById(id)
                                        .orElseThrow(()->new ProductNotFoundException("No Product with ID : "+id));

            Product newprd = ProductMapper.DtoToEntity(inprod);
            newprd.setId(prd.getId());
            productService.save(newprd);
            return ResponseEntity.ok().body(newprd);
        }
5) Delete a Product by ID DELETE /api/products/{id}
        @DeleteMapping(value="/products/{id}")
        ResponseEntity deleteProduct( @PathVariable("id") @Min(1) int id) {
            Product prd = productService.findById(id)
                                        .orElseThrow(()->new ProductNotFoundException("No Product with ID : "+id));
            productService.delete(prd.getId());
            return ResponseEntity.ok().body("Product with ID : "+id+" deleted with success!");
        }
Test Sping Boot API with Postman
Now, it is the time to run the application and test our Spring Boot API using Postman! Once started, the application will be available at http://localhost:8000
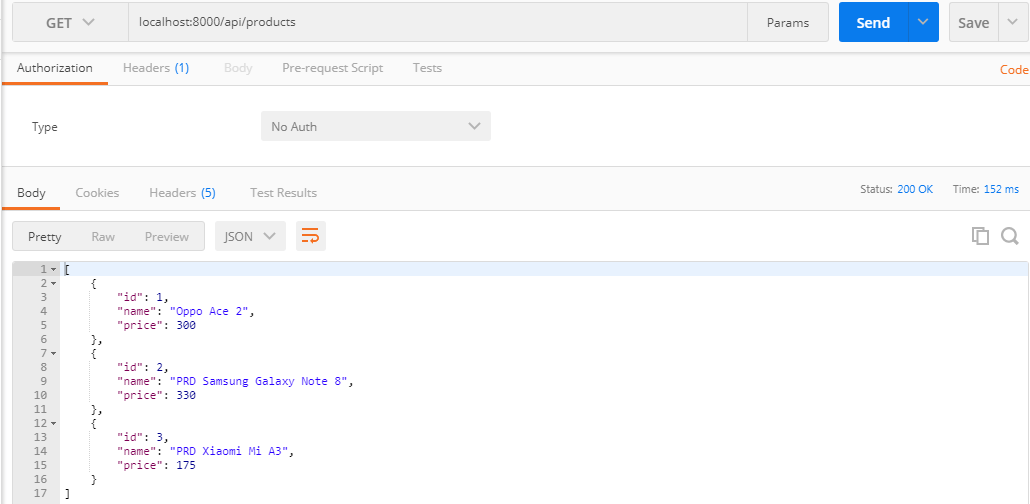
Retrieving all Products using GET request:
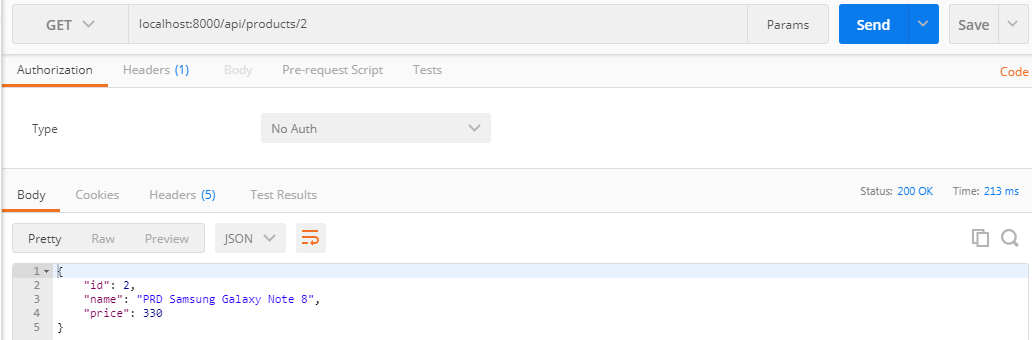
Retrieving single Product by ID using GET request:
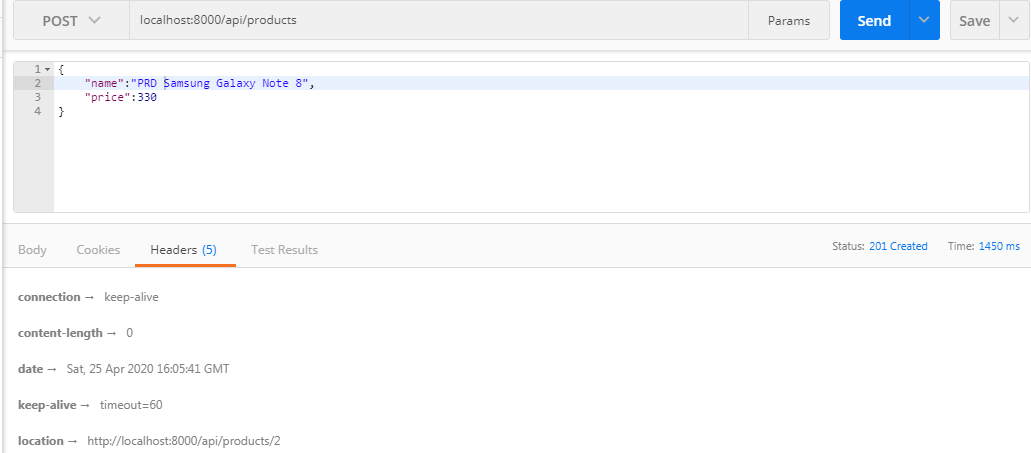
Creating new Product using POST request:
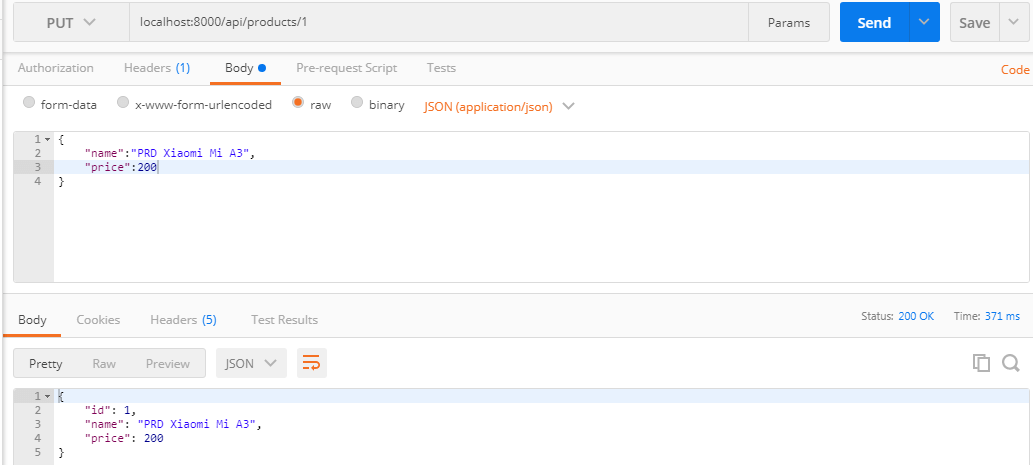
Updating a Product using PUT request:
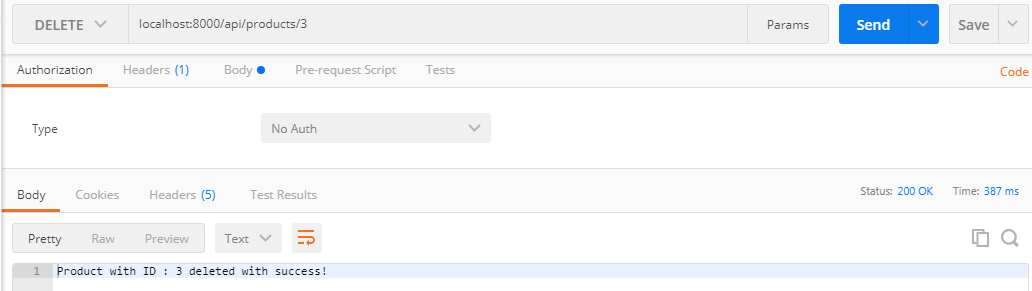
Deleting Product by ID using DELETE request:
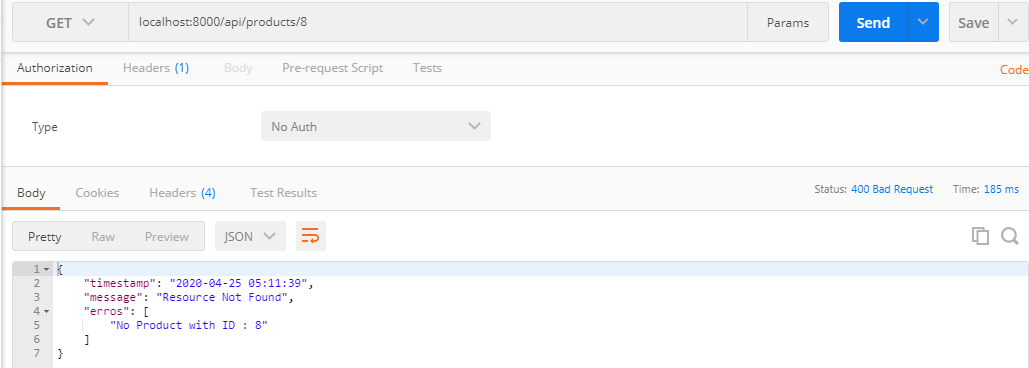
Handle resource not found exception
Conclusion
Congratulations to you! You have successfully build your own RESTful API with Spring Boot, Spring Data JPA and MySQL!
You can find the source code for this tutorial on my GitHub repository https://github.com/devwithus/msproducts
Thank you for reading and stay safe!