Exception Handling for Spring Boot Rest API
In this write-up, we are going to shed light on how to handle exceptions in Spring Boot rest API.
Why? Because exception handling brings some sort of order to errors management when unexpected scenarios occur in our applications.
In simple words, it makes our applications more resilient to errors and exceptions.
We will consider here that you are familiar with what a rest API is. Our article on how to build a rest API with Spring Boot does a great job in covering this topic.
So, let’s get started
Introduction to API Error Handling
Think about the consumer. This idea has been always one of the main core design principles for restful APIs.
So, a good rest API implementation must in one way or another promote good and clean error handling.
You may be wondering WHY?
Well, because error handling gives, in a relatively friendly manner, some hint to the consumers that something went wrong.
It gives us, as developers, the flexibility to inform the clients in a more concise way about what was wrong with the API.
In short, handling and catching our exceptions properly can incredibly improve the API’s readability and reliability.
Best Practices to Handle Exceptions
Before we dive deep into how to handle Spring Boot API exceptions, we are going to talk a little bit about best practices that can be adapted to deal with errors.
Use Meaningful Status Codes
The first step to manage errors properly is to provide the clients with human readable informations and proper HTTP status codes.
This can help the consumers to route their responses accordingly.
We should avoid returning the same HTTP status code every single time. It is a big mistake.
Pick carefully a relevant status code that reflects significantly the returned response.
Use always 2xx for successful responses, 3xx for redirections, 4xx and 5xx for error responses.
| 2xx (Success) | indicates that the request was accepted successfully |
| 3xx (Redirection) | informs that the client must take further actions in order to complete the request |
| 4xx (Client error) | indicates an error in the request from the client side |
| 5xx (Server error) | tells that the server failed to fulfil the request |
Simply put, we should not expose 500 errors to clients because they are server errors, not client errors. What happens in our servers is not the client’s business.
Use Custom Detailed Exceptions
In general, standard exceptions - called also Alien - return stack traces that are usually hard to understand.
So, this is where user-defined exceptions come to the rescue.
A rule of thumb: It is always a good practice to throw an exception that means what we want it to mean.
Wrapping an exception in a more specific class can give us more control over how we want to deal with it.
Providing our customized message can make our exception handling mechanism more meaningful and user-friendly.
Build Rest API with Spring Boot
Spring Boot is a platform of choice when it comes to building restful APIs.
So, in this section, we are going to use Spring Boot to develop a simple web application that exposes RESTful web services for users management.
The following, will be our API’s endpoints:
GET /api/users |
get all the users |
GET /api/users/{id} |
retrieve a single user by ID |
POST /api/users |
create a new user |
PUT /api/users/{id} |
update a user's details |
DELETE /api/users/{id} |
delete a user by ID |
GET /api/user?username={username} |
get a user by username - this endpoint has no real value for our REST API, it is created just for testing purpose |
In this tutorial, we will assume that you are familiar with the basics of Spring Boot. So, we will include code snippets without diving deep into technical details.
If it is not the case, feel free to check our tutorial about what is Spring Boot.
So, let’s get into coding
Create Spring Boot project
We are going to use Spring Initializr to scaffold and create our Spring Boot project.
To do so, you need to open your favorite browser and navigate to https://start.spring.io
Choose Maven Project, Java language, and Spring Boot version.
After that, you need to fill out the form related to Project Metadata.
Next, search for the following dependencies Web, Data JPA, MySQL, and Lombok and add them to the project.
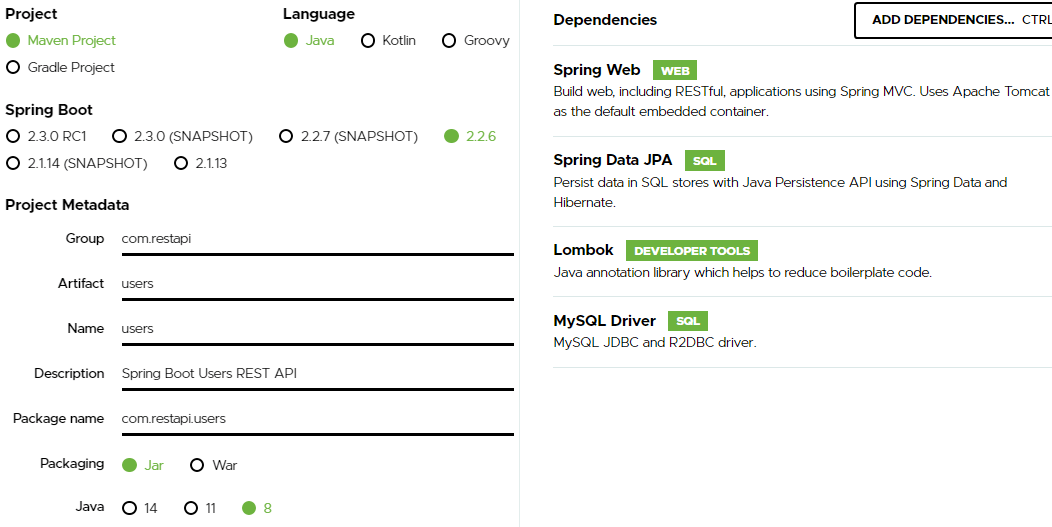
Now, click on the “Generate” button to download the zip file.
Finally, unzip the file and import the generated project into your favorite IDE.
pom.xml
This is how pom.xml of our project looks like:
        <?xml version="1.0" encoding="UTF-8"?>
        <project xmlns="http://maven.apache.org/POM/4.0.0" xmlns:xsi="http://www.w3.org/2001/XMLSchema-instance" xsi:schemaLocation="http://maven.apache.org/POM/4.0.0 https://maven.apache.org/xsd/maven-4.0.0.xsd">
            <modelVersion>4.0.0</modelVersion>
            <parent>
                <groupId>org.springframework.boot</groupId>
                <artifactId>spring-boot-starter-parent</artifactId>
                <version>2.2.6.RELEASE</version>
                <relativePath/> <!-- lookup parent from repository -->
            </parent>
            <groupId>com.restapi</groupId>
            <artifactId>msusers</artifactId>
            <version>0.0.1-SNAPSHOT</version>
            <name>msusers</name>
            <description>Spring Boot Users REST API</description>

            <properties>
                <java.version>1.8</java.version>
            </properties>

            <dependencies>
                <dependency>
                    <groupId>org.springframework.boot</groupId>
                    <artifactId>spring-boot-starter-data-jpa</artifactId>
                </dependency>
                <dependency>
                    <groupId>org.springframework.boot</groupId>
                    <artifactId>spring-boot-starter-web</artifactId>
                </dependency>

                <dependency>
                    <groupId>mysql</groupId>
                    <artifactId>mysql-connector-java</artifactId>
                    <scope>runtime</scope>
                </dependency>
                <dependency>
                    <groupId>org.projectlombok</groupId>
                    <artifactId>lombok</artifactId>
                    <optional>true</optional>
                </dependency>
                <dependency>
                    <groupId>org.springframework.boot</groupId>
                    <artifactId>spring-boot-starter-test</artifactId>
                    <scope>test</scope>
                    <exclusions>
                        <exclusion>
                            <groupId>org.junit.vintage</groupId>
                            <artifactId>junit-vintage-engine</artifactId>
                        </exclusion>
                    </exclusions>
                </dependency>
            </dependencies>

            <build>
                <plugins>
                    <plugin>
                        <groupId>org.springframework.boot</groupId>
                        <artifactId>spring-boot-maven-plugin</artifactId>
                    </plugin>
                </plugins>
            </build>
        </project>
Configure MySQL Database
Spring Boot allows us to define the datasource connection parametres in the application.properties file:
        ## active Profile
        spring.profiles.active=default

        ## MicroService name
        spring.application.name=msusers

        ## Port
        server.port=9000

        ## MySQL DataSource
        spring.datasource.url=jdbc:mysql://localhost:3306/usersdb?allowPublicKeyRetrieval=true&useSSL=false&serverTimezone=UTC
        spring.datasource.username=root
        spring.datasource.password=root@2020@

        ## JPA
        spring.jpa.show-sql=true
        spring.jpa.hibernate.ddl-auto=update
spring.profiles.active to set the active profile.
spring.application.name denotes the application name.
Create Domain Model User
Now, let’s create our domain model User:
        import java.io.Serializable;
        import javax.persistence.Entity;
        import javax.persistence.GeneratedValue;
        import javax.persistence.GenerationType;
        import javax.persistence.Id;
        import javax.persistence.Table;
        import javax.validation.constraints.NotEmpty;
        import lombok.AllArgsConstructor;
        import lombok.Getter;
        import lombok.NoArgsConstructor;
        import lombok.Setter;
        import lombok.experimental.Accessors;

        @Getter
        @Setter
        @Accessors(chain=true)
        @NoArgsConstructor
        @AllArgsConstructor
        @Entity
        @Table(name = "users")
        public class User implements Serializable {
            private static final long serialVersionUID = 1L;

            @Id
            @GeneratedValue(strategy=GenerationType.IDENTITY)
            private int id;
            @NotEmpty
            private String username;
            @NotEmpty
            private String password;
        }
@Getter, @Setter, @Accessors, @NoArgsConstructor, @AllArgsConstructor are Lombok annotations. They allow to generate getter and setter methods, default and all-args constructors.
Please refer to these articles for more detail:
Create User Repository Interface
Next, we need to create a custom repository for our domain model. For instance, let’s consider UserRepository:
        import java.util.Optional;
        import org.springframework.data.jpa.repository.JpaRepository;
        import org.springframework.stereotype.Repository;
        import com.restapi.msusers.models.User;

        @Repository
        public interface UserRepository extends JpaRepository<User, Integer> {
            Optional<User> findByUsername(String username);
        }
Create Spring Rest Controller
Lastly, we are going to create a spring controller to handle our rest API’s endpoints:
        import java.net.URI;
        import java.util.List;
        import javax.validation.Valid;
        import javax.validation.constraints.Min;
        import org.springframework.beans.factory.annotation.Autowired;
        import org.springframework.http.ResponseEntity;
        import org.springframework.web.bind.annotation.DeleteMapping;
        import org.springframework.web.bind.annotation.GetMapping;
        import org.springframework.web.bind.annotation.PathVariable;
        import org.springframework.web.bind.annotation.PostMapping;
        import org.springframework.web.bind.annotation.PutMapping;
        import org.springframework.web.bind.annotation.RequestBody;
        import org.springframework.web.bind.annotation.RequestMapping;
        import org.springframework.web.bind.annotation.RestController;
        import org.springframework.web.servlet.support.ServletUriComponentsBuilder;
        import com.restapi.msusers.exceptions.ResourceNotFoundException;
        import com.restapi.msusers.models.User;
        import com.restapi.msusers.repositories.UserRepository;

        @RestController
        @RequestMapping("/api")
        @Validated
        public class UserController {
            @Autowired
            UserRepository userrepo;

            @GetMapping(value="/users")
            List<User> getAll(){
                return userrepo.findAll();
            }
            @GetMapping(value="/users/{id}")
            ResponseEntity<User> getById(@PathVariable("id") @Min(1) int id) {

                User usr = userrepo.findById(id)
                        .orElseThrow(()->new ResourceNotFoundException("User with ID :"+id+" Not Found!"));

                return ResponseEntity.ok().body(usr);
            }
            @GetMapping(value="/user")
            ResponseEntity<User> getByUsername(@RequestParam(required=true) String username) {

                User usr = userrepo.findByUsername(username)
                        .orElseThrow(()->new  ResourceNotFoundException(username+" NOT Found!"));

                return ResponseEntity.ok().body(usr);
            }
            @PostMapping(value="/users")
            ResponseEntity<?> create( @Valid @RequestBody User user) {

                User addeduser = userrepo.save(user);
                URI location = ServletUriComponentsBuilder.fromCurrentRequest()
                                    .path("/{id}")
                                    .buildAndExpand(addeduser.getId())
                                    .toUri();

                return ResponseEntity.created(location).build();
            }
            @PutMapping(value="/users/{id}")
            ResponseEntity<User> update(@PathVariable("id")  @Min(1) int id, @Valid @RequestBody User user) {

                User puser = userrepo.findById(id)
                        .orElseThrow(()->new ResourceNotFoundException("User with ID :"+id+" Not Found!"));

                user.setId(puser.getId());
                userrepo.save(user);
                return ResponseEntity.ok().body(user);

            }
            @DeleteMapping(value="/users/{id}")
            ResponseEntity<String> delete(@PathVariable("id") @Min(1) int id) {
                User user = userrepo.findById(id)
                        .orElseThrow(()->new ResourceNotFoundException("User with ID :"+id+" Not Found!"));

                userrepo.deleteById(user.getId());
                return ResponseEntity.ok().body("User deleted with success!");
            }
        }
ResourceNotFoundExceptionis a custom Exception that will be thrown when the user with the given ID doesn’t exist@Validis used for validation purpose. Spring Boot automatically detect JSR 303 annotations and trigger validation of the annotated arguments@Minannotation indicates that the value of the annotated parameter must be higher or equal to the specified value. If it is not the case, a validation error will be thrown
Exception Handling in Spring Boot
Spring Framework offers a host of handy ready-to-use features to help us deal with exceptions and errors in a more flexible and appropriate way.
Let’s take a close look at each option.
Using @ExceptionHandler
This annotation, as the name implies, provides a way to define methods in a particular Spring controller to specifically handle exceptions thrown by handler methods of that controller.
        @ExceptionHandler(SpecificException.class)
        public void handleSpecificException() {}
The main drawback of the @ExceptionHandler annotation is that the annotated methods will only work for the specific controller where they are defined and not for the whole application.
So, to address this limitation, Spring provides another annotation: @ControllerAdvice
Using @ControllerAdvice
Spring 3.2 comes with a brand new way to centralize the exception handling mechanism in one place.
@ControllerAdvice is mainly introduced to overcome the limitations of the @ExceptionHandler annotated: Handle exceptions globally in our applications.
With @ControllerAdvice, we can create a global handler class with multiple @ExceptionHandler methods to handle exceptions globally across the application.
        @ControllerAdvice
        public class GlobalResponseException {
            @ExceptionHandler(MyException.class)
            public void handleMyException() {}
        }
The purpose of @ControllerAdvice is to separate request handling from error handling. That way, Spring controllers become free from any sort of exception handling logic.
Using ResponseEntityExceptionHandler Class
This base class provides many methods that we can override to customize the way how we want to handle specific exceptions.
The provided methods return an instance of ResponseEntity<T>, which means that we can create and generate HTTP responses with the details (body, headers, status code) we want.
Customizing Exception Handling Using @ResponseStatus
Spring offers this annotation to bind a particular Exception to a specific HTTP response status.
So, when Spring catches that particular Exception, it generates an HTTP response with the settings defined in @ResponseStatus.
        @ResponseStatus(code = HttpStatus.BAD_REQUEST)
        class MyException extends RuntimeException {}
Handling Exception for Rest API in Practice
Now that we created a rest API using Spring Boot, let’s see how we can implement a good strategy to handle exceptions that may occur when consuming our API’s endpoints.
Create Custom Error Response
Let’s see what will happen when we try to retrieve a user that does not exist.
So, to do that, we need to call the following endpoint: GET /api/users/{id}.
This is how the output looks like:
        {
            "timestamp": "2020-05-04T13:52:12.027+0000",
            "status": 500,
            "error": "Internal Server Error",
            "message": "User with ID :1 Not Found!",
            "path": "/api/users/1"
        }
Well, the default error representation looks a little bit messy and misleading. Right?
500 is not the right code to describe that a requested resource is NOT FOUND. It should be 404.
Internal Server Error does not provide any meaningful information to our consumers.
Thus, exposing 500 internal server errors to the clients is not a good practice at all. Do you remember?
So, to handle our errors properly, we need to customize the default spring boot API error response with:
Meaningful message indicating what went wrong
Proper status code based on the context
List of errors that occurred during the requests handling
First, let’s create a new class to represent our API error response in a more relevant and user-friendly way:
        @Getter
        @Setter
        @AllArgsConstructor
        public class ApiError {
            @JsonFormat(shape = JsonFormat.Shape.STRING, pattern = "dd-MM-yyyy hh:mm:ss")
            private LocalDateTime timestamp;
            private HttpStatus status;
            private String message;
            private List errors;
        }
As we can see, the name of our custom API error class is ApiError.
Create Global Exception Handler
Now, we are going to create our global handler class.
For instance, let’s consider the GlobalExceptionHandler class. We need to annotate it with @ControllerAdvice and make it extend ResponseEntityExceptionHandler.
        @ControllerAdvice
        public class GlobalExceptionHandler extends ResponseEntityExceptionHandler {
            // define your methods here
        }
Now, all we need to do is override ResponseEntityExceptionHandler’s methods and provide our custom exception handling implementation.
we can also define some @ExceptionHandler annotated methods to deal with some specific exceptions across the whole application.
Since the methods of ResponseEntityExceptionHandler class return ResponseEntity<T>, we need to create a helper class to map ResponseEntity objects to our custom ApiError objects.
        package com.restapi.msusers.web;
        import  org.springframework.http.ResponseEntity;

        public class ResponseEntityBuilder {
            public static ResponseEntity<Object> build(ApiError apiError) {
                  return new ResponseEntity<>(apiError, apiError.getStatus());
            }
        }
Now, let’s see how to deal with some exceptions that might be thrown when consuming our Spring Boot rest API.
Handle Resource Not Found Exception
As we have seen in the above example, Spring boot tends by default to return 500 error responses when ResourceNotFoundException is thrown.
500 status code is not meant to describe the situation where a requested resource (user in our case) is not found.
So, How can we fix that? The short answer lies in @ResponseStatus annotation.
First, we need to annotate our custom ResourceNotFoundException class with @ResponseStatus(HttpStatus.NOT_FOUND).
That way, we tell Spring Boot to return an HTTP response with NOT_FOUND status code when ResourceNotFoundException is raised.
        package com.restapi.msusers.exceptions;
        import org.springframework.http.HttpStatus;
        import org.springframework.web.bind.annotation.ResponseStatus;

        @ResponseStatus(HttpStatus.NOT_FOUND)
        public class ResourceNotFoundException extends RuntimeException{
            private static final long serialVersionUID = 1L;

            public ResourceNotFoundException(String message) {
                super(message);
            }
        }
Now, we need to create a new exception handler method annotated in our global hander to deal with ResourceNotFoundException the proper way.
        @ExceptionHandler(ResourceNotFoundException.class)
        public ResponseEntity<Object> handleResourceNotFoundException(
                ResourceNotFoundException ex) {

            List<String> details = new ArrayList<String>();
            details.add(ex.getMessage());

            ApiError err = new ApiError(
                LocalDateTime.now(),
                HttpStatus.BAD_REQUEST,
                "Resource Not Found" ,
                details);

            return ResponseEntityBuilder.build(err);
        }

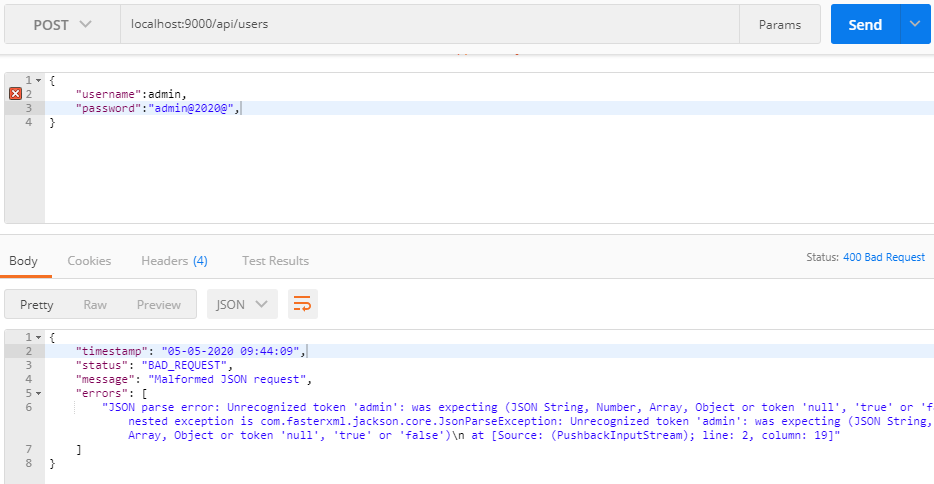
Handling HttpMessageNotReadableException
This exception will be triggered if the request body is invalid:
        @Override
        protected ResponseEntity<Object> handleHttpMessageNotReadable(
                HttpMessageNotReadableException ex,
                HttpHeaders headers,
                HttpStatus status,
                WebRequest request) {

            List<String> details = new ArrayList<String>();
            details.add(ex.getMessage());

            ApiError err = new ApiError(
                LocalDateTime.now(),
                HttpStatus.BAD_REQUEST,
                "Malformed JSON request" ,
                details);

            return ResponseEntityBuilder.build(err);
        }
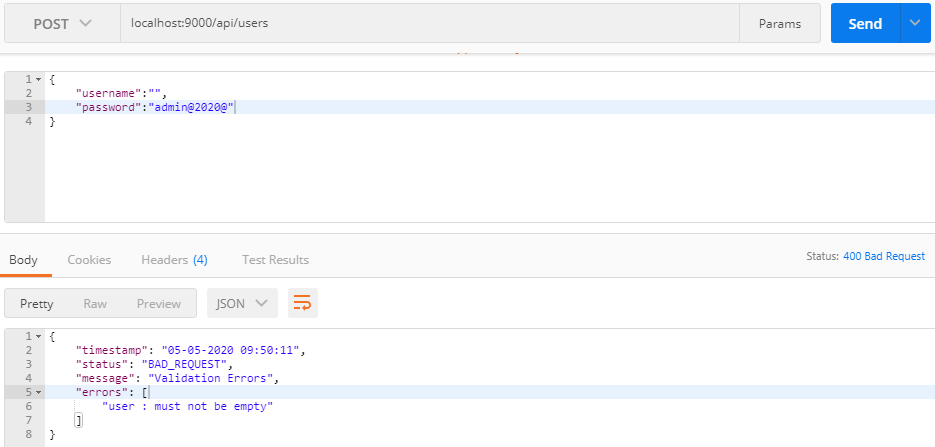
Handle MethodArgumentNotValidException
MethodArgumentNotValidException occurs when a handler method argument annotated with @Valid annotation failed validation.
        @Override
        protected ResponseEntity<Object> handleMethodArgumentNotValid(
                MethodArgumentNotValidException ex,
                HttpHeaders headers,
                HttpStatus status,
                WebRequest request) {

            List<String> details = new ArrayList<String>();
            details = ex.getBindingResult()
                        .getFieldErrors()
                        .stream()
                        .map(error -> error.getObjectName()+ " : " +error.getDefaultMessage())
                        .collect(Collectors.toList());

            ApiError err = new ApiError(
                LocalDateTime.now(),
                HttpStatus.BAD_REQUEST,
                "Validation Errors" ,
                details);

            return ResponseEntityBuilder.build(err);
        }
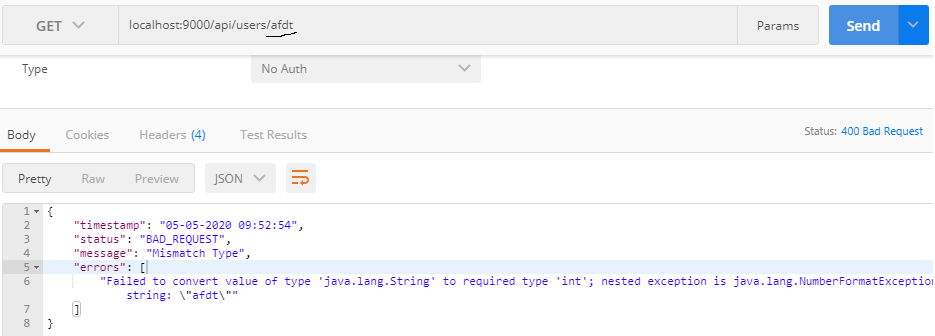
Dealing with MethodArgumentTypeMismatchException
The exception, as the name implies, is thrown when a method parameter has the wrong type:
        @ExceptionHandler(MethodArgumentTypeMismatchException.class)
        protected ResponseEntity<Object> handleMethodArgumentTypeMismatch(
            MethodArgumentTypeMismatchException ex,
            WebRequest request) {

            List<String> details = new ArrayList<String>();
            details.add(ex.getMessage());

            ApiError err = new ApiError(
                LocalDateTime.now(),
                HttpStatus.BAD_REQUEST,
                "Type Mismatch" ,
                details);

            return ResponseEntityBuilder.build(err);
        }
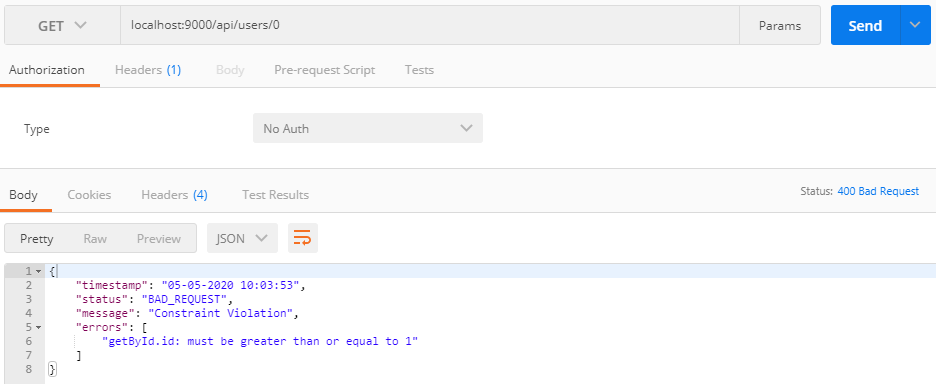
Handle ConstraintViolationException
ConstraintViolationException reports the result of constraint violations.
        @ExceptionHandler(ConstraintViolationException.class)
        public ResponseEntity<?> handleConstraintViolationException(
            Exception ex,
            WebRequest request) {

            List<String> details = new ArrayList<String>();
            details.add(ex.getMessage());

            ApiError err = new ApiError(
                LocalDateTime.now(),
                HttpStatus.BAD_REQUEST,
                "Constraint Violations" ,
                details);

            return ResponseEntityBuilder.build(err);
        }
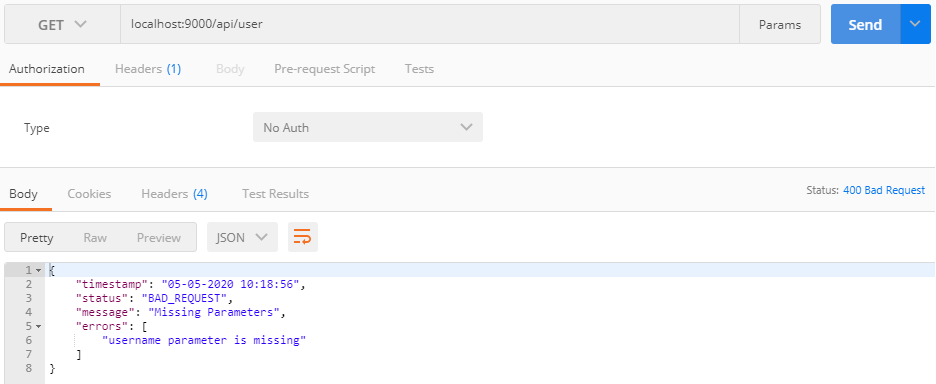
Handle MissingServletRequestParameterException
MissingServletRequestParameterException indicates that a controller method does not receive a required parameter:
        @Override
        protected ResponseEntity<Object> handleMissingServletRequestParameter(
                MissingServletRequestParameterException ex, HttpHeaders headers,
                HttpStatus status, WebRequest request) {

            List<String> details = new ArrayList<String>();
            details.add(ex.getParameterName() + " parameter is missing");

            ApiError err = new ApiError(
                LocalDateTime.now(),
                HttpStatus.BAD_REQUEST,
                "Missing Parameters" ,
                details);

            return ResponseEntityBuilder.build(err);
        }
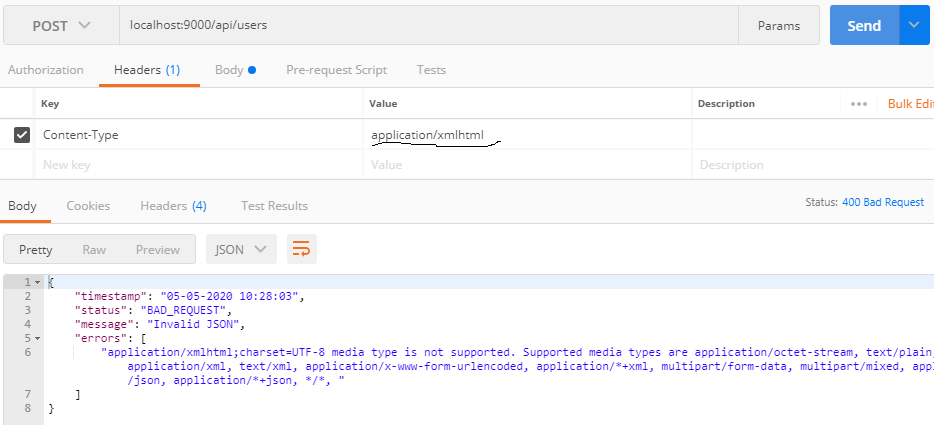
Handling HttpMediaTypeNotSupportedException
The Exception informs that the specified request media type (Content type) is not supported.
        @Override
        protected ResponseEntity<Object> handleHttpMediaTypeNotSupported(
                HttpMediaTypeNotSupportedException ex,
                HttpHeaders headers,
                HttpStatus status,
                WebRequest request) {

            List<String> details = new ArrayList<String>();
            StringBuilder builder = new StringBuilder();
            builder.append(ex.getContentType());
            builder.append(" media type is not supported. Supported media types are ");
            ex.getSupportedMediaTypes().forEach(t -> builder.append(t).append(", "));

            details.add(builder.toString());

            ApiError err = new ApiError(
                LocalDateTime.now(),
                HttpStatus.UNSUPPORTED_MEDIA_TYPE,
                "Unsupported Media Type" ,
                details);

            return ResponseEntityBuilder.build(err);
        }
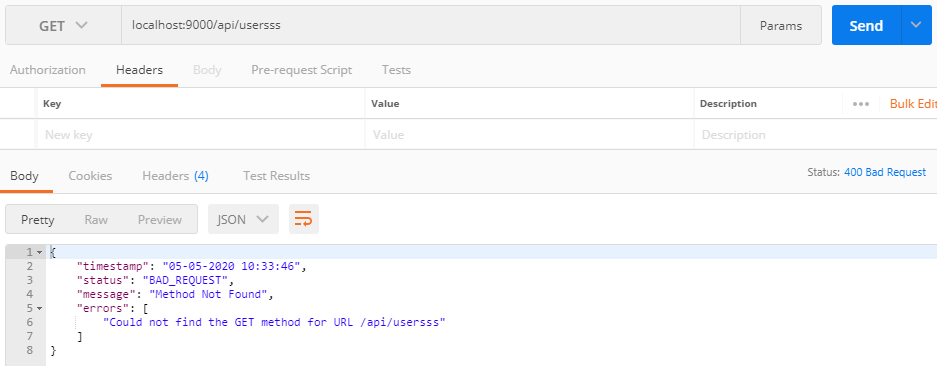
Handle NoHandlerFoundException
By default, DispatcherServlet sends a 404 response if there is no handler for a particular request.
So, to override the default behavior of our Servlet and throw NoHandlerFoundException instead, we need to add the following properties to the application.properties file.
spring.mvc.throw-exception-if-no-handler-found=true
spring.resources.add-mappings=false
Now, we can handle NoHandlerFoundException in the same way we did with other exceptions.
        @Override
        protected ResponseEntity<Object> handleNoHandlerFoundException(
                NoHandlerFoundException ex,
                HttpHeaders headers,
                HttpStatus status,
                WebRequest request) {

            List<String> details = new ArrayList<String>();
            details.add(String.format("Could not find the %s method for URL %s", ex.getHttpMethod(), ex.getRequestURL()));

            ApiError err = new ApiError(
                LocalDateTime.now(),
                HttpStatus.NOT_FOUND,
                "Method Not Found" ,
                details);

            return ResponseEntityBuilder.build(err);

        }
Deal with ALL Other Exceptions
Defining a global exception hander allows us to deal with all those exceptions that don’t have specific handlers.
        @ExceptionHandler({ Exception.class })
        public ResponseEntity<Object> handleAll(
            Exception ex,
            WebRequest request) {

            List<String> details = new ArrayList<String>();
            details.add(ex.getLocalizedMessage());

            ApiError err = new ApiError(
                LocalDateTime.now(),
                HttpStatus.BAD_REQUEST,
                "Error occurred" ,
                details);

            return ResponseEntityBuilder.build(err);
        }
Conclusion
Building a clean and proper exception handling is one of the main fundamental requirements that can make our API design more flexible and efficient.
You can find the full implementation of this tutorial in my Github repository: https://github.com/devwithus/msusers
Take care and stay safe.