How to Secure Spring Boot REST API with JWT
In this write-up, we will cover in-depth how to secure a Spring Boot REST API without reinventing the wheel. Spring Security and JWT have got us covered.
Protecting our APIs against any type of misuse that falls out of normal behavior is a crucial consideration that we should never ignore to make our APIs more secure and efficient.
So, we will walk you through the whole process of configuring Spring Security along with JWT authentication to secure a Spring Boot REST API.
Stay tuned…
Project Overview
Throughout this tutorial, we’ll create a basic Spring Boot REST API and secure it with Spring Security and JWT.
For a better and clear understanding, we’re going to divide the development process of our project into three main parts.
1) Build a simple RESTful API with Spring Boot for managing a list of employees stored in H2 database.
In general, the API will expose the following endpoints:
GET /protected/employees |
get all Employees from database |
GET /protected/employee/{id} |
retrieve an Employee by his ID |
POST /protected/employees |
create a new Employee resource |
PUT /protected/employees/{id} |
get and update one specific Employee details |
DELETE /protected/employee/{id} |
delete a particular Employee based on his ID |
2) Build an Auth API that lets the users log in and generates JWT tokens for successfully authenticated users.
3) Configure Spring Security with JWT to secure our Employee REST API from unauthorized users.
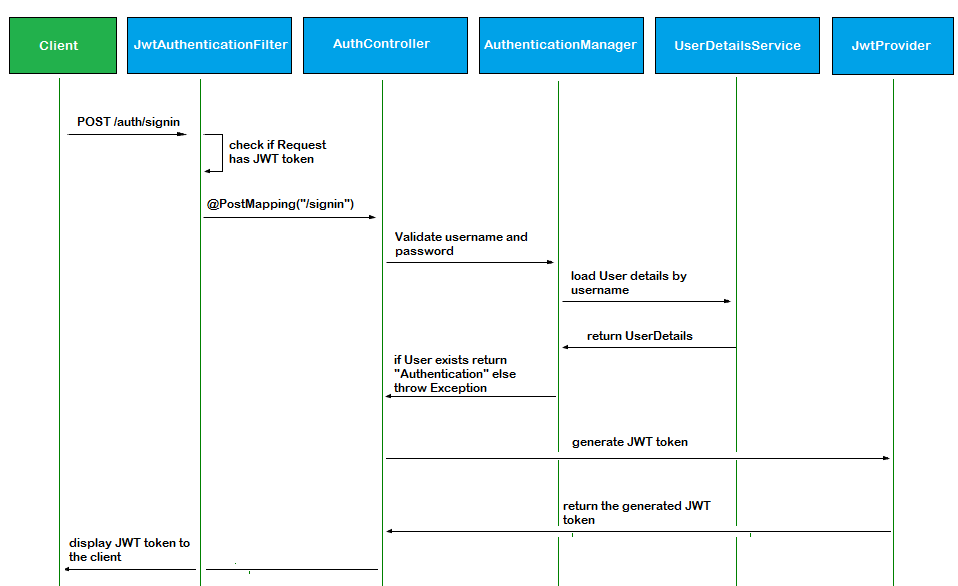
In short, the workflow of the application can be described as follows:
A client sends a POST request to sign in using his username and password
The Auth API generates a JWT token if the client is successfully authenticated
The client sends HTTP requests, with the generated JWT token included, to access protected resources
If the specified JWT token is not valid, Spring Security will throw an unauthorized error
What we will use?
To build our application with all the details described above, we need to install the following tools on our machine: JDK 8, MySQL, and a Java IDE.
We’ll rely on the following technology stack to write the necessary code required to build and secure our Employee REST API:
Spring Boot
Spring Security
JPA/Hibernate
Jackson
jjwt
JWT Authentication Workflow
JWT is a cryptographically signed JSON token that provides a great way to achieve secured token-based authentication.
Nowadays, JSON Web Token becomes a standard for securing API authentication and server-to-server authorization.
The nice thing about JWT is that it is self-contained, verified, and trusted! Even Google relies on it to secure its APIs.
In general, a typical JWT object is a combination of three main parts:
Header: contains details about the type of the token and the algorithm used to sign the content.
Payload: holds the actual data that we want to send. It is not recommended to put sensitive data (emails, passwords) in the payload.
Signature: ensures that the token is trustworthy and not changed along the way to the destination.

The workflow of JWT based authentication can be summarized as follows:
The client provides his username and password to log in.
The server generates a JWT token for the user if the supplied credentials are valid.
every time the client sends a request to access a secured resource, the server verifies the JWT signature.
If the signature is valid, the server grants access, otherwise it denies access to the protected resource.
Spring Security Workflow
Spring Security provides a handy way to easily implement authentication/authorization logic to secure spring-based applications.
In this tutorial, we are going to use Spring Security with JWT to secure a RESTful API from unauthenticated and unauthorized users.
Authentication Flow With Spring Security
In general, when an auth request is intercepted by Spring Security, it goes through a list of filters (filter chain) until it reaches the right authentication filter based on the specified authentication method (HTTP Basic, Form-based…).
For example, a basic Auth request goes through the filter chain until it reaches BasicAuthenticationFilter.
The right filter captures the supplied credentials and delegates the request to AuthenticationManager. This interface provides authenticate() method to encapsulate the logic of performing the authentication mechanism.

Spring Security provides many built-in AuthenticationFilter implementations. Each implementation is responsible for handling one specific authentication mechanism.
Since we will be using JWT, we will need to create a custom JWTAuthenticationFilter class to deal with our JWT-based authentication process.
Build Employee REST API
In this section, we are going to build a basic Employee API using Spring Boot, but we will not go into much detail.
We have already covered in detail how to create a Spring Boot REST API with JPA/Hibernate and MySQL here.
So, let’s skip over the details and get to the point.
Configure H2 Datasource
First, we are going to configure H2 database. To do so, add the following lines in application.properties:
        spring.datasource.url=jdbc:h2:mem:testdb
        spring.datasource.driverClassName=org.h2.Driver
        spring.datasource.username=sa
        spring.datasource.password=
        spring.jpa.database-platform=org.hibernate.dialect.H2Dialect
By default, Spring Boot creates an in-memory data source with the username sa and an empty password.
Next, let’s create data.sql file under src/main/resources to prepare some data:
        DROP TABLE IF EXISTS users_roles;
        DROP TABLE IF EXISTS users;
        DROP TABLE IF EXISTS roles;
        DROP TABLE IF EXISTS employees;

        CREATE TABLE users (
          id INT AUTO_INCREMENT  PRIMARY KEY,
          username VARCHAR(250) NOT NULL,
          password VARCHAR(250) NOT NULL,
          enabled BOOLEAN
        );

        INSERT INTO users (username, password, enabled) VALUES
          ('admin', '$2a$10$e6H1Jgrft/scpmpzbMFO0uqF1gxqop73l5wOlwF30Aem6Tty1nI2G', true),
          ('azhwani', '$2a$10$kWWOnNOiToOxcIQ7UJ.cB.XFAflYvMS5BPASR1eqqojc6H9ELWUfC', true),
          ('guest', '$2a$10$SNsPkXTh0ryc82.D2HRJqOcY8sYh/TPnJW8WLqrERWkOq01ViWaCq', true);

        CREATE TABLE roles (
          id INT AUTO_INCREMENT  PRIMARY KEY,
          name VARCHAR(250) NOT NULL
        );

        INSERT INTO roles (name) VALUES
          ('USER'),
          ('ADMIN'),
          ('MANAGER');


        CREATE TABLE users_roles (
          user_id INTEGER NOT NULL,
          role_id INTEGER NOT NULL,
          FOREIGN KEY(user_id) REFERENCES users(id),
          FOREIGN KEY(role_id) REFERENCES roles(id),
          PRIMARY KEY (user_id, role_id)
        );

        INSERT INTO users_roles (user_id, role_id) VALUES
          (1, 2),
          (2, 1),
          (2, 2),
          (2, 3),
          (3, 1);

        CREATE TABLE employees (
          id INT AUTO_INCREMENT  PRIMARY KEY,
          first_name VARCHAR(250) NOT NULL,
          last_name VARCHAR(250) NOT NULL,
          job VARCHAR(250) NOT NULL,
          salary DECIMAL(9,2) NOT NULL
        );

        INSERT INTO employees (first_name, last_name, job, salary) VALUES
          ('JAMES', 'Jones', 'Laborer', 3000),
          ('ROBERT', 'Williams', 'Retail sales associate', 4500),
          ('MICHAEL', 'Johnson', 'Administrative assistant', 6600);
Spring Boot will automatically run data.sql to insert default data into tables during application startup.
Employee Entity
Next, let’s define a JPA Entity for our domain model employee:
        @Entity
        @Table(name = "employees")
        public class Employee implements Serializable {

            private static final long serialVersionUID = 1L;
            @Id
            @GeneratedValue(strategy = GenerationType.IDENTITY)
            private int id;
            @NotNull
            private String firstName;
            @NotNull
            private String lastName;
            @NotNull
            private String job;
            @NotNull
            private double salary;

            public int getId() {
                return id;
            }
            public void setId(int id) {
                this.id = id;
            }
            public String getFirstName() {
                return firstName;
            }
            public void setFirstName(String firstName) {
                this.firstName = firstName;
            }
            public String getLastName() {
                return lastName;
            }
            public void setLastName(String lastName) {
                this.lastName = lastName;
            }
            public String getJob() {
                return job;
            }
            public void setJob(String job) {
                this.job = job;
            }
            public double getSalary() {
                return salary;
            }
            public void setSalary(double salary) {
                this.salary = salary;
            }
        }
Employee JPA Repository
Now, we need to implement a custom JPA repository for Employee entity class. To do that, we will use Spring’s JpaRepository interface:
        @Repository
        public interface EmployeeRepository extends JpaRepository<Employee, Integer> {
        }
Spring uses the SimpleJpaRepository class under the hood as the default implementation for repository interfaces.
Employee DTO
Next up, let’s create a DTO class (Data Transfer Object pattern) for the Employee entity:
        public class EmployeeDTO implements Serializable {

            private static final long serialVersionUID = 1L;

            @NotBlank
            private String firstName;
            @NotBlank
            private String lastName;
            @NotBlank
            private String job;
            @Positive
            @Min(value = 100)
            private double salary;

            public String getFirstName() {
                return firstName;
            }
            public void setFirstName(String firstName) {
                this.firstName = firstName;
            }
            public String getLastName() {
                return lastName;
            }
            public void setLastName(String lastName) {
                this.lastName = lastName;
            }
            public String getJob() {
                return job;
            }
            public void setJob(String job) {
                this.job = job;
            }
            public double getSalary() {
                return salary;
            }
            public void setSalary(double salary) {
                this.salary = salary;
            }
        }
DTO pattern allows to shift data in expensive remote calls. As we can see, EmployeeDTO holds only the required data we want to transfer.
DTO/Entity Mapper
Next up, we need to create a simple helper class to convert EmployeeDTO objects to Employee objects and vice versa:
        public class EmployeeMapper {

            public static EmployeeDTO entityToDTO(Employee emp) {
                EmployeeDTO empdto = new EmployeeDTO();
                empdto.setFirstName(emp.getFirstName());
                empdto.setLastName(emp.getLastName());
                empdto.setJob(emp.getJob());
                empdto.setSalary(emp.getSalary());
                return empdto;
            }
            public static Employee dtoToEntity(EmployeeDTO empdto) {
                Employee emp = new Employee();
                emp.setFirstName(empdto.getFirstName());
                emp.setLastName(empdto.getLastName());
                emp.setJob(empdto.getJob());
                emp.setSalary(empdto.getSalary());
                return emp;
            }
        }
Employee Controller
Lastly, let’s implement a basic RESTful Spring controller to expose our API’s endpoints:
        @RestController
        @RequestMapping(value = "/protected")
        @Validated
        public class EmployeeController {
            @Autowired
            EmployeeRepository employeeRepository;

            @GetMapping(value = "/employees")
            List findAll() {
                return employeeRepository.findAll();
            }
            @PreAuthorize("hasAnyRole('ADMIN','MANAGER')")
            @GetMapping(value = "/employee/{id}")
            ResponseEntity<Employee> findById(@PathVariable("id") @Min(1) int id) {
                Employee emp = employeeRepository.findById(id)
                    .orElseThrow(() -> new EmployeeNotFoundException("Employee with ID :" + id));
                return ResponseEntity.ok().body(emp);
            }
            @PreAuthorize("hasAnyRole('ADMIN','MANAGER')")
            @PostMapping(value = "/employees")
            ResponseEntity<?> CreateEmployee(@Valid @RequestBody EmployeeDTO empdto) {
                Employee emp = EmployeeMapper.dtoToEntity(empdto);
                Employee addedemp = employeeRepository.save(emp);
                URI location = ServletUriComponentsBuilder.fromCurrentRequest().path("/{id}").buildAndExpand(addedemp.getId())
                    .toUri();
                return ResponseEntity.created(location).build();
            }
            @PreAuthorize("hasAnyRole('ADMIN','MANAGER')")
            @PutMapping(value = "/employee/{id}")
            ResponseEntity<Employee> updateEmployee(@PathVariable("id") @Min(1) int id,
                    @Valid @RequestBody EmployeeDTO empdto) {
                Employee emp = employeeRepository.findById(id)
                    .orElseThrow(() -> new EmployeeNotFoundException("Employee with ID :" + id));
                Employee empu = EmployeeMapper.dtoToEntity(empdto);
                empu.setId(emp.getId());
                employeeRepository.save(empu);
                return ResponseEntity.ok().body(empu);
            }
            @PreAuthorize("hasAuthority('ROLE_MANAGER')")
            @DeleteMapping(value = "/employee/{id}")
            ResponseEntity<String> deleteEmployee(@PathVariable("id") @Min(1) int id) {
                Employee emp = employeeRepository.findById(id)
                    .orElseThrow(() -> new EmployeeNotFoundException("Employee Not Found with ID :" + id));
                employeeRepository.deleteById(emp.getId());
                return ResponseEntity.ok().body("Employee deleted with success!");
            }
        }
As we can see, we used @PreAuthorize annotation to configure security at the method level.
For example, we told Spring security that only users with role ADMIN or MANAGER are authorized to create a new Employee.
REST API Exception Handling
In this chapter, we are going to create the necessary code required to handle exceptions that may be thrown by our API.
Our article on how to handle REST API exceptions does a good job of covering this. Feel free to check it.
Custom API Error Class
Let’s start by creating a custom class - ApiError - to represent an error response that might be returned by our REST API:
        public class ApiError {

            @JsonFormat(shape = JsonFormat.Shape.STRING, pattern = "dd-MM-yyyy hh:mm:ss")
            private LocalDateTime timestamp;
            private String message;
            private List<String> errors;

            public ApiError(LocalDateTime timestamp, String message, List<String> errors) {
                this.timestamp = timestamp;
                this.message = message;
                this.errors = errors;
            }
            public LocalDateTime getTimestamp() {
                return timestamp;
            }
            public void setTimestamp(LocalDateTime timestamp) {
                this.timestamp = timestamp;
            }
            public String getMessage() {
                return message;
            }
            public void setMessage(String message) {
                this.message = message;
            }
            public List<String> getErrors() {
                return errors;
            }
            public void setErrors(List<String> errors) {
                this.errors = errors;
            }
        }
Employee NotFound Exception Class
Now, we are going to create EmployeeNotFoundException class. This custom exception will be thrown when a requested Employee is not found in the database.
        public class EmployeeNotFoundException extends RuntimeException {
            private static final long serialVersionUID = 1L;

            public EmployeeNotFoundException(String message) {
                super(message);
            }
        }
Global Exception Handler
Finally, let’s create a global handler class to deal with some relevant API-related exceptions across the whole application:
        @ControllerAdvice
        public class GlobalExceptionHandler extends ResponseEntityExceptionHandler {
            @Override
            protected ResponseEntity<Object> handleMethodArgumentNotValid(
                MethodArgumentNotValidException ex,
                HttpHeaders headers,
                HttpStatus status,
                WebRequest request) {

                List<String> fieldErrors = ex.getBindingResult()
                    .getFieldErrors()
                    .stream()
                    .map(field -> field.getField() + ", " + field.getDefaultMessage())
                    .collect(Collectors.toList());

                List<String> globalErrors = ex.getBindingResult()
                    .getGlobalErrors()
                    .stream()
                    .map(field -> field.getObjectName() + ", " + field.getDefaultMessage())
                    .collect(Collectors.toList());
                List<String> errors = new ArrayList<String>();
                errors.addAll(globalErrors);
                errors.addAll(fieldErrors);

                ApiError err = new ApiError(LocalDateTime.now(),
                    "Validation Errors" ,
                    errors);
                return ResponseEntity.status(HttpStatus.BAD_REQUEST).body(err);
            }
            @ExceptionHandler(ConstraintViolationException.class)
            public ResponseEntity<Object> handleConstraintViolationException(
                Exception ex,
                WebRequest request) {

                List<String> details = new ArrayList<String>();
                details.add(ex.getMessage());
                ApiError err = new ApiError(
                    LocalDateTime.now(),
                    "Constraint Violation" ,
                    details);

                return ResponseEntity.status(HttpStatus.BAD_REQUEST).body(err);
            }
            @ExceptionHandler(EmployeeNotFoundException.class)
            public ResponseEntity<Object> handleResourceNotFoundException(
                    EmployeeNotFoundException ex) {

                List<String> details = new ArrayList<String>();
                details.add(ex.getMessage());
                ApiError err = new ApiError(
                    LocalDateTime.now(),
                    "Employee Not Found" ,
                    details);
                return ResponseEntity.status(HttpStatus.NOT_FOUND).body(err);
            }
        }
Secure REST API with Spring Security and JWT
Now that we have created our REST API, it is time to see how to configure Spring Security with JWT to secure it.
In this tutorial, we will assume that a user can have many roles and a role can be granted to many users.
So, the association between the User class and the Role class will be many-to-many. This is why we have created the association table users_roles.
RoleName Enum
Let’s assume here that we have three user roles:
USER
ADMIN
MANAGER
        public enum RoleName {
            USER, ADMIN, MANAGER
        }
Role Entity Class
The Role entity simply holds an enum value which denotes a role name:
        @Entity
        @Table(name = "roles")
        public class Role {
            @Id
            @GeneratedValue(strategy=GenerationType.IDENTITY)
            private int id;
            @Enumerated(EnumType.STRING)
            private RoleName name;

            public int getId() {
                return id;
            }
            public void setId(int id) {
                this.id = id;
            }
            public RoleName getName() {
                return name;
            }
            public void setName(RoleName name) {
                this.name = name;
            }
        }
User Entity Class
Now that we have defined the roles, let’s create the User class:
        @Entity
        @Table(name = "users")
        public class User {

            @Id
            @GeneratedValue(strategy=GenerationType.IDENTITY)
            private int id;
            @NotNull
            private String username;
            @NotNull
            private String password;
            @NotNull
            private boolean enabled;
            @ManyToMany(fetch=FetchType.LAZY)
            @JoinTable(
                name="users_roles",
                joinColumns= {@JoinColumn(name="user_id")},
                inverseJoinColumns = {@JoinColumn(name="role_id")}
            )
            private List<Role> roles;

            public int getId() {
                return id;
            }
            public void setId(int id) {
                this.id = id;
            }
            public String getUsername() {
                return username;
            }
            public void setUsername(String username) {
                this.username = username;
            }
            public String getPassword() {
                return password;
            }
            public void setPassword(String password) {
                this.password = password;
            }
            public boolean isEnabled() {
                return enabled;
            }
            public void setEnabled(boolean enabled) {
                this.enabled = enabled;
            }
            public List<Role> getRoles() {
                return roles;
            }
            public void setRoles(List<Role> roles) {
                this.roles = roles;
            }
        }
User class contains a list of roles and the necessary data (username, password …) required for authentication.
User JPA Repositoty
Newt, we will create a custom JPA repository for User class:
        @Repository
        public interface UserRepository extends JpaRepository {
            Optional<User> findByUsername(String username);
        }
Create UserPrincipal
Now, let’s create an implementation of the UserDetails interface to get the details of the currently authenticated principal user:
        public class UserPrincipal implements UserDetails {

            private static final long serialVersionUID = 1L;
            private String username;
            private String password;
            private boolean enabled;
            private Collection<? extends GrantedAuthority> authorities;

            @Override
            public Collection<? extends GrantedAuthority> getAuthorities() {
                return authorities;
            }
            @Override
            public String getPassword() {
                return password;
            }
            @Override
            public String getUsername() {
                return username;
            }
            @Override
            public boolean isAccountNonExpired() {
                return true;
            }
            @Override
            public boolean isAccountNonLocked() {
                return true;
            }
            @Override
            public boolean isCredentialsNonExpired() {
                return true;
            }
            @Override
            public boolean isEnabled() {
                return enabled;
            }
            public void setUsername(String username) {
                this.username = username;
            }
            public void setPassword(String password) {
                this.password = password;
            }
            public void setEnabled(boolean enabled) {
                this.enabled = enabled;
            }
            public void setAuthorities(Collection<? extends GrantedAuthority> authorities) {
                this.authorities = authorities;
            }
        }
User to UserPrincipal Mapper
Next, let’s implement the logic of maping a User object to a UserPrincipal object:
        public class UserMapper {
            public static UserPrincipal userToPrincipal(User user) {
                UserPrincipal userp = new UserPrincipal();
                List<SimpleGrantedAuthority> authorities = user.getRoles().stream()
                    .map(role -> new SimpleGrantedAuthority("ROLE_" + role.getName())).collect(Collectors.toList());

                userp.setUsername(user.getUsername());
                userp.setPassword(user.getPassword());
                userp.setEnabled(user.isEnabled());
                userp.setAuthorities(authorities);
                return userp;
            }
        }
Create Custom UserDetailsService
UserDetailsService is one of the core interfaces in Spring Security. It provides loadUserByUsername() method to load user-related data:
        @Service
        @Transactional
        public class UserDetailsServiceImpl implements UserDetailsService {
            @Autowired
            private UserRepository userRepository;
            @Override
            public UserDetails loadUserByUsername(String username) throws UsernameNotFoundException {
                User user = userRepository.findByUsername(username)
                    .orElseThrow(() -> new UsernameNotFoundException("User NOT Found"));
                return UserMapper.userToPrincipal(user);
            }
        }
As we can see, the method calls findByUsername of the UserRepository to retrieve a user by username.
An exception of type UsernameNotFoundException is thrown if there is no corresponding user.
JWT Provider
Our JWT provider will handle two important things:
Generating a token from the authenticated user
Parsing the generated token to retrieve the username
        @Component
        public class JwtProvider {
            @Value("${app.jwtSecret}")
            private String jwtSecret;
            @Value("${app.jwtExpirationInMs}")
            private int jwtExpirationInMs;

            public String generateToken(Authentication authentication) {
                UserPrincipal userPrincipal = (UserPrincipal) authentication.getPrincipal();
                Date now = new Date();
                Date expiryDate = new Date(now.getTime() + jwtExpirationInMs);

                return Jwts.builder()
                    .setSubject(userPrincipal.getUsername())
                    .setIssuedAt(new Date())
                    .setExpiration(expiryDate)
                    .signWith(SignatureAlgorithm.HS512, jwtSecret)
                    .compact();
            }
            public String getUserUsernameFromJWT(String token) {
                Claims claims = Jwts.parser()
                    .setSigningKey(jwtSecret)
                    .parseClaimsJws(token)
                    .getBody();
                return claims.getSubject();
            }
            public boolean validateToken(String authToken) {
                try {
                    Jwts.parser()
                        .setSigningKey(jwtSecret)
                        .parseClaimsJws(authToken);
                    return true;
                } catch (SignatureException ex) {
                } catch (MalformedJwtException ex) {
                } catch (ExpiredJwtException ex) {
                } catch (UnsupportedJwtException ex) {
                } catch (IllegalArgumentException ex) {
                }
                return false;
            }
        }
@Component allows Spring to automatically detect and register our JwtProvider class as a Spring bean.
JWT Authentication Filter
Now, it’s time to add the most important piece of the puzzle. We need to create a filter to act as the main entry point of the JWT authentication mechanism.
        public class JwtAuthenticationFilter extends OncePerRequestFilter {
            @Autowired
            private JwtProvider tokenProvider;
            @Autowired
            private UserDetailsService userDetailsService;
            @Override
            protected void doFilterInternal(HttpServletRequest request, HttpServletResponse response, FilterChain filterChain)
                throws ServletException, IOException {
                try {
                    String jwt = getJwtFromRequest(request);
                    if (StringUtils.hasText(jwt) && tokenProvider.validateToken(jwt)) {
                        String username = tokenProvider.getUserUsernameFromJWT(jwt);
                        UserDetails userDetails = userDetailsService.loadUserByUsername(username);
                        UsernamePasswordAuthenticationToken authentication = new UsernamePasswordAuthenticationToken(
                            userDetails, null, userDetails.getAuthorities());
                        authentication.setDetails(new WebAuthenticationDetailsSource().buildDetails(request));
                        SecurityContextHolder.getContext().setAuthentication(authentication);
                    }
                } catch (Exception ex) {
                    logger.error("Could not set user authentication in security context", ex);
                }
                filterChain.doFilter(request, response);
            }
            private String getJwtFromRequest(HttpServletRequest request) {
                String bearerToken = request.getHeader("Authorization");
                if (StringUtils.hasText(bearerToken) && bearerToken.startsWith("Bearer ")) {
                    return bearerToken.substring(7, bearerToken.length());
                }
                return null;
            }
        }
This filter extracts the JWT token from the request header Authorization, retrieves the username from the token, and calls the userDetailsService to load a user based on the extracted username.
User Authentication Controller
Now, we are going to create a Spring controller to handle the process of user authentication and JWT token generation:
        @RestController
        @RequestMapping("/auth")
        public class AuthController {
            @Autowired
            AuthenticationManager authenticationManager;
            @Autowired
            JwtProvider tokenProvider;
            @PostMapping("/signin")
            public ResponseEntity<JwtResponse> authenticateUser(@Valid @RequestBody LoginDTO login) {
                Authentication authentication = authenticationManager
                    .authenticate(new UsernamePasswordAuthenticationToken(login.getUsername(), login.getPassword()));
                SecurityContextHolder.getContext().setAuthentication(authentication);
                String jwt = tokenProvider.generateToken(authentication);
                return ResponseEntity.ok(new JwtResponse(jwt));
            }
        }
Spring Security Configuration Class
Lastly, let’s put all the pieces together and create the security configuration class:
        @Configuration
        @EnableWebSecurity
        @EnableGlobalMethodSecurity(prePostEnabled = true)
        public class SecurityAdapter extends WebSecurityConfigurerAdapter {
            @Autowired
            private UserDetailsService userDetailsService;
            @Bean
            public JwtAuthenticationFilter jwtAuthenticationFilter() {
                return new JwtAuthenticationFilter();
            }
            @Bean
            public PasswordEncoder passwordEncoder() {
                return new BCryptPasswordEncoder();
            }
            @Bean
            @Override
            public AuthenticationManager authenticationManagerBean() throws Exception {
                return super.authenticationManagerBean();
            }
            @Override
            protected void configure(AuthenticationManagerBuilder auth) throws Exception {
                auth.userDetailsService(userDetailsService).passwordEncoder(passwordEncoder());
            }
            @Override
            protected void configure(HttpSecurity http) throws Exception {
                http
                .headers().frameOptions().sameOrigin()
                .and()
                .csrf().disable()
                .authorizeRequests()
                .antMatchers("/auth/**").permitAll()
                .antMatchers("/protected/**").authenticated()
                .and()
                .exceptionHandling()
                .authenticationEntryPoint((req, res, ex) -> res.sendError(HttpServletResponse.SC_UNAUTHORIZED, "UNAUTHORIZED : " + ex.getMessage()))
                .and()
                .sessionManagement().sessionCreationPolicy(SessionCreationPolicy.STATELESS)
                .and()
                .addFilterBefore(jwtAuthenticationFilter(), UsernamePasswordAuthenticationFilter.class);
            }
        }
Let’s dive into the explication:
@EnableWebSecurity tells Spring to enable web security for our application
@EnableGlobalMethodSecurity provides AOP security on methods. The attribute prePostEnabled = true enables the usage of pre/post security annotations
As shown above, we overrode configure(AuthenticationManagerBuilder auth) method. This method encapsulates the logic to process user authentication.
Similarly, configure(HttpSecurity http) holds the logic of configuring web-based security for http requests.
As we can see, we have configured the authorization so that all requests are allowed on /auth/ path.
However, only authenticated users can send requests to our API’s endpoints.
authenticationEntryPoint() tells spring security to send a response error when an unauthenticated user tries to access a protected resource that requires authentication.
We used addFilterBefore method to register and add our custom filter JwtAuthenticationFilter before UsernamePasswordAuthenticationFilter.
Testing Security With JWT
Now that we put all the pieces together, let’s test if we secured our Spring Boot REST API with JWT the right way.
To test our API’s endpoints, we will be using curl command.
Test User Authentication and Token Generation
        C:\Users\Asus>curl -X POST -H "Content-Type: application/json" -d "{\"username\":\"azhwani\",\"password\":\"@zhwaniPass\"}" http://localhost:9001/auth/signin
        {
            "token":"eyJhbGciOiJIUzUxMiJ9.eyJzdWIiOiJhemh3YW5pIiwiaWF0IjoxNjI5NjU4NjcxLCJleHAiOjE2Mjk3NDUwNzF9.XwQtf0G1X5DLziYbCfKyuFFCUptzG40NVHW6VZouHNP0JBnveZWjokYvWcIdAE8vAAKbhMHxLfWNVJNHbr9Mww",
            "tokenHeader":"Bearer"
        }
        C:\Users\Asus>curl -X POST -H "Content-Type: application/json" -d "{\"username\":\"user\",\"password\":\"wrongPass\"}" http://localhost:9001/auth/signin
        {
            "timestamp":"2021-08-22T19:02:09.679+0000",
            "status":401,
            "error":"Unauthorized",
            "message":"UNAUTHORIZED : Bad credentials",
            "path":"/auth/signin"
        }
GET /protected/employees for Unauthenticated User
        C:\Users\Asus>curl -X GET -H "Content-Type: application/json" http://localhost:9001/protected/employees
        {
            "timestamp":"2021-08-22T19:28:12.666+0000",
            "status":401,
            "error":"Unauthorized",
            "message":"UNAUTHORIZED : Full authentication is required to access this resource",
            "path":"/protected/employees"
        }
        C:\Users\Asus>
GET /protected/employee/{id} for Authenticated User with Valid JWT Token
        C:\Users\Asus>curl -X GET -H "Content-Type: application/json" -H "Authorization: Bearer eyJhbGciOiJIUzUxMiJ9.eyJzdWIiOiJhemh3YW5pIiwiaWF0IjoxNjI5NjYwOTQ1LCJleHAiOjE2Mjk3NDczNDV9._4BbiXZ4wec6SBngNA-KLeGWJKNZLDRXcOPpwaMG97qXxoR2sqmK90eqNFL7imCE6bIDAQWfVA1ybh4JOew3jw" http://localhost:9001/protected/employee/1
        {
            "id":1,
            "firstName":"JAMES",
            "lastName":"Jones",
            "job"::"Laborer",
            "salary":3000.0
        }
        C:\Users\Asus>
GET /protected/employee/{id} for Unauthorized User
        curl -X POST -H "Content-Type: application/json" -d ""{\"username\":\"guest\",\"password\":\"guestPasswd\"}" http://localhost:9001/auth/signin
        {
            "token":"eyJhbGciOiJIUzUxMiJ9.eyJzdWIiOiJndWVzdCIsImlhdCI6MTYyOTY2MTUwOCwiZXhwIjoxNjI5NzQ3OTA4fQ.H2VjKSV3QYsJAGcXpBK0DLPw5--HYQnQOfiHb7mCB_MyqHT1QS3F89MxLvWCJL8wVYTI4Je8CqBujR7GRm-Y8w",
            "tokenHeader":"Bearer"
        }
        C:\Users\Asus>curl -X GET -H "Content-Type: application/json" -H "Authorization: Bearer eyJhbGciOiJIUzUxMiJ9.eyJzdWIiOiJndWVzdCIsImlhdCI6MTYyOTY2MTUwOCwiZXhwIjoxNjI5NzQ3OTA4fQ.H2VjKSV3QYsJAGcXpBK0DLPw5--HYQnQOfiHb7mCB_MyqHT1QS3F89MxLvWCJL8wVYTI4Je8CqBujR7GRm-Y8w" http://localhost:9001/protected/employee/2
        {
            "timestamp":"2021-08-22T19:47:15.844+0000",
            "status":403,
            "error":"Forbidden",
            "message":"Forbidden",
            "path":"/protected/employee/2"
        }
        C:\Users\Asus>
The guest user has only USER role, so he is not authorized to retrieve an employee by ID.
The request requires ADMIN or MANAGER role, hence the error code 403.
Conclusion
To sum it up, in this tutorial we covered in-depth how to secure a Spring Boot REST API with JWT.
First, we have seen how to configure H2 database and build a basic restful API. Along the way, we explained how to integrate JWT to secure our Spring Boot REST API.
Finally, we showcased how to test the securing rules we have applied using curl.