CRUD API with Spring Boot, Lombok, JPA, Hibernate and MySQL
Spring Boot has a lot of power when it comes to quickly setup and bootstrap spring based applications! The magic provided by Spring Boot has taken Spring framework to the next level!
If you are looking to create your first API with Spring Boot, then you are lucky, this article is just written for you!
This guide will walk you through the process of building a full CRUD RESTful API with Spring Boot, Lombok, JPA/Hibernate and MySQL!
Let’s get into coding!
Project overview and requirements
What you will need ?
You will need JDK 8+, MySQL and your favorite IDE (configured with Lombok project) installed on your local machine!
What you will build ?
You will build from scratch a CRUD (create-read-update-delete) API for a simple students management application. A Student can have first name, second name and an email.
What you will use ?
You will use Spring Boot to bootstrap your spring application, JPA/Hibernate to handle ORM (Object-relational mapping), MySQL for the database and Lombok to minimize significantly boilerplate code!
Create Spring Boot CRUD API project
Spring Boot, as you may know, provides two ways to quickly setup and generate a new project! You have the choice to use Spring CLI or Spring Initializr!
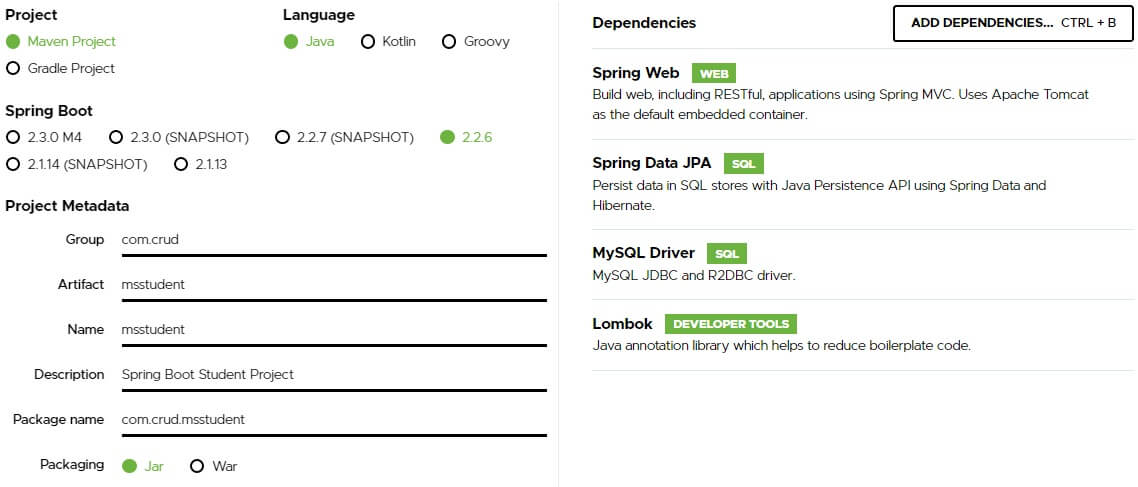
In this tutorial, we will use Spring Initializr to generate our Students project! All you need to do is follow the following steps:
Step 1) Go to http://start.spring.io
Step 2) Select Maven Project, Java and the lastest version of Spring Boot!
Step 3) Enter the following metadata:
Group :
com.crudArtifact :
msstudentName :
msstudentPackaging : keep the default option JAR
Step 4) Once everything is entered, search for the following dependencies : Web, JPA, MySQL, Lombok and add them to the project!
Step 5) Once you click on Generate button, Spring Initializer will generate for you a zip file containing the backbone of your project with the details your have already specified!
Step 6) Unzip the downloaded zip file and import it into your favorite IDE! (Eclipse for me)
Directory Structure
The folder structure of the imported Spring Boot project should normally look like the following:
        ├── src
        │   └── main
        │   │   ├── java
        │   │   │   └── com
        │   │   │       └── crud
        │   │   │           └── msstudent
        │   │   │               └── MsstudentApplication.java
        │   │   └── resources
        │   │       └── static
        │   │       └── templates
        │   │       └── application.properties
        │   │
        │   └── test
        │       └── java
        │           └── com
        │               └── crud
        │                   └── msstudent
        │                       └── MsstudentApplicationTests.java
        └── pom.xml
The directory structure of our project is organized around some important folders and files:
main folder: contains the main entry point class of our application + resources folder, dedicated to all static resources, templates and global config files such as application.properties!
test foler: set up the test infrastructure! It keeps tests separate from the business logic of the application!
pom.xml: it is the fundamental file in Maven, it contains informations about all dependencies used in the project!
Entry point class of our project
MsstudentApplication.java class is annotated with @SpringBootApplication! It contains main() method, so it is the entry-point of our application!
        package com.crud.msstudent;

        import org.springframework.boot.SpringApplication;
        import org.springframework.boot.autoconfigure.SpringBootApplication;
        @SpringBootApplication
        public class MsstudentApplication {
            public static void main(String[] args) {
                SpringApplication.run(MsstudentApplication.class, args);
            }
        }
@SpringBootApplication is an All-in-one annotation that combines the following annotations:
@Configuration: indicates that the decorated class is a configuration class used to declare one or more spring beans!@EnableAutoConfiguration: tells Spring to automatically configure your application based on dependencies present in the classpath!@ComponentScan: tells Spring to scan the specified package and register all the annotated components as beans in the context!
SpringApplication class automatically launch our Spring Boot application from the main() method.
application.properties
It is one the most important files! Its main purpose is to store properties (key-value) that can be used to configure your application!
Spring Boot loads application.properties automatically at startup from src/main/resources directory without any extra configuration!
For example, you can define in this file, name of the application, port on which your server will listen to the requests, database configuration and more …
        ## Active profile
        spring.profiles.active=default
        ## Application name
        spring.application.name=msstudent
        ## Port
        server.port=9000
pom.xml
The following is the code snippet of our pom.xml file:
        <project xmlns="http://maven.apache.org/POM/4.0.0"
        xmlns:xsi="http://www.w3.org/2001/XMLSchema-instance"
        xsi:schemaLocation="http://maven.apache.org/POM/4.0.0 https://maven.apache.org/xsd/maven-4.0.0.xsd">

            <modelVersion>4.0.0</modelVersion>
            <parent>
                <groupId>org.springframework.boot</groupId>
                <artifactId>spring-boot-starter-parent</artifactId>
                <version>2.2.6.RELEASE</version>
                <relativePath/> <!-- lookup parent from repository -->
            </parent>

            <groupId>com.crud</groupId>
            <artifactId>msstudent</artifactId>
            <version>0.0.1-SNAPSHOT</version>

            <name>msstudent</name>
            <description>Student CRUD APP</description>
            <packaging>jar</packaging>

            <properties>
                <java.version>1.8</java.version>
                <maven.test.skip>true</maven.test.skip>
            </properties>

            <dependencies>
                <dependency>
                    <groupId>org.springframework.boot</groupId>
                    <artifactId>spring-boot-starter-data-jpa</artifactId>
                </dependency>

                <dependency>
                    <groupId>org.springframework.boot</groupId>
                    <artifactId>spring-boot-starter-web</artifactId>
                </dependency>

                <dependency>
                    <groupId>mysql</groupId>
                    <artifactId>mysql-connector-java</artifactId>
                    <scope>runtime</scope>
                </dependency>

                <dependency>
                    <groupId>org.projectlombok</groupId>
                    <artifactId>lombok</artifactId>
                    <optional>true</optional>
                </dependency>

                <dependency>
                    <groupId>org.springframework.boot</groupId>
                    <artifactId>spring-boot-starter-test</artifactId>
                    <scope>test</scope>
                    <exclusions>
                        <exclusion>
                            <groupId>org.junit.vintage</groupId>
                            <artifactId>junit-vintage-engine</artifactId>
                        </exclusion>
                    </exclusions>
                </dependency>
            </dependencies>

            <build>
                <plugins>
                    <plugin>
                        <groupId>org.springframework.boot</groupId>
                        <artifactId>spring-boot-maven-plugin</artifactId>
                    </plugin>
                </plugins>
            </build>
        </project>
Create MySQL Database
Let’s create a MySQL database with the name: studentdb before start developing our application!

Now, we are going to create one table named student that will be used to store Student records!
You can execute the following MySQL query to create our table into our database!
        CREATE TABLE IF NOT EXISTS student (
            id INT AUTO_INCREMENT PRIMARY KEY,
            firstname VARCHAR(50) NOT NULL,
            lastname VARCHAR(50) NOT NULL,
            email VARCHAR(50)
        );
Configuring MySQL DataSource
Spring Boot relies on auto configuration feature to automatically configure an embedded database for you in case you did not define any DataSource bean explicitly!
Since, we have added spring-data-jpa and mysql-connector-java dependencies, Spring will configure a MySQL DataSource bean automatically by reading the database configuration from application.properties file.
So, what we need to do to override the default in-memory database provided by Spring Boot is just add connection properties of our MySQL database to application.properties file and Spring Boot will take care of the rest!
        ## MySQL DataSource
        spring.datasource.url=jdbc:mysql://localhost:3306/studentdb?allowPublicKeyRetrieval=true&useSSL=false&serverTimezone=UTC
        spring.datasource.username=root
        spring.datasource.password=admin@2020@
Configuring JPA using Hibernate
JPA refers to Java Persistence API, it is an API that define a set of rules to be respected to persist Java objects into database!
JPA provides a bridge between Relational world and Object world! It describes how a Java class can be mapped to a relational table!
This Mapping between tables and classes is called ORM (Object Relational Mapping)! ORM can be described using XML or annotations!
Spring Boot uses Hibernate as the default JPA implementation and provides a nice out-of-the-box integration with it!
You can use properties prefixed with spring.jpa to set up JPA related configuration!
        ## JPA/Hibernate
        spring.jpa.show-sql=true
        spring.jpa.hibernate.ddl-auto=update
spring.jpa.show-sql : used to log and dump SQL queries to the standard output!
spring.jpa.hibernate.ddl-auto : controls the way how our database will be initialized at startup! This property accepts four values:
validate: makes no changes to the database!
update: updates the schema with the given values.
create: creates the schema and destroy previous data.
create-drop: drops the schema when the session is closed.
Using update is fine for development, but I would not trust it on a production database! You can choose validate value and use an automatic schema migration tool such as Flyway for production!
In this project, we will try to use annotations to map our domain model “Student” to our MySQL table “student”!
Creating JPA entity class
An Entity class is nothing than a simple POJO class intended to represent and map onto a specific table in database!
We will create our Student entity class inside a new subpackage named models! This subpackage should be created under the main package : com.crud.msstudent
Student class will be defined with the following attributes: id, firstname, lastname and email! Those fields map to the columns of “student” table!
We can use Lombok annotations to reduce the amount of boilerplate code required to implement JavaBeans specification (Getters, Setters …)!
package com.crud.msstudent.models;
import java.io.Serializable;
import javax.persistence.*;
import javax.validation.constraints.NotEmpty;
import lombok.AllArgsConstructor;
import lombok.Getter;
import lombok.NoArgsConstructor;
import lombok.Setter;
import lombok.experimental.Accessors;
@Getter
@Setter
@Accessors(chain=true)
@NoArgsConstructor
@AllArgsConstructor
@Entity
@Table(name = "student")
public class Student implements Serializable {
private static final long serialVersionUID = 1L;
@Id
@GeneratedValue(strategy=GenerationType.IDENTITY)
private int id;
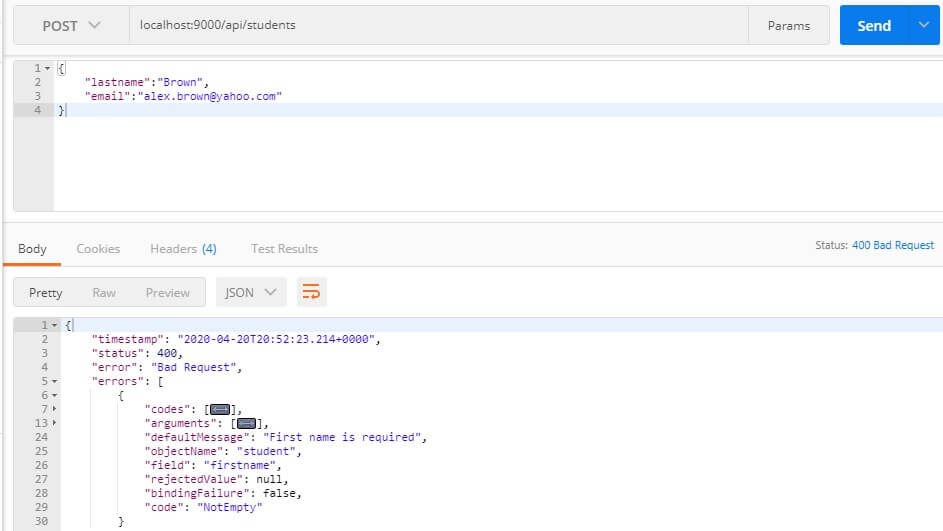
@NotEmpty(message = "First name is required")
private String firstname;
@NotEmpty(message = "Last name is required")
private String lastname;
@Column(nullable = true, name = "email")
private String email;
}
Let’s understand some of the important annotations used in our Entity class Student.java:
@Getter and @Setterare Lombok annotations used to generate Getters and Setters methods for all fields automatically! You can also use @Data annotation!@NoArgsConstructorprovided by Lombok to generate a default no-args constructor for our class.@AllArgsConstructoris a Lombok annotation used to generate all-arguments constructor.@Entityis a JPA annotation used to indicate that the annotated class is a JPA entity class!@Tableprovided by JPA to specify more details about the table associated to the class.@Idused to bind the annotated field to the primary key column.@GeneratedValuedefines the primary key generation strategy. IDENTITY means that the values of the primary key will be generated using an Auto-Increment field.@Columnis a JPA annotation that we use to define some details about the mapped column!@NotEmptyused to validate the annotated field! It checks whether the field is not null and not empty!
Creating repository layer
Now, we are going to create a repository interface for our domain model Student!The repository pattern is pretty simple. It mediates between data access layer and business logic layer!
Spring Data JPA comes with great integration with the underlying JPA layer! It provides a set of repository interfaces that you can extend to create your own repositories!
JpaRepository is a JPA specific interface that offers out-of-box implementations for all basic CRUD operations!
This means that you don’t have to define CRUD methods by yourself! All is set for you!
Sounds great, right ?
Before creating our Student repository, let’s create a new package called com.crud.msstudent.repositories!
To create our StudentRepository interface, we need just to extend JpaRepository interface:
        package com.crud.msstudent.repositories;
        import java.util.Optional;
        import org.springframework.data.jpa.repository.JpaRepository;
        import org.springframework.stereotype.Repository;
        import com.crud.msstudent.models.Student;

        @Repository
        public interface StudentRepository extends JpaRepository<Student, Integer> {
            // Query method
            Optional<Student> findByEmail(String email);
        }
WoW! As you can see, that’s all we have to write to implement data access logic!
JpaRepository interface provides you with all the methods you need to manage data: save(), findAll(), count(), delete()…
@Repository annotation indicates that the underlying interface is a repository and tells Spring to register it as a bean in the context during component scan.
Query method lets us create custom queries! Spring Data parses the method name based on some keywords to generate a specific query for you!
findByEmail(String email) method will generate a SELECT query that will retrieve a Student from the database based on the specified email!
The magic of Spring Data JPA lies in the fact that, it doesn’t force you to implement JpaRepository methods. They are implemented by the default implementation SimpleJpaRepository which is already plugged in by Spring automatically at runtime!
Cool, right ?
Creating service layer
The next thing we are going to do is create our service layer to hold the business logic of our application!First, let’s create another package named services where our business classes and interfaces will live!
To implement Loose Coupling pattern in our application, we need to create an interface called IStudent with the following methods!
        package com.crud.msstudent.services;

        import java.util.List;
        import java.util.Optional;
        import com.crud.msstudent.models.Student;

        public interface IStudent {
            List<Student> getAllStudents();
            Optional<Student> findById(int id);
            Optional<Student> findByEmail(String email);
            Student save(Student std);
            void deleteById(int id);
        }
Now, we are going to create an implementation class of our IStudent interface with the following content:
        package com.crud.msstudent.services;

        import java.util.List;
        import java.util.Optional;
        import org.springframework.beans.factory.annotation.Autowired;
        import org.springframework.stereotype.Service;
        import com.crud.msstudent.models.Student;
        import com.crud.msstudent.repositories.StudentRepository;
        @Service
        public class StudentService implements IStudent {
            StudentRepository studentrepo;
            @Autowired
            public StudentService(StudentRepository studentrepo) {
                this.studentrepo = studentrepo;
            }
            @Override
            public List<Student> getAllStudents() {
                // TODO Auto-generated method stub
                return studentrepo.findAll();
            }
            @Override
            public Optional<Student> findById(int id) {
                // TODO Auto-generated method stub
                return studentrepo.findById(id);
            }
            @Override
            public Optional<Student> findByEmail(String email) {
                // TODO Auto-generated method stub
                return studentrepo.findByEmail(email);
            }
            @Override
            public Student save(Student std) {
                // TODO Auto-generated method stub
                return studentrepo.save(std);
            }
            @Override
            public void deleteById(int id) {
                // TODO Auto-generated method stub
                studentrepo.deleteById(id);
            }
        }
@Service annotation specifies the intent that the annotated class is a business class! It tells spring to pick it up and pull it into the application context.
The service layer stands on top of JPA repository to handle business details of the application! Note that StudentRepository is referenced from StudentService class!
Creating Spring controller
Finally, we are in the final step, we are going here to create our spring controller which defines all API’s endpoints for creating, finding, updating and deleting Student resources.
First, we need to create a new subpackage called controllers inside the main package!
Now, let’s create StudentController.java class, the sole main controller of our CRUD API Spring Boot application:
package com.crud.msstudent.controllers;
import java.util.List;
import javax.validation.Valid;
import javax.validation.constraints.Min;
import org.springframework.beans.factory.annotation.Autowired;
import org.springframework.web.bind.annotation.DeleteMapping;
import org.springframework.web.bind.annotation.GetMapping;
import org.springframework.web.bind.annotation.PathVariable;
import org.springframework.web.bind.annotation.PostMapping;
import org.springframework.web.bind.annotation.PutMapping;
import org.springframework.web.bind.annotation.RequestBody;
import org.springframework.web.bind.annotation.RequestMapping;
import org.springframework.web.bind.annotation.RestController;
import com.crud.msstudent.exceptions.StudentNotFoundException;
import com.crud.msstudent.models.Student;
import com.crud.msstudent.services.StudentService;
@RestController
@RequestMapping("/api")
public class StudentController {
StudentService studentservice;
@Autowired
public StudentController(StudentService studentservice) {
this.studentservice = studentservice;
}
@GetMapping(value="/students")
public List<Student> getAllStudents(){
return studentservice.getAllStudents();
}
@GetMapping(value="/students/{id}")
public Student getStudentById(@PathVariable("id") @Min(1) int id) {
Student std = studentservice.findById(id)
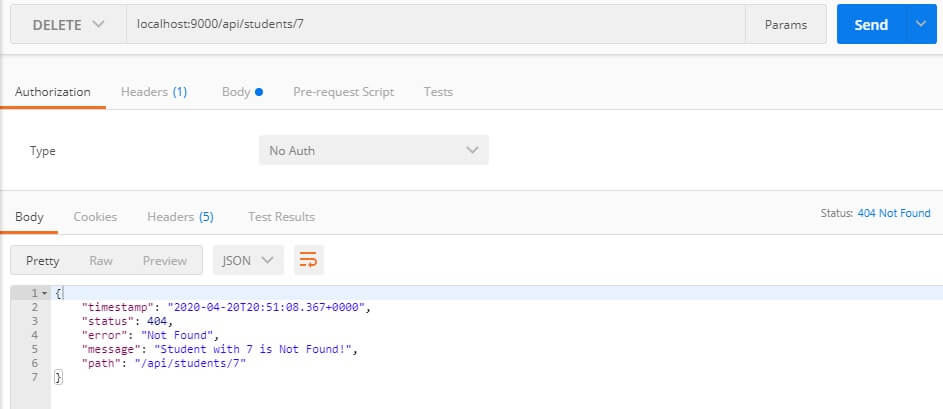
.orElseThrow(()->new StudentNotFoundException("Student with "+id+" is Not Found!"));
return std;
}
@PostMapping(value="/students")
public Student addStudent(@Valid @RequestBody Student std) {
return studentservice.save(std);
}
@PutMapping(value="/students/{id}")
public Student updateStudent(@PathVariable("id") @Min(1) int id, @Valid @RequestBody Student newstd) {
Student stdu = studentservice.findById(id)
.orElseThrow(()->new StudentNotFoundException("Student with "+id+" is Not Found!"));
stdu.setFirstname(newstd.getFirstname());
stdu.setLastname(newstd.getLastname());
stdu.setEmail(newstd.getEmail());
return studentservice.save(stdu);
}
@DeleteMapping(value="/students/{id}")
public String deleteStudent(@PathVariable("id") @Min(1) int id) {
Student std = studentservice.findById(id)
.orElseThrow(()->new StudentNotFoundException("Student with "+id+" is Not Found!"));
studentservice.deleteById(std.getId());
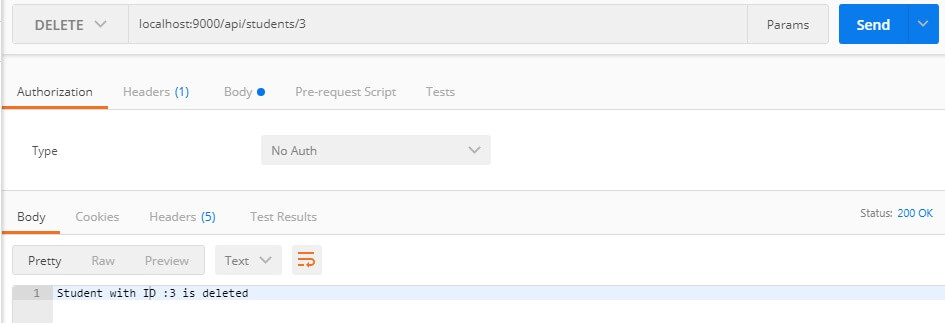
return "Student with ID :"+id+" is deleted";
}
}
@RestController is used to create RESTful APIs. It is a combination of @Controller and @ResponseBody annotations.
@RequestMapping(“/api”) is used to map HTTP requests to handler methods! In our example, it indicates that all API’s endpoints URLs will start with ”/api”.
It is worth to mention that, our StudentController calls StudentService methods to handle HTTP requests! StudentService uses also StudentRepository methods to interact with the Database!
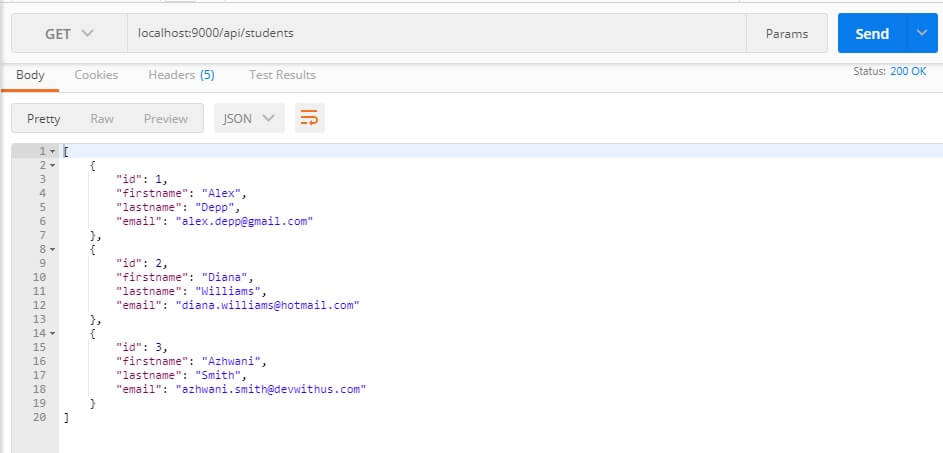
Get all Students
@GetMapping(“/students”) is a simple shortcut annotation of @RequestMapping(value=“/students”, method=RequestMethod.GET). It maps our GET request /api/students to getAllStudents() responsible for retrieving all students from database!
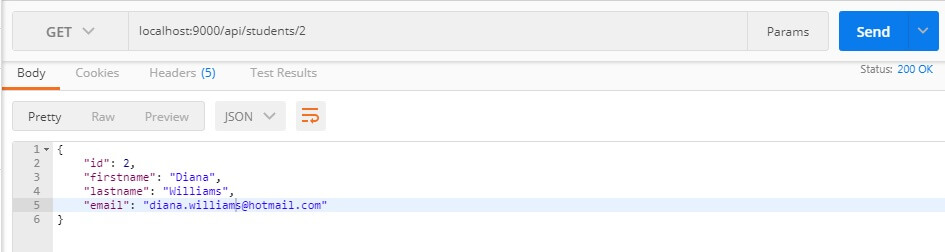
Get single Student by ID
@GetMapping(“/students/{id}”) used to map /api/students/{id} GET request to getStudentById() handler method!
@PathVariable indicates that the method parameter id will be retrieved from request URI Template!
getStudentById() method returns a Student object or throws StudentNotFoundException exception if there is no Student with the given ID in database!
Let’s take a close look at our StudentNotFoundException class:
        package com.crud.msstudent.exceptions;

        import org.springframework.http.HttpStatus;
        import org.springframework.web.bind.annotation.ResponseStatus;
        import lombok.Getter;
        import lombok.Setter;

        @Getter
        @Setter
        @ResponseStatus(value = HttpStatus.NOT_FOUND)
        public class StudentNotFoundException extends RuntimeException {
            private static final long serialVersionUID = 1L;
            private String message;
            public StudentNotFoundException( String message) {
                this.message = message;
            }
        }
The idea is very simple here! When StudentNotFoundException is thrown, this means that the Student with the given ID is not found!
So, @ResponseStatus(value = HttpStatus.NOT_FOUND) is precisely the appropriate HTTP response status code to describe the situation!
Awesome, right ?
Create new Student
@PostMapping(“/students”) is used to bind our POST request /api/students to addStudent() method responsible for persisting a new Student object into database!
@RequestBody annotation binds the HttpRequest body to the handler method parameter std!
@Valid is used for validation purpose to make sure that the request body is valid!
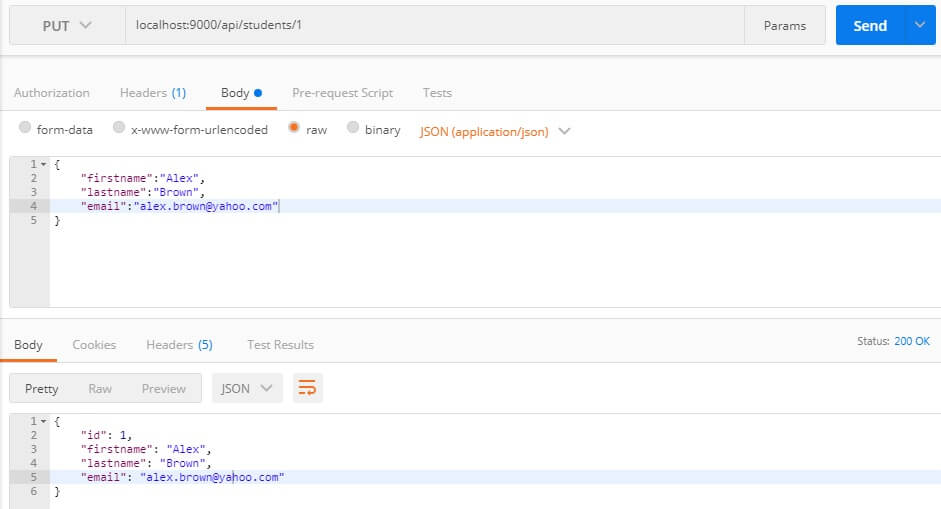
Update Student details
@PutMapping(“/students/{id}”) acts as a shortcut for @RequestMapping(method = RequestMethod.PUT)! It used for mapping our HTTP request /students/{id} onto updateStudent() handler method!
Delete Student by ID
@DeleteMapping(“/students/{id}”) is used to bind HTTP DELETE request /students/{id} to deleteStudent() handler method that encapsulates the logic of deleting a Student by ID!
Run and test Spring Boot CRUD API
Our application will start at port 9000 (already defined in application.properties file)! Once started, the API will be accessible via http://localhost:9000/api/
Now, it is the time for us to test our API endpoints using Postman!
Testing GET /api/students
Testing GET /api/students/{id}
Testing POST /api/students

Testing PUT /api/students/{id}
Testing DELETE /api/students/{id}
Testing ResourceNotFound exception
Testing inputs validation
Conclusion
That’s all folks! You can find the source code of this tutorial on this Github repository!
You can drop me any question or comment related to creating CRUD API using Spring Boot, JPA, Hibernate and MySQL!
Stay safe and see you asap :)