Introduction to Lombok Data Annotation
As a developer, I couldn’t imagine myself programming Java classes without using lombok data annotation.
So, in this article, I will try to highlight the importance of the lombok project and cover in-depth every point related to @Data annotation.
Stay tuned,
@Data Annotation Overview
Using lombok @Data can surely provide significant technical benefits to our Java projects. It reduces the required extra code that usually brings no real value to the business side of our applications.
So, let’s see this annotation in detail.
What is Lombok Data Annotation?
In short, @Data is a special annotation provided by the lombok project. Its main purpose is to automatically generate all the extra code that is frequently associated with POJOs and Java beans.
You may wonder what is boilerplate code. Well, it is the repetitive code that we have to write each time such as:
Getter methods for all fields
Setter methods for all fields
toString() method
equals() and hashCode() implementations
Constructor that initializes all final fields
The lombok project comes with a host of ready-to-use annotations. However @Data is very special because it provides an implicit shortcut that binds together all the following annotations:
@Getter
@Setter
@ToString
@EqualsAndHashCode
Please bear in mind that each annotation has one specific purpose, we should use it only when it makes sense.
For example, we use the @ToString annotation only when we want to implement the toString method.
How Lombok @Data Works?
Lombok hooks itself into the compilation phase and acts as an annotation processor that generates the extra code we need for our classes.
Its real job is not to generate new files but to modify the existing ones.
By annotating a particular class with @Data, we tell lombok to generate:
Parameterized constructor for required fields
Setters and getters
equals, hashCode and toString methods
And all that silently during compile time. Awesome, right?
Now that we know how lombok works, let’s see how to add it in eclipse.
Install Lombok in Eclipse IDE
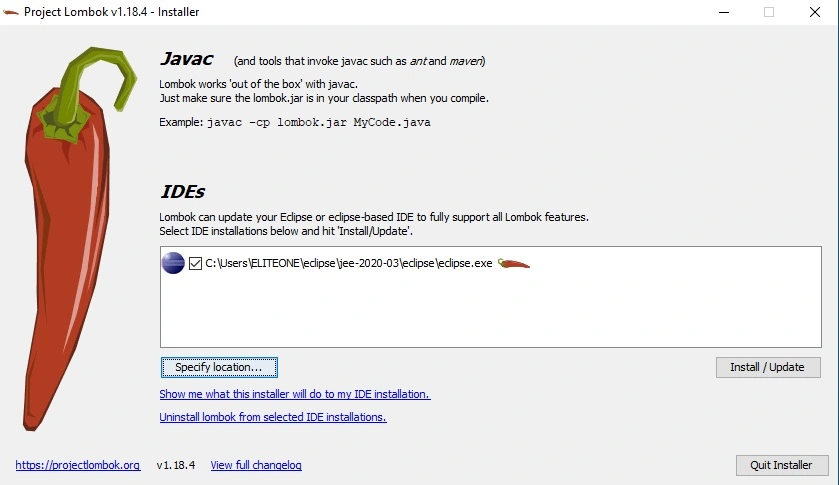
To work with lombok plugin, we need to configure it first. Follow the below steps to add it in eclipse (Windows OS):
Download the jar file from https://projectlombok.org/download
Go to the jar file location, then execute it or run this command line in your terminal: java -jar lombok.jar
Once the Lombok window is opened, specify the eclipse.exe location under the Eclipse installation folder
Click on Install/Update button to start the installation process
If you are a big fan of Maven like me, you need just to add the following dependency in the pom.xml of your project:
        <dependency>
            <groupId>org.projectlombok</groupId>
            <artifactId>lombok</artifactId>
            <version>1.18.4</version>
            <scope>provided</scope>
        </dependency>
Feel free to check our articles on how to install maven:
Example Without @Data
Let’s see how to create a POJO class in Java without using any lombok annotations. For instance, consider the Person class:
        package com.azhwani;
        import java.io.Serializable;
        public class Person implements Serializable {
            /**
            *
            */
            private static final long serialVersionUID = 1L;
            // Properties
            private Long id;
            private String firstName;
            private String lastName;
            private String email;
            private int age;
            // Constructors
            public Person() {
            }
            public Person(Long id, String firstName, String lastName, String email, int age) {
                this.id = id;
                this.firstName = firstName;
                this.lastName = lastName;
                this.email = email;
                this.age = age;
            }
            // Getters + Setters
            public Long getId() {
                return id;
            }
            public void setId(Long id) {
                this.id = id;
            }
            public String getFirstName() {
                return firstName;
            }
            public void setFirstName(String firstName) {
                this.firstName = firstName;
            }
            public String getLastName() {
                return lastName;
            }
            public void setLastName(String lastName) {
                this.lastName = lastName;
            }
            public String getEmail() {
                return email;
            }
            public void setEmail(String email) {
                this.email = email;
            }
            public int getAge() {
                return age;
            }
            public void setAge(int age) {
                this.age = age;
            }
            // hashCode + equals + toString methods
            @Override
            public int hashCode() {
                final int prime = 31;
                int result = 1;
                result = prime * result + age;
                result = prime * result + ((email == null) ? 0 : email.hashCode());
                result = prime * result + ((firstName == null) ? 0 : firstName.hashCode());
                result = prime * result + ((id == null) ? 0 : id.hashCode());
                result = prime * result + ((lastName == null) ? 0 : lastName.hashCode());
                return result;
            }
            @Override
            public boolean equals(Object obj) {
                if (this == obj)
                    return true;
                if (obj == null)
                    return false;
                if (getClass() != obj.getClass())
                    return false;
                Person other = (Person) obj;
                if (age != other.age)
                    return false;
                if (email == null) {
                    if (other.email != null)
                        return false;
                } else if (!email.equals(other.email))
                    return false;
                if (firstName == null) {
                    if (other.firstName != null)
                        return false;
                } else if (!firstName.equals(other.firstName))
                    return false;
                if (id == null) {
                    if (other.id != null)
                        return false;
                } else if (!id.equals(other.id))
                    return false;
                if (lastName == null) {
                    if (other.lastName != null)
                        return false;
                } else if (!lastName.equals(other.lastName))
                    return false;
                return true;
            }
            @Override
            public String toString() {
                return "Person [id=" + id + ", firstName=" + firstName + ", lastName=" + lastName + ", email=" + email
                        + ", age=" + age + "]";
            }
        }
As we can see, we have already more than 100 lines of code for a class with 5 properties.
Person class has just 5 properties, so it is normally a basic simple Java class. However, with the extra code of the getters and setters … we ended up with a quite overwhelming boilerplate zero-value code.
You may say that most Java IDE can also auto-generate getters and setters (and even more) for us with just a few clicks.
Yes, you are right. However, the generated code needs to live in your sources and must be maintainable and maintained.
Example with Lombok @Data
With this annotation, we will be able to focus only on what is important in our class: its data and its representation.
The rest will be generated automatically by lombok. Thanks to the Data annotation.
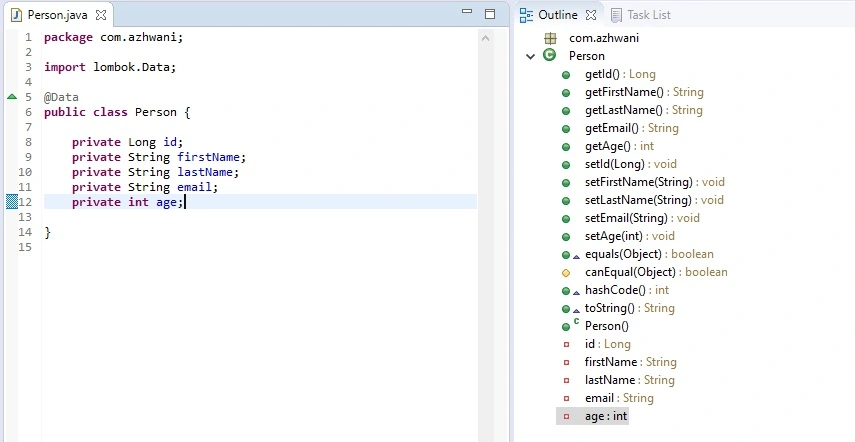
Now, let’s take a close look at our class Person decorated with @Data:
        import lombok.Data;
        @Data
        public class Person  {
            private Long id;
            private String firstName;
            private String lastName;
            private String email;
            private int age;

        }
And that’s how we can go from more than 100 lines of code to just 9 lines. Cool, right?
The code is more clearer and concise that way. As shown above, there is less code to write and maintain. Lombok does not stop here, it can provide more flexibility and readability to our code.
Please keep in mind that @Data annotation is like having the following implicit annotations:
        import lombok.EqualsAndHashCode;
        import lombok.Getter;
        import lombok.RequiredArgsConstructor;
        import lombok.Setter;
        import lombok.ToString;

        @Getter
        @Setter
        @ToString
        @EqualsAndHashCode
        @RequiredArgsConstructor
        public class Person  {
            private Long id;
            private String firstName;
            private String lastName;
            private String email;
            private int age;

        }
Demo
Now, let’s verify if @Data annotation did its job and that everything works as excepeted:
        public class LombokDataTest {
            public static void main(String[] args) {
                // TODO Auto-generated method stub
                Person pers = new Person();

                pers.setId(1L);
                pers.setFirstName("Jean");
                pers.setLastName("Deep");
                pers.setEmail("jean.deep@hotmail.com");
                pers.setAge(25);

                System.out.println("pers Hash Code: "+ pers.hashCode());
                System.out.println("Person Id : "+pers.getId());
                System.out.println("Person First Name : "+pers.getFirstName());
                System.out.println("Person Email : "+pers.getEmail());

                System.out.println(pers.toString());

                Person pers2 = new Person();
                pers.setId(1L);
                pers.setFirstName("Samantha");
                pers.setLastName("Collins");
                pers.setEmail("samantha.bella@gmail.com");
                pers.setAge(30);

                System.out.println("pers2 Hash Code: "+ pers2.hashCode());

                System.out.println("Equals method : "+ pers.equals(pers2));
            }
        }

        # Output :
        pers Hash Code: -1414117140
        Person Id : 1
        Person First Name : Jean
        Person Email : jean.deep@hotmail.com
        Person(id=1, firstName=Jean, lastName=Deep, email=jean.deep@hotmail.com, age=25)
        pers2 Hash Code: 1244954339
        Equals method : false
Static Factory Method Using @Data Annotation
With some adjustments added to our previous example, we can end up with a class that can only be instantiated through a static factory method.
With the help of the staticConstructor attribute, we can tell @Data to generate a private constructor and a public static factory method:
        package com.azhwani;
        import lombok.Data;
        @Data(staticConstructor = "of")
        public class Person  {
            private Long id;
            private String firstName;
            private String lastName;
            private String email;
            private int age;
        }
The name of the static method is “of”. Here the “of” convention is considered a best practice because it is heavily used in the new Java 8 APIs.
That way, we can create our instances using Person.of() instead of new Person().
Please keep in mind that we can also use the old naming conventions such as newInstance.
Demo
        package com.azhwani;
        public class LombokDataStaticFactoryTest {
            public static void main(String[] args) {
                Person ovlperson = Person.of();
                ovlperson.setId(1L);
                ovlperson.setFirstName("Olivia");
                ovlperson.setLastName("Wright");
                ovlperson.setEmail("olivia.queen@yahoo.com");
                ovlperson.setAge(30);

                System.out.println(ovlperson.toString());

                System.out.println("ovlperson Hash Code: "+ ovlperson.hashCode());
                System.out.println("Person Id : "+ovlperson.getId());
                System.out.println("Person First Name : "+ovlperson.getFirstName());
                System.out.println("Person Last Name : "+ovlperson.getLastName());
                System.out.println("Person Age : "+ovlperson.getAge());
            }
        }

        # Output :
        Person(id=1, firstName=Olivia, lastName=Wright, email=olivia.queen@yahoo.com, age=30)
        ovlperson Hash Code: 357966216
        Person Id : 1
        Person First Name : Olivia
        Person Last Name : Wright
        Person Age : 30
Use @Data with Other Annotations
The best thing about the data annotation is its flexibility as it can be used alongside other annotations.
For example, we can use @Data with @Setter(AccessLevel.NONE) to make our class read-only. We can use it also with @AllArgsConstructor to generate an all-args constructor instead of the default required args constructor.
Let’s see how we can use data annotation with @ToString to tell lombok to skip the field names in the implementation of the toString() method:
        @Data
        @ToString(includeFieldNames=false)
        public class Employee {
            private int id;
            private String name;
            private double salary;
        }
includeFieldNames=false simply informs @ToString to omit each field name and display a comma-separated list of all the field values:
        public class Employee  {
            private int id;
            private String name;
            private double salary;
            @Override
            public String toString() {
                return "Employee(" + this.id + ", " + this.name + ", " + this.salary + ")";
            }
        }
Exclude Fields with @Data
By default, @Data includes all the fields when generating getters, setters, and other implementations.
Unfortunately, it does not offer direct support for ignoring and excluding some specific fields.
Though all hope is not lost, we can combine @Data with other lombok specific annotations to address our central question:
        @Data
        public class User {
          private int  id;
          private String login;

          @ToString.Exclude
          private String password;

          @EqualsAndHashCode.Exclude
          @ToString.Exclude
          private boolean enabled;
        }
As shown above, we can use the Exclude parameter to ignore and skip the annotated fields.
Lombok @Data With @Builder
As we have already mentioned in the beginning, @Data generates a required-args constructor.
However, this behavior will change if we add @Builder to the equation.
Using @Data and @Builder annotations together will generate an all-args constructor instead.
The problem here is that most DI Frameworks such as Spring rely on a no-args constructor to initialize objects.
So, a nice workaround to fix this issue would be using the @NoArgsConstructor annotation to generate the default constructor for us.
Lombok will complain if we use @NoArgsConstructor alongside with @Data and @Builder, that’s why we need to add @AllArgsConstructor too.
        @AllArgsConstructor
        @NoArgsConstructor
        @Data
        @Builder
        public class Person  {
            ...
        }
Difference Between @Value and @Data
The big difference between @Value and @Data annotation is that @Value is mainly used to create immutable objects.
@Value is a also an all-in-one annotation that combines: @Getter, @AllArgsConstructor, @ToString and @EqualsAndHashCode and @FieldDefaults(makeFinal = true, level = AccessLevel.PRIVATE).
As we can see @Value, unlike the Data annotation, does not contain @Setter annotation. Omitting setters is the first step for promoting immutability.
@FieldDefaults(makeFinal = true, level = AccessLevel.PRIVATE) allows to mark the fields as private and final.
        package com.azhwani;
        import lombok.Value;

        @Value
        public class Person  {
            private String name;
            private int section;
        }
The Expanded version of the @Value annotation looks like bellow:
        package com.azhwani;
        import lombok.Getter;
        import lombok.ToString;
        import lombok.EqualsAndHashCode;
        import lombok.experimental.FieldDefaults;;
        import lombok.AllArgsConstructor;

        @Getter
        @ToString
        @EqualsAndHashCode
        @FieldDefaults(makeFinal = true)
        @AllArgsConstructor
        public class Student  {
            private String name;
            private int section;
        }
If we de-lombok our class Student, we will get:
        public final class Student {
            private final String name;
            private final int section;

            public Student(String name, int section) {
                this.name = name;
                this.section = section;
            }
            public String getName() {
             return this.name;
            }
            public int getSection() {
                return this.section;
            }
            @Override
            public boolean equals(final Object obj) {
                if (this == obj)
                    return true;
                if (obj == null)
                    return false;
                if (getClass() != obj.getClass())
                    return false;
                Student other = (Student) obj;
                if (name == null) {
                    if (other.name != null)
                        return false;
                } else if (!name.equals(other.name))
                    return false;
                if (section != other.section)
                    return false;
                return true;
            }
            @Override
            public int hashCode() {
                final int prime = 31;
                int result = 1;
                result = prime * result + ((name == null) ? 0 : name.hashCode());
                result = prime * result + section;
                return result;
            }
            @Override
            public String toString() {
                return "Student [name=" + name + ", section=" + section + "]";
            }
        }
Conclusion
That’s all. In this article, we explained in detail what is lombok @Data annotation and how we can use it in our Java projects.
Along the way, we have showcased how to use it with @Builder and explained the core difference between it and the @Value annotation.
I hope you have found this article helpful, enlightening and inspiring to convince you to give lombok a chance to get into your Java development toolset.