Documenting Spring Boot REST API with SpringFox Swagger2
Documenting your API is an essential part for building clean, intuitive and reliable REST APIs! Good documentation can make your API self-explanatory, easy to use, and easy to understand!
In this article, we will cover in-depth how to use Swagger 2 to document a Spring Boot RESTful API.
First, we will implement a simple basic REST API using Spring Boot, JPA/Hibernate, Lombok and MySQL! Then we will integrate Swagger 2 to generate our API docs!
So, let’s get started!
Introduction to SpringFox Swagger2
Swagger is built around OpenAPI specification and has a lot of power when it comes to documenting RESTful APIs!
Over the past few years, Swagger has become one of the most used tools to produce REST APIs documentation! It offers flexibility on several levels and provides both, JSON and UI support!
What about SpringFox ?
Well, SpringFox is the most widely used implementation of Swagger 2.0 specification!
In this tutorial, we are going to use SpringFox implementation to generate our API’s documentation!
Note that, we will be using Swagger, Swagger 2 and SpringFox to refer at the same thing!
Swagger dependencies
To use Swagger2 with Spring Boot REST APIs, you need to add the following dependencies in your pom.xml.
        <dependency>
            <groupId>io.springfox</groupId>
            <artifactId>springfox-swagger2</artifactId>
            <version>2.9.2</version>
        </dependency>
        <dependency>
            <groupId>io.springfox</groupId>
            <artifactId>springfox-swagger-ui</artifactId>
            <version>2.9.2</version>
        </dependency>
springfox-swagger2offers all the features that can be used to generate JSON API documentation for spring based applications.springfox-swagger-uiprovides all the necessary resources required for generating an interactive web interface.
Creating Spring Boot project
In this tutorial, we are going to build a basic RESTful API to manage a list of Posts stored in a MySQL database!
To do that, we are going to use the following technologies:
Java8
Spring Boot
Spring Data
JPA/Hibernate
Lombok
MySQL
Swagger2
Our Spring Boot API will expose the following RESTful endpoints:
GET /api/posts | Display all Posts. |
GET /api/posts/{id} | Get single Post by ID. |
POST /api/posts | Create new Post resource. |
PUT /api/posts/{id} | Update Post details. |
DELETE /api/posts/{id} | Delete Post by ID. |
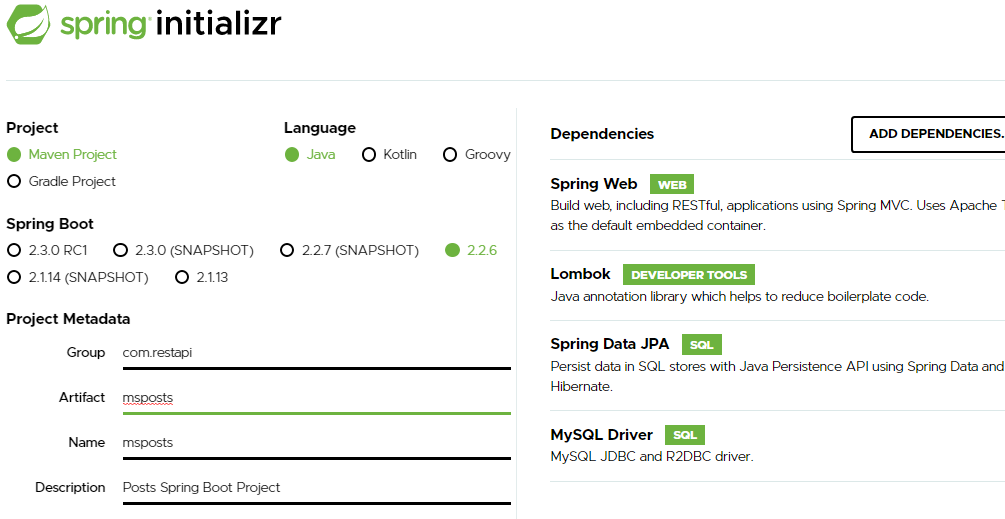
To quickly bootstrap our Spring Boot project, we are going to lean on Spring Initializr!
Open https://start.spring.io/ and fill out all the required details!
Add Spring Web, Lombok, Spring Data JPA dependencies to your project and you are ALL set!
Do not forget to add Swagger2 dependencies to pom.xml file of the generated project!
I assure that you are familiar with how to create a RESTful API with Spring Boot!
So, I’m not going to explain all the technical details because I already did that in a previous post!
pom.xml
        <?xml version="1.0" encoding="UTF-8"?>
        <project xmlns="http://maven.apache.org/POM/4.0.0" xmlns:xsi="http://www.w3.org/2001/XMLSchema-instance" xsi:schemaLocation="http://maven.apache.org/POM/4.0.0 https://maven.apache.org/xsd/maven-4.0.0.xsd">
            <modelVersion>4.0.0</modelVersion>
            <parent>
                <groupId>org.springframework.boot</groupId>
                <artifactId>spring-boot-starter-parent</artifactId>
                <version>2.2.6.RELEASE</version>
                <relativePath/> <!-- lookup parent from repository -->
            </parent>
            <groupId>com.restapi</groupId>
            <artifactId>msposts</artifactId>
            <version>0.0.1-SNAPSHOT</version>
            <name>msposts</name>
            <description>Posts Spring Boot Project</description>

            <properties>
                <java.version>1.8</java.version>
            </properties>

            <dependencies>
                <dependency>
                    <groupId>org.springframework.boot</groupId>
                    <artifactId>spring-boot-starter-data-jpa</artifactId>
                </dependency>
                <dependency>
                    <groupId>org.springframework.boot</groupId>
                    <artifactId>spring-boot-starter-web</artifactId>
                </dependency>
                <dependency>
                    <groupId>mysql</groupId>
                    <artifactId>mysql-connector-java</artifactId>
                    <scope>runtime</scope>
                </dependency>
                <dependency>
                    <groupId>org.projectlombok</groupId>
                    <artifactId>lombok</artifactId>
                    <optional>true</optional>
                </dependency>
                <dependency>
                    <groupId>io.springfox</groupId>
                    <artifactId>springfox-swagger2</artifactId>
                    <version>2.9.2</version>
                </dependency>
                <dependency>
                    <groupId>io.springfox</groupId>
                    <artifactId>springfox-swagger-ui</artifactId>
                    <version>2.9.2</version>
                </dependency>
                <dependency>
                    <groupId>org.springframework.boot</groupId>
                    <artifactId>spring-boot-starter-test</artifactId>
                    <scope>test</scope>
                    <exclusions>
                        <exclusion>
                            <groupId>org.junit.vintage</groupId>
                            <artifactId>junit-vintage-engine</artifactId>
                        </exclusion>
                    </exclusions>
                </dependency>
            </dependencies>

            <build>
                <plugins>
                    <plugin>
                        <groupId>org.springframework.boot</groupId>
                        <artifactId>spring-boot-maven-plugin</artifactId>
                    </plugin>
                </plugins>
            </build>
        </project>
Configure MySQL dataSource
        ## MySQL DataSource
        spring.datasource.url=jdbc:mysql://localhost:3306/postsdb?allowPublicKeyRetrieval=true&useSSL=false&serverTimezone=UTC
        spring.datasource.username=root
        spring.datasource.password=admin@2020@
        ## JPA/Hibernate
        spring.jpa.hibernate.ddl-auto=update
        ## Server Port
        server.port=9009
Create JPA Entity class
        package com.restapi.msposts.models;
        import java.io.Serializable;
        import java.time.LocalDate;
        import javax.persistence.Entity;
        import javax.persistence.GeneratedValue;
        import javax.persistence.GenerationType;
        import javax.persistence.Id;
        import lombok.Getter;
        import lombok.NoArgsConstructor;
        import lombok.Setter;
        import lombok.experimental.Accessors;

        @Entity
        @Getter
        @Setter
        @Accessors(chain = true)
        @NoArgsConstructor
        public class Post implements Serializable{
            private static final long serialVersionUID = 1L;

            @Id
            @GeneratedValue(strategy=GenerationType.IDENTITY)
            private int id;
            private String title;
            private String content;
            private LocalDate publishdate;
        }
Create Post DTO class
        package com.restapi.msposts.dtos;
        import java.time.LocalDate;
        import javax.validation.constraints.FutureOrPresent;
        import javax.validation.constraints.NotBlank;
        import org.springframework.format.annotation.DateTimeFormat;
        import org.springframework.format.annotation.DateTimeFormat.ISO;
        import lombok.Getter;
        import lombok.NoArgsConstructor;
        import lombok.Setter;
        import lombok.experimental.Accessors;

        @Getter
        @Setter
        @Accessors(chain = true)
        @NoArgsConstructor
        public class PostDTO {
            @NotBlank
            private String title;
            @NotBlank
            private String content;
            @DateTimeFormat(iso = ISO.DATE)
            @FutureOrPresent
            private LocalDate publishdate;
        }
Create Post DTO/Entity mapper class
        package com.restapi.msposts.mappers;
        import com.restapi.msposts.dtos.PostDTO;
        import com.restapi.msposts.models.Post;

        public class PostMapper {
            public static Post postDtoTopost(PostDTO postdto) {
                return new Post()
                        .setTitle(postdto.getTitle())
                        .setContent(postdto.getContent())
                        .setPublishdate(postdto.getPublishdate());
            }
            public static PostDTO postToPost(Post post) {
                    return new PostDTO()
                            .setTitle(post.getTitle())
                            .setContent(post.getContent())
                            .setPublishdate(post.getPublishdate());
            }
        }
Create JPA repository interface
        package com.restapi.msposts.repositories;
        import org.springframework.data.jpa.repository.JpaRepository;
        import com.restapi.msposts.models.Post;

        @Repository
        public interface PostRepository extends JpaRepository<Post, Integer> {
        }
Create Spring controller
        package com.restapi.msposts.controllers;

        import java.net.URI;
        import java.util.List;
        import javax.validation.Valid;
        import javax.validation.constraints.Min;
        import org.springframework.beans.factory.annotation.Autowired;
        import org.springframework.http.ResponseEntity;
        import org.springframework.validation.annotation.Validated;
        import org.springframework.web.bind.annotation.DeleteMapping;
        import org.springframework.web.bind.annotation.GetMapping;
        import org.springframework.web.bind.annotation.PathVariable;
        import org.springframework.web.bind.annotation.PostMapping;
        import org.springframework.web.bind.annotation.PutMapping;
        import org.springframework.web.bind.annotation.RequestBody;
        import org.springframework.web.bind.annotation.RequestMapping;
        import org.springframework.web.bind.annotation.RestController;
        import org.springframework.web.servlet.support.ServletUriComponentsBuilder;
        import com.restapi.msposts.dtos.PostDTO;
        import com.restapi.msposts.exceptions.PostNotFoundException;
        import com.restapi.msposts.mappers.PostMapper;
        import com.restapi.msposts.models.Post;
        import com.restapi.msposts.repositories.PostRepository;

        @RestController
        @RequestMapping("/api")
        @Validated
        public class PostController {
            @Autowired
            private PostRepository postRepository;

            // GET ALL POSTS
            @GetMapping(value="/posts")
            List getAll(){
                return postRepository.findAll();
            }
            // GET SINGLE POST BY ID
            @GetMapping(value="/posts/{id}")
            ResponseEntity getById(@PathVariable("id") @Min(1) int id) {
                Post usr = postRepository.findById(id)
                           .orElseThrow(()->new PostNotFoundException("Post with ID : "+id+" Not Found!"));
                return ResponseEntity.ok().body(usr);
            }
            // CREATE NEW POST
            @PostMapping(value="/posts")
            ResponseEntity create( @Valid @RequestBody PostDTO postdto) {
                Post post = PostMapper.postDtoTopost(postdto);
                Post addeduser = postRepository.save(post);
                URI location = ServletUriComponentsBuilder.fromCurrentRequest()
                                    .path("/{id}")
                                    .buildAndExpand(addeduser.getId())
                                    .toUri();
                return ResponseEntity.created(location).build();
            }
            // UPDATE ONE POST DETAILS
            @PutMapping(value="/posts/{id}")
            ResponseEntity update(@PathVariable("id")  @Min(1) int id, @Valid @RequestBody PostDTO postdto) {
                Post ppost = postRepository.findById(id)
                       .orElseThrow(()->new PostNotFoundException("Post with ID : "+id+" Not Found!"));
                Post newpost = PostMapper.postDtoTopost(postdto);
                newpost.setId(ppost.getId());
                postRepository.save(newpost);
                return ResponseEntity.ok().body(newpost);
            }
            // DELETE POST BY ID
            @DeleteMapping(value="/posts/{id}")
            ResponseEntity delete(@PathVariable("id") @Min(1) int id) {
                Post post = postRepository.findById(id)
                        .orElseThrow(()->new PostNotFoundException("Post with ID : "+id+" Not Found!"));
                postRepository.deleteById(post.getId());
                return ResponseEntity.ok().body("Post deleted with success!");
            }
        }
Handle validation errors and exceptions of our REST API
We are not going to dive deep into the exception handling mechanism! I already wrote a complete guide about how to handle REST API exceptions properly, feel free to check it: https://devwithus.com/exception-handling-spring-boot-rest-api/
In this section, we will include only the necessary code required to handle the following exceptions:
PostNotFoundException, raised when the requested Post is not found.
MethodArgumentNotValidException, thrown when a handler method parameter annotated with @Valid is not valid.
ConstraintViolationException occurs when @Validated fails validation.
PostNotFoundException custom class
        package com.restapi.msposts.exceptions;

        public class PostNotFoundException extends RuntimeException {
            public PostNotFoundException(String message) {
                super(message);
            }
        }
ApiError class
        import java.time.LocalDateTime;
        import java.util.List;
        import com.fasterxml.jackson.annotation.JsonFormat;
        import lombok.AllArgsConstructor;
        import lombok.Getter;
        import lombok.Setter;

        @Getter
        @Setter
        @AllArgsConstructor
        public class ApiError {
            @JsonFormat(shape = JsonFormat.Shape.STRING, pattern = "dd-MM-yyyy hh:mm:ss")
            private LocalDateTime timestamp;
            private String message;
            private List<String> errors;
        }
GlobalExceptionHandler class
        package com.restapi.msposts.exceptions;

        import java.time.LocalDateTime;
        import java.util.ArrayList;
        import java.util.List;
        import java.util.stream.Collectors;
        import javax.validation.ConstraintViolationException;
        import org.springframework.http.HttpHeaders;
        import org.springframework.http.HttpStatus;
        import org.springframework.http.ResponseEntity;
        import org.springframework.web.bind.MethodArgumentNotValidException;
        import org.springframework.web.bind.annotation.ControllerAdvice;
        import org.springframework.web.bind.annotation.ExceptionHandler;
        import org.springframework.web.context.request.WebRequest;
        import org.springframework.web.servlet.mvc.method.annotation.ResponseEntityExceptionHandler;
        import com.restapi.msposts.web.ApiError;

        @ControllerAdvice
        public class GlobalExceptionHandler extends ResponseEntityExceptionHandler {
            @Override
            protected ResponseEntity<Object> handleMethodArgumentNotValid(
                    MethodArgumentNotValidException ex,
                    HttpHeaders headers,
                    HttpStatus status,
                    WebRequest request) {
                List<String> details = new ArrayList<String>();
                details = ex.getBindingResult()
                            .getFieldErrors()
                            .stream()
                            .map(error -> error.getObjectName()+ " : " +error.getDefaultMessage())
                            .collect(Collectors.toList());
                ApiError err = new ApiError(LocalDateTime.now(),
                        "Validation Errors" ,
                        details);
                return ResponseEntity.status(HttpStatus.BAD_REQUEST).body(err);
            }
            @ExceptionHandler(ConstraintViolationException.class)
            public ResponseEntity<Object> handleConstraintViolationException(
                    Exception ex,
                    WebRequest request) {
                List<String> details = new ArrayList<String>();
                details.add(ex.getMessage());
                ApiError err = new ApiError(
                        LocalDateTime.now(),
                        "Constraint Violation" ,
                        details);
                return ResponseEntity.status(HttpStatus.BAD_REQUEST).body(err);
            }
            @ExceptionHandler(PostNotFoundException.class)
            public ResponseEntity<Object> handleResourceNotFoundException(
                    PostNotFoundException ex) {
                List<String> details = new ArrayList<String>();
                details.add(ex.getMessage());
                ApiError err = new ApiError(
                        LocalDateTime.now(),
                        "Resource Not Found" ,
                        details);
                return ResponseEntity.status(HttpStatus.NOT_FOUND).body(err);
            }
        }
Integrating Swagger 2 with Spring Boot
SpringFox comes with a handy and great annotation called @EnableSwagger2, the source of ALL Swagger2 magic!
The idea is pretty simple! To enable Swagger 2 integration, you need just to create a new Java @configuration class annotated with @EnableSwagger2!
Swagger basic configuration
Springfox Swagger2 configuration is basically organized around Docket class!
Docket provides us with all the necessary methods we need to easily configure Swagger 2 for our Spring Boot application.
First, let’s define a Docket bean in our configuration class!
        package com.restapi.msposts.docs;
        import org.springframework.context.annotation.Bean;
        import org.springframework.context.annotation.Configuration;
        import springfox.documentation.builders.PathSelectors;
        import springfox.documentation.builders.RequestHandlerSelectors;
        import springfox.documentation.spi.DocumentationType;
        import springfox.documentation.spring.web.plugins.Docket;
        import springfox.documentation.swagger2.annotations.EnableSwagger2;

        @Configuration
        @EnableSwagger2
        public class SpringFoxSwaggerConfig {
            @Bean
            public Docket api() {
                return new Docket(DocumentationType.SWAGGER_2)
                  .select()
                  .apis(RequestHandlerSelectors.any())
                  .paths(PathSelectors.any())
                  .build();
            }
        }
Now, allow me to highlight some of the key elements of our SpringFox configuration class:
select()lets us initialize a class called ApiSelectorBuilder which provides handy methods that can be used to customize Swagger configuration.apis()allows us to filter our API documentation based on some conditions! For example, you can use this method to hide the documentation of a private part of your API.RequestHandlerSelectorsis a predicate (introduced since Java 8) which returns TRUE or FALSE. We used any which always return TRUE. In simple words,RequestHandlerSelectors.any()tells Swagger to document all classes of all packages!paths()provides, with the help ofPathSelectors, another way to control how our API docs will be produced by Swagger2! For example, we can ask Swagger to document only handler methods whose URIs start with /api.
Now, let’s run our application and hit the follwing URL : http://localhost:9009/v2/api-docs
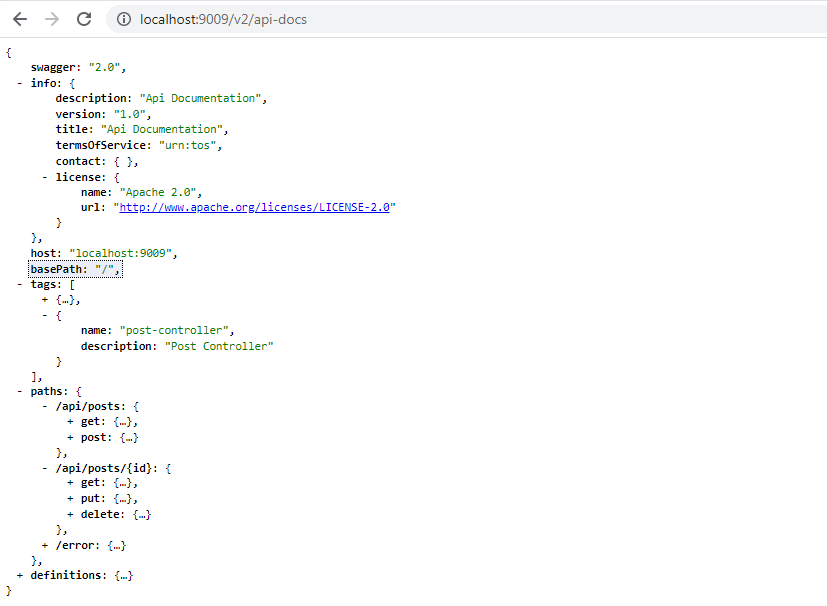
Cool! we have got a complete JSON Swagger documentation for our Spring Boot REST API!
Enabling Swagger UI
Swagger 2 provides a nice built-in web interface that allows API consumers to access Swagger-generated documentation in a more elegant and interactive way.
In order to enable Swagger UI, you need to add springfox-swagger-ui dependency in your pom.xml file.
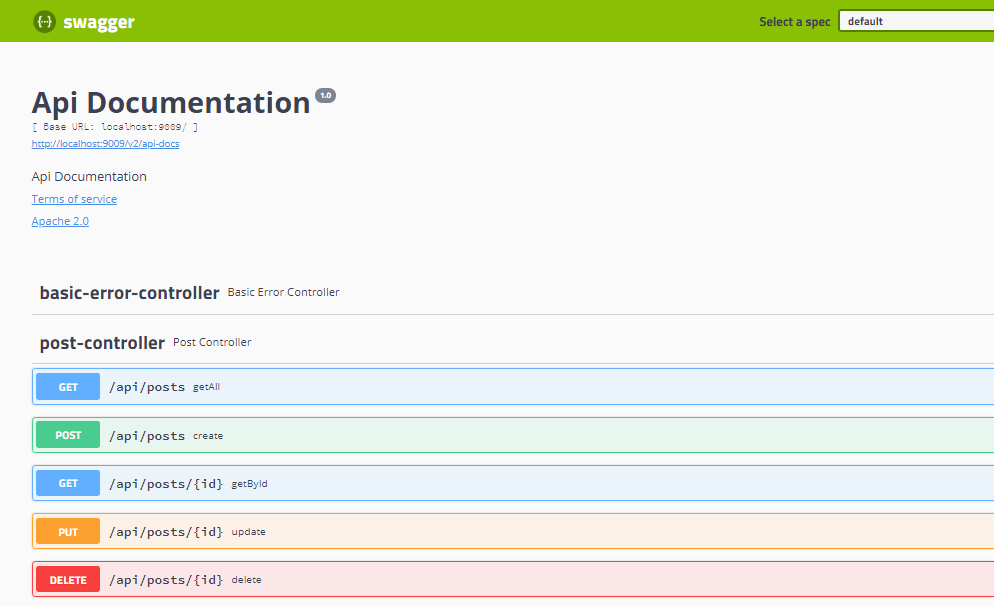
Open http://localhost:9009/swagger-ui.html in your favorite browser and tell me what do you see!
Looks AMAZING, right? A human-readable colorful HTML page! I’m pretty sure you are happy with what you are seeing right now :)
Advanced Swagger2 configuration
Exposing your entire API docs is not always a good idea! So, in this chapter, we are going to discuss how to customize and restrict the logic of generating our REST API documentation!
We will use RequestHandlerSelectors.basePackage() to include only controllers belonging to one particular package - only com.restapi.msposts.controllers package where our controllers live.
We can also tell Swagger to document only RESTful endpoints that are prefixed with /api! We can do that using PathSelectors.ant().
        @Bean
        public Docket api() {
            return new Docket(DocumentationType.SWAGGER_2)
                .select()
                .apis(RequestHandlerSelectors.basePackage("com.restapi.msposts.controllers"))
                .paths(PathSelectors.ant("/api"))
                .build();
        }
Custom API informations
It is always a good practice to add general contact information to your API documentation!
To do so, SpringFox Swagger2 comes with ApiInfo class to help you provide relevant details about your API such as title, website, email, author …
        @Bean
        public Docket api() {
            return new Docket(DocumentationType.SWAGGER_2)
              .select()
              .apis(RequestHandlerSelectors.basePackage("com.restapi.msposts.controllers"))
              .paths(PathSelectors.ant("/api"))
              .build()
              .apiInfo(metaData());
        }

        private ApiInfo metaData() {
            ApiInfo apiInfo = new ApiInfo(
                    "MS Posts : Spring Boot REST API",
                    "Spring Boot REST API for Posts management",
                    "1.0",
                    "Terms of service",
                    new Contact("Azhwani", "https://devwithus.com", "azhwani@devwithus.com"),
                    "Apache License Version 2.0",
                    "https://www.apache.org/licenses/LICENSE-2.0",new ArrayList<VendorExtension>());
            return apiInfo;
        }
Now, let’s restart our application and see what will happen!

As you can see, our API documentation is populated with all the information we have already specified using ApiInfo!
Documenting Spring Boot API using Swagger 2 annotations
In this section, we are going to talk about some of the important annotations provided by SpringFox Swagger2 to enhance our Spring Boot API documentation.
Document controllers using Swagger 2
SpringFox provides many built-in annotations that you can use to decorate your RESTful controllers or their handler methods!
Each annotation lets us add some extra metadata and describe the purpose of the marked element!
@Api allows us to describe the purpose of a particular controller.
@ApiOperation lets you add a short description to a specific handler method.
@ApiParam is used to specify some details about the marked request parameter.
@ApiResponse is used to document HTTP responses.
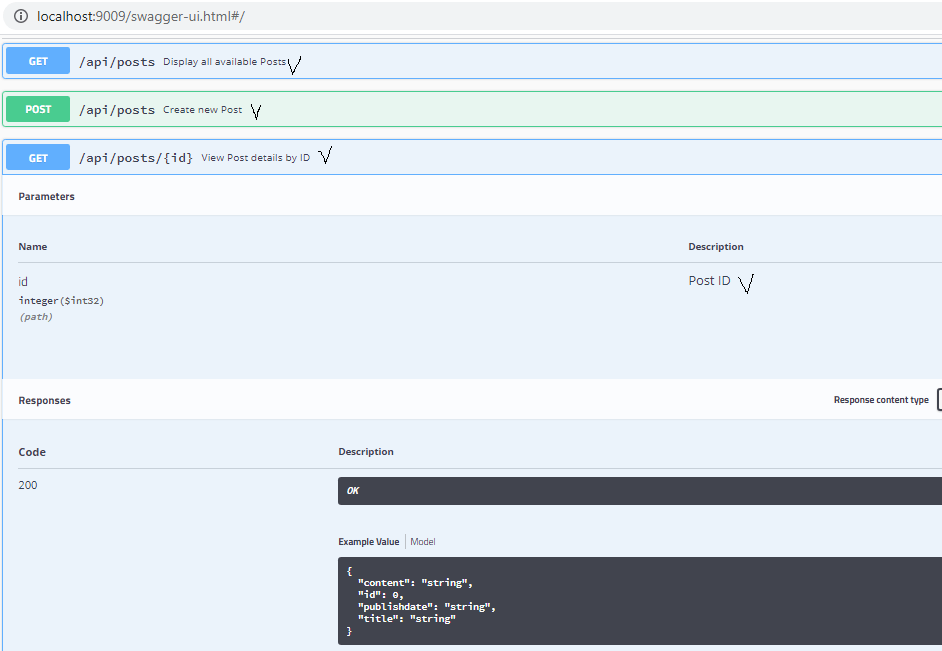
The following is the complete code of PostController that includes SpringFox annotations:
        @RestController
        @RequestMapping("/api")
        @Validated
        @Api(value = "Post MicroService", description = "MicroService For Posts Management")
        public class PostController {

            @Autowired
            private PostRepository postRepository;

            // GET ALL POSTS
            @ApiOperation(value = "Display all available Posts", response = Iterable.class)
            @GetMapping(value="/posts")
            List getAll(){
                return postRepository.findAll();
            }
            // GET SINGLE POST BY ID
            @ApiOperation(value = "View Post details by ID", response = Post.class)
            @GetMapping(value="/posts/{id}")
            ResponseEntity getById(@ApiParam(value = "Post ID") @PathVariable("id") @Min(1) int id) {
                Post usr = postRepository.findById(id)
                           .orElseThrow(()->new PostNotFoundException("Post with ID : "+id+" Not Found!"));
                return ResponseEntity.ok().body(usr);
            }
            // CREATE NEW POST
            @ApiOperation(value = "Create new Post")
            @PostMapping(value="/posts")
            ResponseEntity create(@ApiParam(value = "Post DTO instance") @Valid @RequestBody PostDTO postdto) {
                Post post = PostMapper.postDtoTopost(postdto);
                Post addeduser = postRepository.save(post);
                URI location = ServletUriComponentsBuilder.fromCurrentRequest()
                                    .path("/{id}")
                                    .buildAndExpand(addeduser.getId())
                                    .toUri();
                return ResponseEntity.created(location).build();
            }
            // UPDATE ONE POST DETAILS
            @ApiOperation(value = "Update Post details by ID")
            @PutMapping(value="/posts/{id}")
            ResponseEntity update(@ApiParam(value = "Post ID") @PathVariable("id")  @Min(1) int id, @ApiParam(value = "Post DTO instance") @Valid @RequestBody PostDTO postdto) {
                Post ppost = postRepository.findById(id)
                       .orElseThrow(()->new PostNotFoundException("Post with ID : "+id+" Not Found!"));
                Post newpost = PostMapper.postDtoTopost(postdto);
                newpost.setId(ppost.getId());
                postRepository.save(newpost);
                return ResponseEntity.ok().body(newpost);
            }
            // DELETE POST BY ID
            @ApiOperation(value = "Delete Post by ID")
            @DeleteMapping(value="/posts/{id}")
            ResponseEntity delete(@ApiParam(value = "Post ID") @PathVariable("id") @Min(1) int id) {
                Post post = postRepository.findById(id)
                        .orElseThrow(()->new PostNotFoundException("Post with ID : "+id+" Not Found!"));
                postRepository.deleteById(post.getId());
                return ResponseEntity.ok().body("Post deleted with success!");
            }
        }
Swagger annotations for domain models
SpringFox offers also several annotations that can be used to describe and add additional information about your domain models.
@ApiModel is used to describe your domain model.
@ApiModelProperty allows us to include some extra details about specific properties.
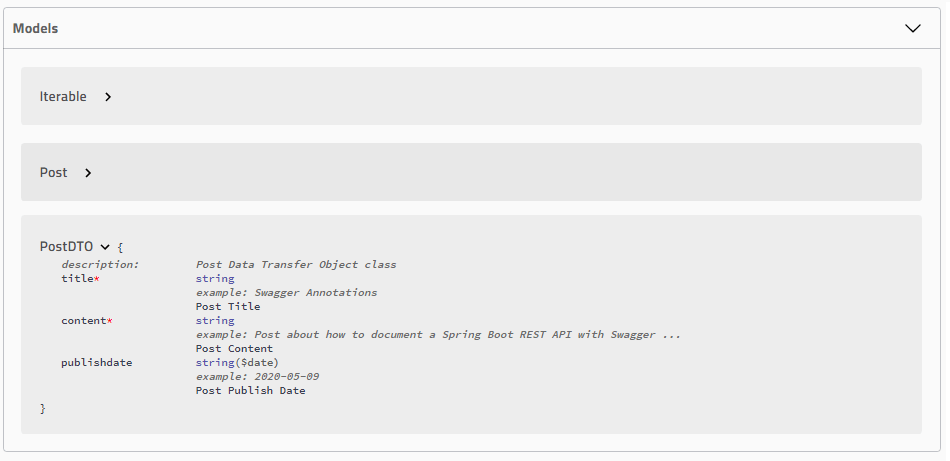
Let’s try to use @ApiModel and @ApiModelProperty annotations in our PostDTO class:
        @ApiModel(description = "Post Data Transfer Object class")
        @Getter
        @Setter
        @Accessors(chain = true)
        @NoArgsConstructor
        public class PostDTO {
            @ApiModelProperty(notes = "Post Title", required = true, example = "Swagger Annotations",  position = 0)
            @NotBlank
            private String title;
            @ApiModelProperty(notes = "Post Content", required = true, example = "Post about how to document a Spring Boot REST API with Swagger ...", position = 1)
            @NotBlank
            private String content;
            @ApiModelProperty(notes = "Post Publish Date",example = "2020-05-09", position = 2)
            @DateTimeFormat(iso = ISO.DATE)
            @FutureOrPresent
            private LocalDate publishdate;
        }
Swagger2 and Beans Validation API
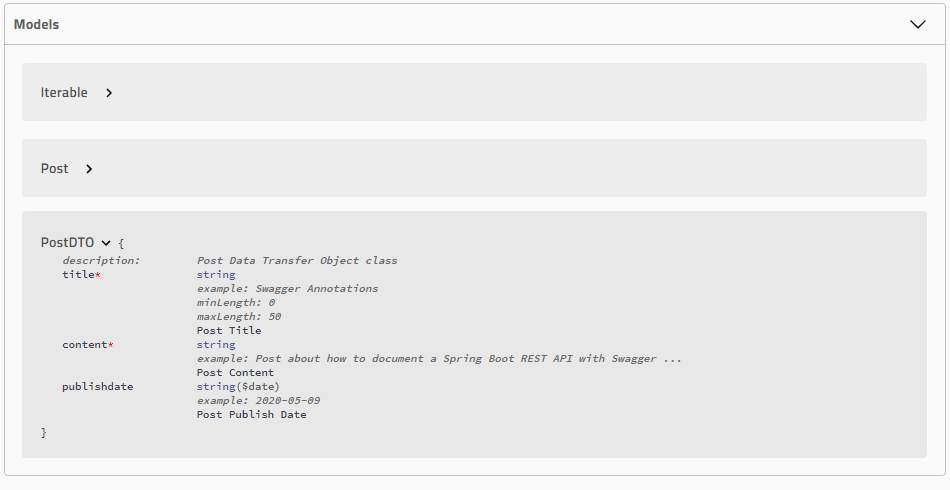
Unfortunately, SpringFox Swagger2 cannot detect JSR-303 annotations automatically! However, the good news is that, there is a workaround!
In order to make SpringFox include JSR-303 annotations in our API docs, we need to do two things:
- include
springfox-bean-validatorsdependency in pom.xml file:
        <dependency>
           <groupId>io.springfox</groupId>
           <artifactId>springfox-bean-validators</artifactId>
           <version>2.9.2</version>
        </dependency>
- import
BeanValidatorPluginsConfigurationinto SpringFox Swagger2 configuration class:
        @Configuration
        @EnableSwagger2
        @Import(BeanValidatorPluginsConfiguration.class)
        public class SpringFoxSwaggerConfig {
            ...
        }
Now, let’s decorate title field of our PostDTO class with @Min annotation!
        @Size(max = 50)
        private String title;
Conclusion
That’s all folks! You have learned how to document your Spring Boot REST API with SpringFox Swagger2!
You can find the complete code of this tutorial in our Github repository: https://github.com/devwithus/msposts
Take care and stay SAFE!
