Guide to Java Update Windows 10
In this tutorial, we are going to cover in-depth how to update java on windows 10.
First, we will shed light on how to update Java to a newer version. Then, we are going to explain how to downgrade Java on Windows 10.
How to Update Java on Windows 10
It’s very important to keep any installed software up to date on our machine. Updating Java regularly with the latest versions can help us enhance and improve performance and security.
Before diving deep into how to update Java, we need first to make sure that Java is already installed. Our article on how to install Java on Windows 10 does a great job in covering this topic.
Next up, we need to know which version is installed. To do so, open a terminal and type java -version:
        C:\Users\Asus>java -version
        java version "16.0.1" 2021-04-20
        Java(TM) SE Runtime Environment (build 16.0.1+9-24)
        Java HotSpot(TM) 64-Bit Server VM (build 16.0.1+9-24, mixed mode, sharing)
As we can see, we have installed Java 16.0.1. Now that we know which version is installed, let’s see how to update Java on Windows 10.
In general, there are three ways to do this:
Using Java Control Panel
Using auto-update mechanism
Uninstall the installed version and install the new one
Let’s explore in detail each method.
Update Using Java Control Panel
Java Control Panel provides a handy way to upgrade Java. Follow these steps to open the Java Control Panel window.
First, type Configure Java in the search box. Then, click on the result icon.
Next, navigate to the update tab and click on the Update Now button to upgrade Java to a newer version.
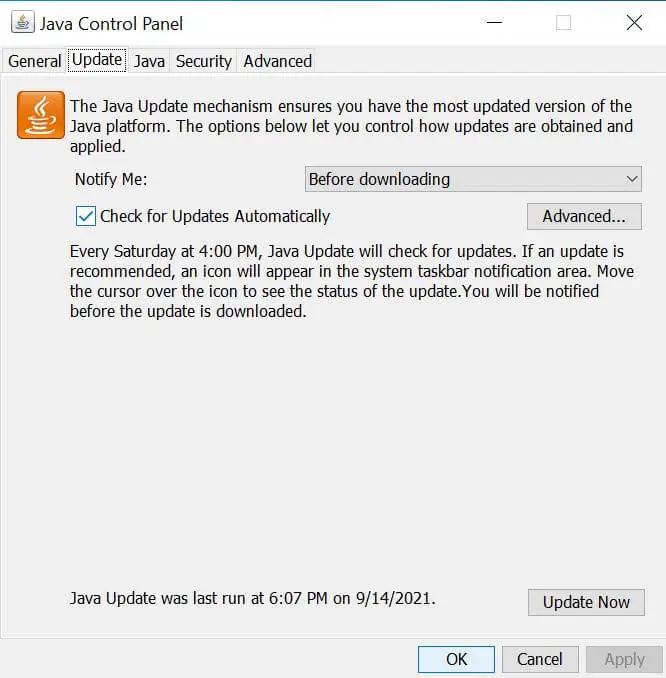
Finally, follow the provided instructions to complete the Java update process.
Update Java Using auto-update
The best way to launch a Java update on Windows 10 is to use the auto-update mechanism.
Auto-update helps keep the system in tip-top condition. So, installing Windows updates from time to time keeps Java up to date.
Please bear in mind that we can disable Java automatic update.
Downgrade Java on Windows 10
Sometimes, we need to install an older version of Java to address some compatibility issues.
The most straightforward possible way to downgrade our Java is to download and install the version we want from scratch.
For example, if we want to downgrade Java from 11 to 8, we need to uninstall the 11th version and install the 8th.
However, we need to keep in mind that installing an old Java version presents a serious security risk. So, we need always to make sure that our Java version is up to date.
Conclusion
To sum it up, we explored different ways to update Java on Windows 10. We have seen how to do this using the Java Control Panel Window.
Along the way, we have explained the importance of the Windows auto-update and how to downgrade Java.