Introduction to Spring Boot
Spring Boot is basically an extension that is built on top of Spring Framework! It aims, in particular, to reduce the time allocated to set up and configure a new application in order to make Spring easier to use!
In this write-up, I will try to explain in details what is Spring Boot and its main features! I will try also to clarify the difference between Spring boot and Spring Framework!
Let’s get started!
Difference between Spring and Spring Boot!
Spring is an open source Java Framework that provides multiple modules like Spring MVC, Spring Batch, Spring Securiry, Spring Data… packed with several great features like inversion of control, dependency injection and loose coupling to simplify the development process of your application!
Unfortunately, spring requires a lot of configuration work that you need to do it manually by yourself.
Working with many modules can make your application dense with numerous Java configuration classes or XML files!
This is one of the main spring drawbacks that Spring Boot solves for you.
To sum things up, Spring boot can be seen as another Spring module, introduced to reduce the boilerplate configuration in order to allow developers focus on the application logic rather than configuration tasks!
What are Spring Boot features?
Spring and Spring MVC are great tools that can come handy if you are looking to develop a web based application. However, as I mentioned above, one of their biggest problems is the configuration!
If you have already developed an application using spring MVC, then you have already noticed that your application is loaded with many XML files and/or Java configuration classes that bring no real value to the business side of your application! Right ?
They do nothing but to configure the dispatcher servlet, the view resolver …
            <mvc:annotation-driven />
            <context:component-scan base-package="com.azhwani.springmvc" />
            <mvc:resources mapping="/resources/**" location="/resources/" />
            <bean id="viewResolver"
                  class="org.springframework.web.servlet.view.InternalResourceViewResolver">
                <property name="prefix" value="/WEB-INF/views/" />
                <property name="suffix" value=".jsp" />
            </bean>
Configuration can become a real challenge if you are developing a complex application! This is where SpringBoot comes to rescue!
To bootstrap your application with almost zero configuration, Spring Boot provides 2 main features:
Autoconfiguration
Starters
Auto Configuration
Generally speaking, If we want to create a web application with Spring and Hibernate, we need to add the following dependencies: Spring core, Spring MVC, Hibernate, H2, Jackson …We need also to create some configuration files such as :
spring.xml
spring-mvc.xml
persistence.xml
Since you don’t necessarily know the syntax of the these files by heart! You need to consult every time the documentation or your old projects to add the exact configuration that wires successulfly the necessary spring beans to the application context.
Things surely get more complicated if you are working on a medium to big sized project!
So, this is where autoconfiguration feature comes to rescue!
Auto-configuration is the most important feature provided by Spring Boot. It allows to automatically configure your application based on the jars that are presents in the Classpath.
In other words, SpringBoot will scan your imported dependencies to produce the configuration needed to bootstrap your application!
All you need to do is just mark you main class with @EnableAutoConfiguration annotation to enable auto-configuration feature! Cool, right ?
Spring boot provides also @SpringBootApplication annotation that does much more than what @EnableAutoConfiguration does! It is actually a combination of three annotations:
@Configuration : allows to enbale Java based configuration!
@ComponentScan : enables compoent-scan feature.
@EnableAutoConfgiuration : enables auto-configuration feature.
        package com.azhwani.springboot;
        import org.springframework.boot.SpringApplication;
        import org.springframework.boot.autoconfigure.SpringBootApplication;
        // same as @Configuration @EnableAutoConfiguration @ComponentScan
        @SpringBootApplication
        public class MySpringBootApplication {
            public static void main(String[] args) {
                SpringApplication.run(MySpringBootApplication.class, args);
            }
        }
Spring Boot starters
No one can disagree with the fact that dependency management can turn into a real nightmare if your project requires many dependencies!Won’t you agree that it would be nice if there is a simple way to manage all the dependencies! This is where starters come into picture!
Starters complete the autoconfiguration feature! They are introduced to address the complexity of dependencies management and reduce the number of manually added dependencies just by adding one fat dependency called starter!
A starter brings to your project a set of ready-in-use convenient dependencies that are commonly used together!
For example, instead of manually adding the following dependencies: Spring, Spring MVC, Jackson (JSON provider)… to develop a web application, you can just add the web starter as in the following example:
        <dependency>
            <groupId>org.springframework.boot</groupId>
            <artifactId>spring-boot-starter-web</artifactId>
        </dependency>
Another great advantage is the version management. You are not required anymore to search for which versions are compatible and then add them one by one in pom.xml!
Of course, spring-boot-starter-web is not the only available starter. Depending on what you plan to develop, you will always find a suitable starter. Here are some examples :
| spring-boot-starter-mail | For spring Framework's email sending support. |
| spring-boot-starter-data-jpa | For using Spring Data JPA with Hibernate |
| spring-boot-starter-jersey | For building RESTful web applications using JAX-RS and Jersey. |
| spring-boot-starter-test | For testing purpose using JUnit, Hamcrest and Mockito. |
| spring-boot-starter-thymeleaf | For building MVC web applications using Thymeleaf |
| spring-boot-starter-batch | To support batch processing |
For more details about other starters you can check the following link : https://docs.spring.io/spring-boot/docs/current/reference/htmlsingle/#using-boot-starter
Scaffolding your first Spring boot application
In software development context, scaffolding is the name given to tools that are used to generate a standard prototype for your project with all the necessary files and build tools, in order to ease the bootstrapping of a new project!
Spring Boot team provides multiple ways to quickly create and bootstrap your application.
Spring Initializr
Spring Boot CLI
Spring Initializr
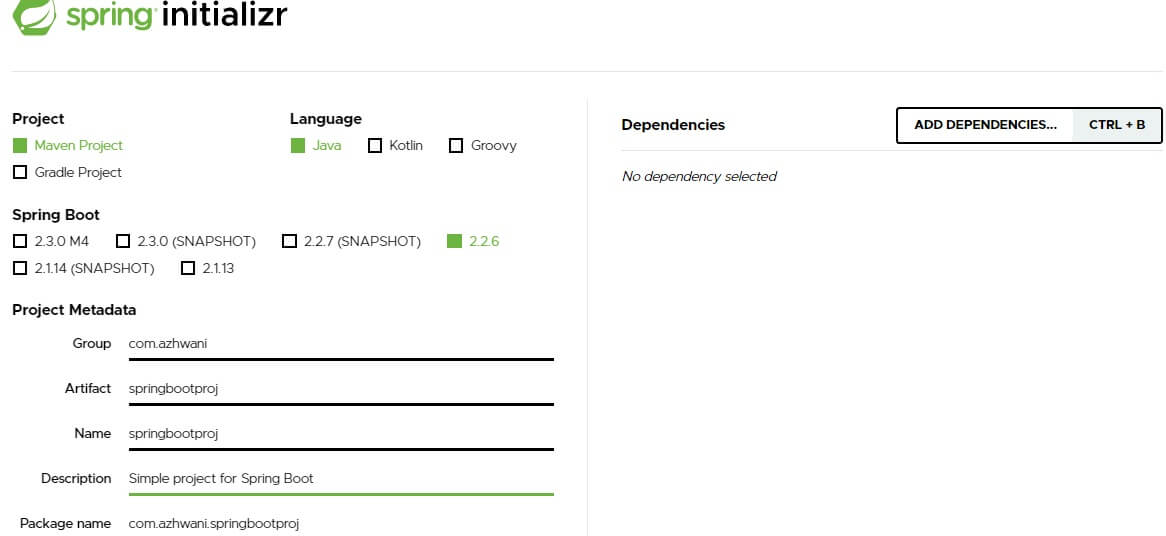
Spring Initializr is a web based application hosted on http://start.spring.io. It is the easiest way to quickly create your project.The tool has a great user friendly web interface! All you need to do is just enter your project details and all the required dependencies.
The tool will generate everything for you and ask you to download a zip file containing a skeleton project based on the details you have entered!

You can follow these steps to generate a new project using Spring Initializr:
Visit http://start.spring.io.
Select Maven or Gradle as dependency management system. Maven is the default one.
Select your programming language : Java, Kotlin or Groovy. Java is the default one.
Select a version. The last stable release is always the default version.
Enter project metadata : group, artifact, name, description, package …
Select packaging option: JAR or WAR, JAR is default value.
Search and add all the dependencies you want in the Dependencies section.
Click Generate button to generate and download your project as a zip file.
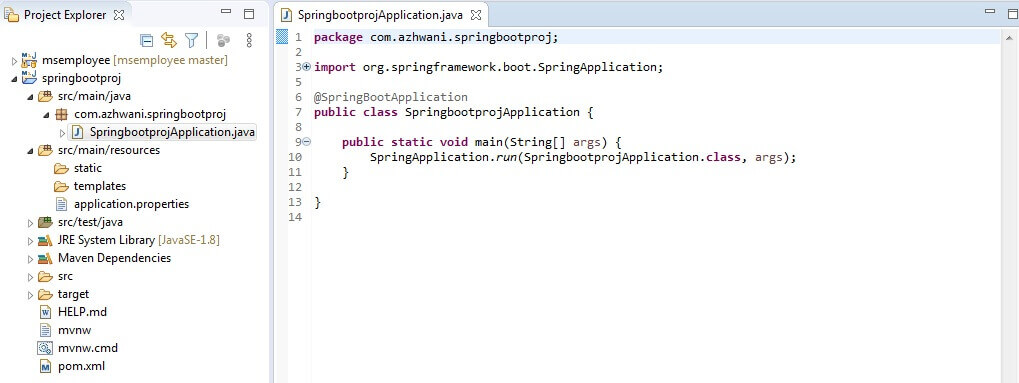
Once the zip file is downloaded, you can unzip it and import it in your favorite IDE - Eclipse in my case, as an existing Maven projet - and start working!

WOW! As you can see! The generated project with Spring Initializr has everything that is needed to get started.
The application should start running without any error! If you get an error in pom.xml, just do a right click on the project and then a ‘Maven -> Update project’ ;)
Spring Boot CLI
Spring Boot CLI, as the name implies, is a command line tool that can help you prototype your Spring applications.You do not need to use CLI to work with Spring Boot, but it is definitely the fastest way to bootstrap a new application.
You can visit this officiel link to check how to install Spring Boot CLI in your machine.
Once installed, you can type spring –version to confirm the installation and spring –help to see what you can do with CLI!
        C:\Users\azhwani>spring --version
        Spring CLI v2.3.0.BUILD-SNAPSHOT
        C:\Users\azhwani>
        C:\Users\azhwani>spring --help
        usage: spring [--help] [--version]
             []

        Available commands are:

          run [options] <files> [--] [args]
            Run a spring groovy script

          grab
            Download a spring groovy script's dependencies to ./repository

          jar [options] <jar-name> <files>
            Create a self-contained executable jar file from a Spring Groovy script

          war [options] <war-name> <files>
            Create a self-contained executable war file from a Spring Groovy script

          install [options] <coordinates>
            Install dependencies to the lib/ext directory

          uninstall [options] <coordinates>
            Uninstall dependencies from the lib/ext directory

          init [options] [location]
            Initialize a new project using Spring Initializr (start.spring.io)

          encodepassword [options] <password to encode>
            Encode a password for use with Spring Security

          shell
            Start a nested shell

        Common options:

          --debug Verbose mode
            Print additional status information for the command you are running

        See 'spring help ' for more information on a specific command.

        C:\Users\azhwani>
To create and initialize a new spring boot project, you need to use init command which uses internally Spring Initializr web app to generate and download the project!
spring help init lists of the available options that you can use with init command.
        C:\Users\azhwani>spring help init
        spring init - Initialize a new project using Spring Initializr (start.spring.io)

        usage: spring init [options] [location]

        Option                          Description
        ------                          -----------
        -a, --artifactId        Project coordinates; infer archive name (for example 'test')
        -b, --boot-version      Spring Boot version (for example '1.2.0.RELEASE')
        --build                 Build system to use (for example 'maven' or 'gradle') (default: maven)
        -d, --dependencies      Comma-separated list of dependency identifiers to include in the generated project
        --description           Project description
        -f, --force             Force overwrite of existing files
        --format                Format of the generated content (for example 'build' for a build file, 'project' for a project archive) (default: project)
        -g, --groupId           Project coordinates (for example 'org.test')
        -j, --java-version      Language level (for example '1.8')
        -l, --language          Programming language  (for example 'java')
        --list                  List the capabilities of the service. Use it to discover the dependencies and the types that are available
        -n, --name              Project name; infer application name
        -p, --packaging         Project packaging (for example 'jar')
        --package-name          Package name
        -t, --type              Project type. Not normally needed if you use --build and/or --format. Check the capabilities of the service (--list) for more details
        --target                URL of the service to use (default: https://start.spring.io)
        -v, --version           Project version (for example '0.0.1-SNAPSHOT')
        -x, --extract           Extract the project archive. Inferred if a location is specified without an extension

        examples:

            To list all the capabilities of the service:
                $ spring init --list

            To creates a default project:
                $ spring init

            To create a web my-app.zip:
                $ spring init -d=web my-app.zip

            To create a web/data-jpa gradle project unpacked:
                $ spring init -d=web,jpa --build=gradle my-dir
Let’s try to generate a new maven web application with thymeleaf dependency using init command:
        C:\Users\azhwani>spring init -n=demo -d=web,thymeleaf --package-name=com.azhwani
        Using service at https://start.spring.io
        Content saved to 'demo.zip'
        C:\Users\azhwani>
Simple and easy! Right ?

Packaging Spring boot application
Spring boot applications are typically bundled and shipped as single fat JAR or WAR file which includes all of your module/service’s dependencies!
Packaging is the process that packages your application in a single, runnable fat JAR or WAR file! The default packaging is set to JAR.
JAR file includes all the libraries, resources, and metadata files and can be deployed in embedded servers.
WAR file can be deployed to any servlet container out there such as Tomcat or Jetty…
How can you package your spring boot application?
Well, All you need to do is to choose the packaging option you want! You can declare the packaging type in pom.xml!
        <packaging>jar</packaging>
        or
        <packaging>war</packaging>
Summing up:
Spring Boot is a micro framework that allows you to quickly bootstrap Spring based applications using : autoconfiguration and starters concepts!
To enable auto-configuration feature, you can use @EnableAutoConfiguration annotation.
Starters allow to import a set of convenient dependencies in order to set up and configure your application quickly.
