What is Spring Bean ?
They say: A journey of a thousand miles begins with a single step! I say mastering spring framework begins with understanding what is spring bean! This is for me the halfway!
Spring beans, as the documentation says, are the objects that form the backbone of your spring application!
From a technical point of view, spring bean is a simple object which is created, managed and destroyed by spring container. Simple, right?
So, in this article, we will talk about what is exactly a bean in spring in detail. We will discuss in depth everything you need to know about spring beans backed with examples for a clear understanding.
So, let’s start!
What is spring container?
In short, a container literally, has the meaning of something that contain something else! Technically, it describes any component that provide an infrastructure to other components.
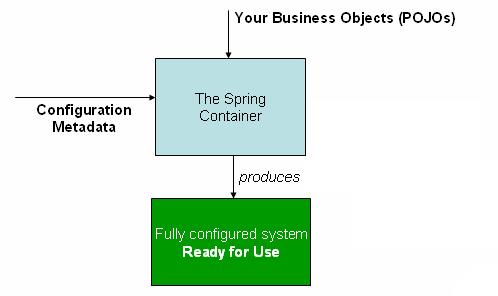
Spring container or IoC is at the heart of the spring framework, it is responsible for managing the complete lifecycle of every bean from creation to destruction!
What is the purpose of Inversion of Control:
Before digging into the definition of IoC, let’s consider the following example:
We suppose that we have two domain classes, User and Address declared as bellow:
        public class Address {
            private String street;
            private String city;
            public Address() {
            }
            // Address Getters + Setters
        }
        public class User {
            private String login;
            private String password;
            private Address address;
            public User() {
            }
            public User(String login, String password, Address address) {
                this.login    = login;
                this.password = password;
                this.address  = address;
            }
            //User Getters + Setters
        }
Now, let’s try to create a User object using the traditional approach:
        Address address = new Address("AVN Street 300", "New York");
        User user = new User("Sofia","Smith",address);
You may be asking what is wrong with that approach? Well, I can assure you, there is nothing wrong!
Remember, doing all the job yourself is not always the best way to get things done!
What I did in the above example is just following exactly the natural order of java programming:
- Create an Address object using new operator.
- Create a User object using new operator.
- Fill out the dependency between User and Address classes by passing Address object to the Employee constructor.
What do you say, if I tell you that there is a better way to manage your business objects? A way that says, just give me the objects you want to manage and I will do all the work for you with a happy face :)
Any real world application has hundreds even thousands of classes! Doing all the work by yourself to create all the required objects and dependencies can turn to a real nightmare!
This is where Inversion of control comes to rescue!
Instead of creating your object using new operator, a magical container - referred as the IoC container- will provide it for you! Wow
Instead of constructing your bean dependencies, IoC container will retrieve them for you!
What you need to do is just define your business objects and provide them to the container!
Spring bean configuration!
As I mentioned earlier in the introduction, every bean in spring is managed by IoC container, but wait! How can spring know the list of objects to manage from others?
Well, you tell the container everything it needs to know by providing what’s called: Bean definition.
How to define a bean in spring?
Bean definition describes in details how the bean will be managed by the container! It contains all the necessary configuration metadata needed to help spring IoC knows the following points:
- How a bean should be created.
- Life cycle details.
- Required dependencies.
Different ways to define a spring bean:
In general, spring framework suggests two simple ways to define a managed bean:
Using annotations:
- Spring beans can be declared using stereotype annotations.
- A bean in spring can be defined inside a method annotated with @Bean.
Using XML:
- Specify bean definition in an XML configuration file. Old fashion!
Maybe, you are wondering now which is the perfect approach! Well, the answer is not simple! Each method has its advantages and disadvantages, it is up to you to choose which approach suits you better.
For me, I prefer annotations over XML, because I believe they are simple and easy to use! Another reason is that annotations based config is the direction the spring is moving now! (Spring boot is the new thing)
Bean annotations in spring
Spring introduces bean annotations to simplify and minimize XML configuration files! They provide a flexible and clean way to define and declare spring beans!
You can use the following stereotype annotations to declare a bean in spring!
| @Component | Generic annotation which indicates that a java class is a bean! with the help of auto scan mechanism, spring picks it up and register it in the context! |
| @Repository | This annotation is used to indicate that a class is a repository: Provides exception translation support for persistence operations! |
| @Service | This annotation is basically used for classes which hold business logic in the service layer! It gives a logical sense that a class is a service! |
| @Controller | a stereotype used at class level in spring MVC! It marks a class as a spring web controller, responsible to handle HTTP request! |
If a java class is annotated with one of the above stereotype annotations and if the component-scan is enabled, then spring will automatically detect it and register it in the context! Awesome, right?
To enable component scanning mechanism, you can use @ComponentScan annotation in java configuration or component-scan tag in XML based configuration.
Let’s try to define a spring bean using stereotype annotations!
        @Component
        public class Student {
            private int Id;
            private String firstname;
            private String lastname;
            private String email;
            public Student() {
            }
            // Getters + Setters
        }
You can also use @Bean to declare a bean in spring! @Bean annotation is used at method level to indicate that the annotated method will simply return a new instance that should be registered as a spring managed bean!
@Configuration annotation is used at class level to indicate that the class will be used as a source of bean definitions.
Here is a sample example on how to declare a bean using @Bean annotation:
        @Configuration
        public class SpringConfig {
            @Bean
            public Student studentBean() {
                return new Student();
            }
            @Bean
            public Employee employeeBean() {
                return new Employee();
            }
            // Other spring beans ...
        }
XML based bean definition
If you don’t like annotations or java based configuration, spring framework allows also to use XML to write bean definitions.
The concept of using XML to define beans is called: XML based configuration!
All spring beans must be configured inside a top level element <beans> and each managed bean must be defined in a child tag: <bean>.
Let’s see how we can define a spring bean using XML-based configuration:
        <beans>
            <bean
                id="studentBean"
                class="com.azhwani.beans.Student" />
            <bean
                id="employeeBean"
                class="com.azhwani.beans.Employee" />
        </beans>
Splitting the main configuration into several separate files is particularly useful if the size of the configuration file becomes too large to handle.
Spring bean properties
Normally when we write a bean definition, we define what’s called bean properties! These properties, simply give details about how spring container should manage the defined object.
The following are some key bean properties you should know:
class: This attribute is mandatory, it indicates the concrete java class which will be used to create the bean.
id: This property represents the unique bean identifier, each bean managed by the container must have at least one unique identifier across the whole application context!
name: It provides another way to specify bean identifier! The bean will be identified by a name! Spring uses id/name attributes to identify the beans.
Scope: This property is used to define the scope of the bean object! Spring provides some values that you can use to define the bean scope attribute, we will discuss them in details later.
Property: This attribute is mainly used to manage and specify bean dependencies and their values through setter methods!
initialization: It describes the initialization mode, it tells spring container how to initialize a bean! It specifies whether a spring bean is lazily or eagerly initialized!
How to define multiple beans of the same class?
Sometimes under certain conditions, we are required to define several beans of the same class! I know, it is a rare situation!
You may be wondering, how we can register multiple beans of the same class in spring context? Well, the answer is so simple, you can do it with the help of name attribute of @Bean annotation!
        @Configuration
        public class MyBeansConfig {
            @Bean(name="simpleBeanA")
            public SimpleBean simpleBeanA() {
                return new SimpleBean();
            }
            @Bean(name="simpleBeanB")
            public SimpleBean simpleBeanB(){
                return new SimpleBean();
            }
        }
How does IoC create bean instance?
When you start a spring based application, spring framework firstly creates IoC container!
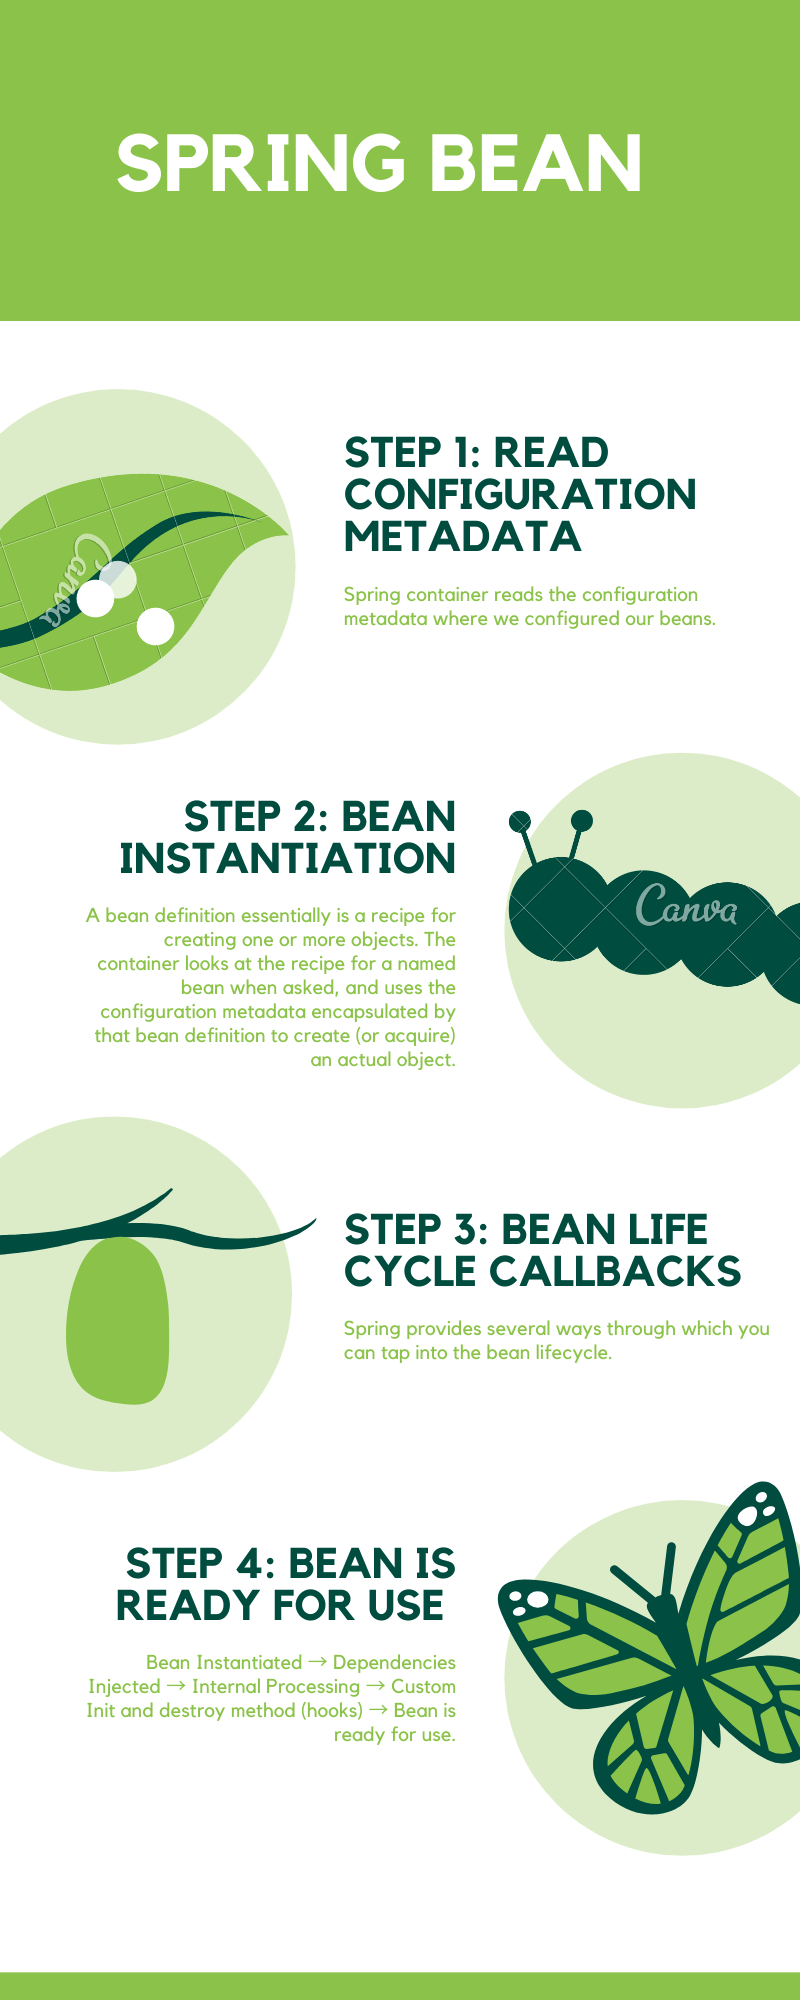
Once the container is created, it reads the configuration metadata provided in Java or XML, then it starts instantiating the required beans based on bean properties and their dependencies.
Bean dependencies
As you might know, every small or large spring application has its own graph of managed beans that work together to implement all the functionalities we want! But, how beans can work together?
Well, In Object-oriented application, objects can communicate with each other using dependencies!
In general, you create a dependency when you define an object of a class as a data member in another class!
        public class Address {
            private String street;
            private String city;
            public Address() {
            }
            // Getters + Setters
        }
        public class Employee {
            private String firstname;
            private String lastname;
            // Dependency
            private Address address
            public Employee() {
            }
            // Getters + Setters
        }
How to define a bean dependency?
The real magic of spring framework lies in the fact that, we don’t have to think about how to create objects or how to manage all the dependencies between them! Spring does all of that for you.
Well, bean dependency is one of the most complex topic in spring, so we cannot cover all the details in this article, we will try to dedicate a separate article for it later!
So, Let’s see in general how to define a bean dependency in spring:
        @Component
        public class Employee {
            private Address address;
            public Employee(Address address) {
                this .address = address;
            }
        }
Spring uses constructor arguments as bean dependencies! The Employee bean depends on Address, so to define this dependency, we simply pass an instance of Address class as a parameter to the Employee constructor!
The same rule applies for the bean defined using @Bean annotation! You need just to put your dependency as a method parameter! Easy, right?
        @Bean
        public Employee empBean(Address address) {
            return new Employee(address);
        }
Bean scope in spring
In Spring framework, scope enables to apply visibility to a bean, it defines how the bean instances will be created by spring IOC container!
The following are the built-in scope values which are supported by spring 5.2.x:
| Scope | Description |
|---|---|
| singleton | This is the default scope, it means only one single instance of the bean will be created in the container! |
| prototype | Each time the bean is requested, a new instance will be created. |
| request | A new instance of the bean will be returned for each HTTP request. |
| session | This is same as request scope, a single instance for every HTTP session. |
| application | This value creates a single bean instance shared accross the same web-aware Spring ApplicationContext |
| websocket | Only one instance will be created during complete lifecycle of WebSocket. |
If you don’t specify any scope value, then singleton will be the default scope of your bean!
How to define a spring bean scope?
By default, spring container creates all the beans with singleton scope! However, you can always override this default behavior easily!
You can use @Scope annotation to define a customized bean scope, let’s see how we can do that!
        @Scope(value="prototype")
        public class  MyBean {
            public  MyBean() {
            }
            // Getters + Setters
        }
        @Configuration
        public class MySpringConfiguration {
            @Bean(value="prototype")
            public MyBean1 myBean1() {
                return new MyBean1();
             }
            @Bean(value="request")
            public MyBean2 myBean2() {
                return new MyBean2();
            }
        }
If you are using XML configuration to configure your spring beans, you can use scope attribute to set your bean scope:
        <beans>
            <bean
                id="mySpringBean"
                class="com.azhwani.beans.MySpringBean"
                scope="prototype"/>
        </beans>
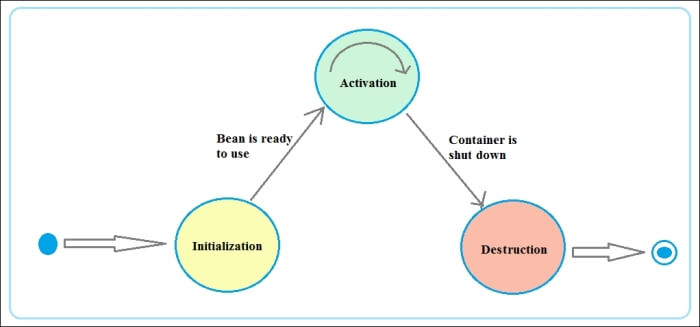
Spring bean life cycle
As we have already discussed, spring container is responsible for instantiating and managing life cycle of every bean in spring by reading the configuration metadata specified in Java or XML bean definitions.
Sometimes, it is required to perform some post initialization steps when a bean is initialized and some pre destruction actions when it is destroyed!
Bean initialization callbacks
Spring framework provides some interesting features to perform initialization work and customize the logic of bean creation!
If multiple initialization callbacks are defined for the same bean, then each callback is executed in the order below:
- @PostConstruct method.
- InitializingBean interface.
- init-method custom method.
@PostConstruct annotation:
Normally, a bean is not fully initialized when the constructor is called, so @PostConstruct annotation can be used to invoke and trigger a method to perform some post initialization!
        public class PostConstructBeanA {
            public PostConstructBeanA() {
            }
            @PostConstruct
            public void init() {
                // Post initialization code
            }
        }
InitializingBean interface:
InitializingBean is another way which allows to execute some custom code upon bean initialization, What you have to do is just implementing the afterPropertiesSet() method!
        public class CustomInitializingBean implements InitializingBean {
            public CustomInitializingBean() {
            }
            public void afterPropertiesSet() throws Exception {
                // Custom initialization code
                System.out.println("Init method");
            }
        }
Spring does not recommended to use InitializingBean interface because it couples the code to Spring!
initMethod with @Bean:
Alternatively, if you are using @Bean annotation to declare a spring bean, then you can use initMethod to intercept the initialization process!
        @Configuration
        public class BeansDef {
            @Bean (initMethod="init")
            public CustomBean customBean() {
                return new CustomBean();
            }
        }
        public class CustomBean {
            public CustomBean() {
            }
            // init method
            public void  init(){
            }
        }
init-method in XML:
In case you are prefering XML to define your spring beans, you can use init-method - an attribute of <bean> XML tag - to perform some initialization operations after bean creation!
        <beans>
            <bean
                id="customspringBean"
                class="com.azhwani.beans.CustomBean"
                init-method="init"/>
        </beans>
Bean destruction callbacks
Spring allows to write some custom cleanup operations when a bean is destroyed by the IoC container! The following are some options to create shutdown callbacks!
@PreDestroy annotation:
Spring always recommends us to use @PreDestroy annotation to perform cleanup operations during bean destruction!
        public class PreDestroyBean {
            public PreDestroyBean() {
            }
            @PreDestroy
            public void  destroy() {
                // Pre destruction code
            }
        }
DisposableBean interface:
DisposableBean provides destroy() as a cleanup method! Spring recommends us to not use DisposableBean interface because it tightly couples your code!
        public class  CustomDisposableBean implements DisposableBean {
            public CustomDisposableBean() {
            }
            public void destroy() {
                // Custom cleanup code
                System.out.println("cleanup method");
            }
        }
destroyMethod attribute:
You can also use destroyMethod attribute of the @Bean annotation to perform some actions before bean destruction!
        @Configuration
        public class BeansConfiguration {
            @Bean (destroyMethod="destroy")
            public CustomBean customBean() {
                return new CustomBean();
            }
        }
destroy-method in XML:
In XML configuration, you can define destroy-method bean attribute! Spring calls the method specified in the destroy-method just before the bean is destroyed.
        <beans>
            <bean
                id="customspringBean"
                class="com.azhwani.beans.CustomBean"
                destroy-method="destroy"/>
        </beans>
Summary:
Well, that’s all folks! We highlighted everything you need to know about spring beans! The most important bullet point to remmember is that all beans in spring are managed by IoC container!
Now you are ready to move to the next chapter! Spring is easy, but there’s a lot going on under the hood!
If you have any question about spring bean, please let us know!
Happy Learning ! See you next time!