How to download and upload files with Spring Boot REST API
Downloading and uploading files is a common task in web development! Personally, I worked on a project where I was required to implement file upload/download logic whith Spring Boot!
In this article, I will cover in depth how to download and upload files using Spring Boot RESTful web services.! I will walk you through the whole process step by step!
So, let’s get started!
Project requirements
What we will use?
To complete this tutorial, you need to install the following tools on your machine:
Java 8+
JDK 1.8+
Your favorite Java IDE
Postman (optional)
What we will build ?
To exemplify how to download and upload files, we will build a Spring Boot web application that handles file upload, download and storage!
In general, our simple project will be designed around two important things:
Service layer to hold file storage logic.
One single controller for handling upload and download requests/responses.
Let’s get into coding!
Setup Spring Boot project
In this tutorial, we will use Spring Boot CLI to quickly scaffold and prototype our project!
Open your terminal and type the following command lines:
        C:\Users\azhwani>spring init --groupId=com.api --artifactId=downupload --name=downupload --dependencies=web,lombok downupload
        Using service at https://start.spring.io
        Project extracted to 'C:\Users\azhwani\downupload'
        C:\Users\azhwani>
You are all set! Cool, right ?
You have got a project with all necessary files and dependencies that are needed to get started!
Now, you can import your project into your favorite Java IDE and start coding right away :)
Project Structure
By default, Spring Boot generates projects with the following directory structure:
        ├── src
        │   └── main
        │   │   ├── java
        │   │   │   └── com
        │   │   │       └── api
        │   │   │           └── downupload
        │   │   │               └── DownuploadApplication.java
        │   │   └── resources
        │   │       └── static
        │   │       └── templates
        │   │       └── application.properties
        │   │
        │   └── test
        │       └── java
        │           └── com
        │               └── api
        │                   └── downupload
        │                       └── DownuploadApplicationTests.java
        └── pom.xml
As you can see, the directory tree of our project is organized around some importants folders and files:
pom.xml: contains details about all dependencies used by Maven to build the project.DownuploadApplication.java: An entry point class with a main() method to bootstrap the application.DownuploadApplicationTests.java: An empty test class.application.properties: a special file that can be used to store configuration properties!
Project Dependencies
The following listing shows how pom.xml file of our project looks like:
        <modelVersion>4.0.0</modelVersion>
        <parent>
            <groupId>org.springframework.boot</groupId>
            <artifactId>spring-boot-starter-parent</artifactId>
            <version>2.2.6.RELEASE</version>
            <relativePath/> <!-- lookup parent from repository -->
        </parent>
        <groupId>com.api</groupId>
        <artifactId>downupload</artifactId>
        <version>0.0.1-SNAPSHOT</version>
        <name>downupload</name>
        <description>Download and upload files with Spring Boot</description>

        <properties>
            <java.version>1.8</java.version>
        </properties>

        <dependencies>
            <dependency>
                <groupId>org.springframework.boot</groupId>
                <artifactId>spring-boot-starter-web</artifactId>
            </dependency>
            <dependency>
                <groupId>org.projectlombok</groupId>
                <artifactId>lombok</artifactId>
                <optional>true</optional>
            </dependency>
            <dependency>
                <groupId>org.springframework.boot</groupId>
                <artifactId>spring-boot-starter-test</artifactId>
                <scope>test</scope>
                <exclusions>
                    <exclusion>
                        <groupId>org.junit.vintage</groupId>
                        <artifactId>junit-vintage-engine</artifactId>
                    </exclusion>
                </exclusions>
            </dependency>
        </dependencies>
        <build>
            <plugins>
                <plugin>
                    <groupId>org.springframework.boot</groupId>
                    <artifactId>spring-boot-maven-plugin</artifactId>
                </plugin>
            </plugins>
        </build>
Spring Boot REST API for file upload/download
In this section, we are going to use Spring Boot to build a backend API that exposes three REST endpoints:
POST /api/uploadfileto upload one single file.POST /api/uploadfilesto upload multiple files.GET /api/download/{filename:.+}to download a file.
MultipartFile interface
Simple put, you need to construct HTTP multipart requests to upload files over to your server!
You can explore more about multipart requests here.
Spring relies on MultipartFile interface to handle HTTP multi-part requests! MultipartFile encapsulates an uploaded file received in a multipart request!
Configuring file upload properties
First, let’s configure multipart settings! It is always pratical to define the maximum file size that can be uploaded when dealing with multipart requests!
Add the following properties to src/main/resources/application.properties file and Spring Boot will take care of the rest!
        ## Multipart config
        spring.servlet.multipart.enabled=true
        spring.servlet.multipart.file-size-threshold=2KB
        spring.servlet.multipart.max-file-size=200MB
        spring.servlet.multipart.max-request-size=215MB

        ## File upload custom properties
        file.upload.location=/Users/uploads
Spring Boot does not provide any default property that can be used to specify where all your files will be uploaded!
So, we defined this custom property file.upload.location to configure the directory path where you want to store the uploaded files!
Now, we need just to tell Spring Boot about it!
Binding custom properties
Spring Boot comes with a handy feature called ConfigurationProperties to help us access all the custom properties defined in application.properties file.
@ConfigurationProperties provides a way to map property files into Java classes!
Now, let’s create a simple Java class FileUploadProperties to bind our custom property file.upload.location!
        package com.api.downupload.properties;
        import org.springframework.boot.context.properties.ConfigurationProperties;

        @ConfigurationProperties(prefix = "file.upload")
        public class FileUploadProperties {
            private String location;
            public String getLocation() {
                return location;
            }
            public void setLocation(String location) {
                this.location = location;
            }
        }
As you can see, we have defined getter and setter methods for “location” field! Spring uses JavaBean specification to do the mapping between file properties and Java fields!
@ConfigurationProperties(prefix = “file.upload”) will simply bind all the properties prefixed with file.upload to the corresponding class fields!
To enable ConfigurationProperties feature, you need to add @EnableConfigurationProperties annotation to DownuploadApplication.java class, the starting point of our application!
        package com.api.downupload;

        import org.springframework.boot.SpringApplication;
        import org.springframework.boot.autoconfigure.SpringBootApplication;
        import org.springframework.boot.context.properties.EnableConfigurationProperties;
        import com.api.downupload.properties.FileUploadProperties;

        @SpringBootApplication
        @EnableConfigurationProperties({
            FileUploadProperties.class
        })
        public class DownuploadApplication {
            public static void main(String[] args) {
                SpringApplication.run(DownuploadApplication.class, args);
            }
        }
Create service layer for file storage
Our Spring controller needs to interact with the file system to store or retrieve files! So, to promote good separation of concerns, we are going to create a service layer to hold the business logic!
First, we are going to create a simple interface IFileSytemStorage with the following methods:
        package com.api.downupload.service;
        import org.springframework.core.io.Resource;
        import org.springframework.web.multipart.MultipartFile;

        public interface IFileSytemStorage {
            void init();
            String saveFile(MultipartFile file);
            Resource loadFile(String fileName);
        }
Now, let’s create an implementation of our interface with the following code:
        package com.api.downupload.service;

        import java.net.MalformedURLException;
        import java.nio.file.Files;
        import java.nio.file.Path;
        import java.nio.file.Paths;
        import java.nio.file.StandardCopyOption;
        import javax.annotation.PostConstruct;
        import org.springframework.beans.factory.annotation.Autowired;
        import org.springframework.core.io.Resource;
        import org.springframework.core.io.UrlResource;
        import org.springframework.stereotype.Service;
        import org.springframework.web.multipart.MultipartFile;
        import com.api.downupload.exception.FileNotFoundException;
        import com.api.downupload.exception.FileStorageException;
        import com.api.downupload.properties.FileUploadProperties;

        @Service
        public class FileSystemStorageService implements IFileSytemStorage {
            private final Path dirLocation;
            @Autowired
            public FileSystemStorageService(FileUploadProperties fileUploadProperties) {
                this.dirLocation = Paths.get(fileUploadProperties.getLocation())
                                        .toAbsolutePath()
                                        .normalize();
            }

            @Override
            @PostConstruct
            public void init() {
                // TODO Auto-generated method stub
                try {
                    Files.createDirectories(this.dirLocation);
                }
                catch (Exception ex) {
                    throw new FileStorageException("Could not create upload dir!");
                }
            }

            @Override
            public String saveFile(MultipartFile file) {
                // TODO Auto-generated method stub
                try {
                    String fileName = file.getOriginalFilename();
                    Path dfile = this.dirLocation.resolve(fileName);
                    Files.copy(file.getInputStream(), dfile,StandardCopyOption.REPLACE_EXISTING);
                    return fileName;

                } catch (Exception e) {
                    throw new FileStorageException("Could not upload file");
                }
            }

            @Override
            public Resource loadFile(String fileName) {
                // TODO Auto-generated method stub
                try {
                  Path file = this.dirLocation.resolve(fileName).normalize();
                  Resource resource = new UrlResource(file.toUri());

                  if (resource.exists() || resource.isReadable()) {
                      return resource;
                  }
                  else {
                      throw new FileNotFoundException("Could not find file");
                  }
                }
                catch (MalformedURLException e) {
                    throw new FileNotFoundException("Could not download file");
                }
            }
        }
Handle file upload/download exceptions
In this section, we will write the necessary code to handle file related exceptions that might be thrown when downloading or uploading files!
FileStorageException will be raised in case of unexpected scenarios that may occur when storing the uploaded files!
        package com.api.downupload.exception;
        import lombok.AllArgsConstructor;
        import lombok.Getter;
        import lombok.Setter;

        @Getter
        @Setter
        @AllArgsConstructor
        public class FileStorageException extends RuntimeException {
            private String message;
        }
FileNotFoundException will be thrown when the requested file does not exist!
        package com.api.downupload.exception;
        import lombok.AllArgsConstructor;
        import lombok.Getter;
        import lombok.Setter;

        @Getter
        @Setter
        @AllArgsConstructor
        public class FileNotFoundException extends RuntimeException {
            private String message;
        }
Spring provides @ControllerAdvice annotation to help us centralize exception handling logic across the whole application in one global handler class!
The idea is very simple, you just need to create a Java class annotated with @ControllerAdvice:
        package com.api.downupload.exception;
        import java.time.LocalDateTime;
        import java.util.ArrayList;
        import java.util.List;
        import org.springframework.http.HttpStatus;
        import org.springframework.http.ResponseEntity;
        import org.springframework.web.bind.annotation.ControllerAdvice;
        import org.springframework.web.bind.annotation.ExceptionHandler;
        import org.springframework.web.multipart.MaxUploadSizeExceededException;
        import org.springframework.web.servlet.mvc.method.annotation.ResponseEntityExceptionHandler;
        import com.api.downupload.model.ResponseError;

        @ControllerAdvice
        public class FileExceptionAdvice extends ResponseEntityExceptionHandler {
            @ExceptionHandler(FileNotFoundException.class)
            public ResponseEntity<Object> handleFileNotFoundException(FileNotFoundException exc) {

                List<String> details = new ArrayList<String>();
                details.add(exc.getMessage());
                ResponseError err = new ResponseError(LocalDateTime.now(), "File Not Found" ,details);
                return ResponseEntity.status(HttpStatus.NOT_FOUND).body(err);
            }

            @ExceptionHandler(MaxUploadSizeExceededException.class)
            public ResponseEntity<Object> handleMaxSizeException(MaxUploadSizeExceededException exc) {

                List<String> details = new ArrayList<String>();
                details.add(exc.getMessage());
                ResponseError err = new ResponseError(LocalDateTime.now(), "File Size Exceeded" ,details);
                return ResponseEntity.status(HttpStatus.EXPECTATION_FAILED).body(err);
            }
        }
@ExceptionHandler is used to bind a method to a specific exception!
For example, handleFileNotFoundException() is activated when FileNotFoundException is raised!
ResponseError class represents error responses in a more concise and meaningful way!
        package com.api.downupload.model;
        import java.time.LocalDateTime;
        import java.util.List;
        import com.fasterxml.jackson.annotation.JsonFormat;
        import lombok.AllArgsConstructor;
        import lombok.Data;

        @Data
        @AllArgsConstructor
        public class ResponseError {
            @JsonFormat(shape = JsonFormat.Shape.STRING, pattern = "yyyy-MM-dd hh:mm:ss")
            private LocalDateTime timestamp;
            private String message;
            private List erros;
        }
Create controller for downloading and uploading files
Now, let’s create a new Spring controller class inside com.api.downupload.controller package to handle HTTP multi-part requests for downloading and uploading files!
        import org.springframework.web.bind.annotation.RestController;
        import org.springframework.web.multipart.MultipartFile;
        import org.springframework.web.servlet.support.ServletUriComponentsBuilder;
        import com.api.downupload.model.FileResponse;
        import com.api.downupload.service.IFileSytemStorage;

        @RestController
        @RequestMapping("/api")
        public class FileController {
            @Autowired
            IFileSytemStorage fileSytemStorage;

            // POST "/uploadfile"
            // POST "/uploadfiles"
            // GET  "/download/{filename}"
        }
Note that, FileController uses a reference of IFileSytemStorage service (holds business logic) to deal with file download/upload requests!
FileResponse class
This class will be used to encapsulate HTTP response body returned from our REST API endpoints!
        package com.api.downupload.model;
        import lombok.AllArgsConstructor;
        import lombok.Data;

        @Data
        @AllArgsConstructor
        public class FileResponse {
            private String fileName;
            private String fileUrl;
            private String message;
        }
Upload Single File
        @PostMapping("/uploadfile")
        public ResponseEntity<FileResponse> uploadSingleFile (@RequestParam("file") MultipartFile file) {
            String upfile = fileSytemStorage.saveFile(file);

            String fileDownloadUri = ServletUriComponentsBuilder.fromCurrentContextPath()
                    .path("/api/download/")
                    .path(upfile)
                    .toUriString();

            return ResponseEntity.status(HttpStatus.OK).body(new FileResponse(upfile,fileDownloadUri,"File uploaded with success!"));
        }
@PostMapping maps POST requests to handler methods! We used it to map our POST /api/uploadfile request to uploadSingleFile() handler method!
@RequestParam binds request parameter file to MultipartFile object passed as a parameter to uploadSingleFile() method!
Upload Multiple Files
        @PostMapping("/uploadfiles")
        public ResponseEntity<List<FileResponse>> uploadMultipleFiles (@RequestParam("files") MultipartFile[] files) {

            List<FileResponse> responses = Arrays
                .asList(files)
                .stream()
                .map(
                    file -> {
                        String upfile = fileSytemStorage.saveFile(file);
                        String fileDownloadUri = ServletUriComponentsBuilder.fromCurrentContextPath()
                                .path("/api/download/")
                                .path(upfile)
                                .toUriString();
                        return new FileResponse(upfile,fileDownloadUri,"File uploaded with success!");
                    }
                )
                .collect(Collectors.toList());
            return ResponseEntity.status(HttpStatus.OK).body(responses);
        }
Here, we used Java 8 Stream API to simplify the logic of uploading all the files encapsulated in MultipartFile array!
In general, map() method is used to transform an object of type T to another object of type R! We used a lambda expression to handle file upload process and return an object of FileResponse class!
Download File
        @GetMapping("/download/{filename:.+}")
        public ResponseEntity<Resource> downloadFile(@PathVariable String filename) {

            Resource resource = fileSytemStorage.loadFile(filename);

            return ResponseEntity.ok()
                    .header(HttpHeaders.CONTENT_DISPOSITION, "attachment; filename=\"" + resource.getFilename() + "\"")
                    .body(resource);
        }
@GetMapping is used to map HTTP GET requests onto specific handler methods!
ResponseEntity class helps us generate a more significant HTTP response with all the details we need : appropriate status code and body!
Run and Test File download/upload API:
Let’s run our Spring Boot application! Awesome! As you can see, the application is running without any issue!
          .   ____          _            __ _ _
         /\\ / ___'_ __ _ _(_)_ __  __ _ \ \ \ \
        ( ( )\___ | '_ | '_| | '_ \/ _` | \ \ \ \
         \\/  ___)| |_)| | | | | || (_| |  ) ) ) )
          '  |____| .__|_| |_|_| |_\__, | / / / /
         =========|_|==============|___/=/_/_/_/
         :: Spring Boot ::        (v2.2.6.RELEASE)

        2020-04-28 16:01:37.970  INFO 2184 --- [           main] c.api.downupload.DownuploadApplication   : Starting DownuploadApplication on azhwani-PC with PID 2184 (C:\Users\azhwani\git\downupload\target\classes started by azhwani in C:\Users\azhwani\git\downupload)
        2020-04-28 16:01:37.979  INFO 2184 --- [           main] c.api.downupload.DownuploadApplication   : No active profile set, falling back to default profiles: default
        2020-04-28 16:01:41.951  INFO 2184 --- [           main] o.s.b.w.embedded.tomcat.TomcatWebServer  : Tomcat initialized with port(s): 9000 (http)
        2020-04-28 16:01:41.979  INFO 2184 --- [           main] o.apache.catalina.core.StandardService   : Starting service [Tomcat]
        2020-04-28 16:01:41.980  INFO 2184 --- [           main] org.apache.catalina.core.StandardEngine  : Starting Servlet engine: [Apache Tomcat/9.0.33]
        2020-04-28 16:01:42.402  INFO 2184 --- [           main] o.a.c.c.C.[Tomcat].[localhost].[/]       : Initializing Spring embedded WebApplicationContext
        2020-04-28 16:01:42.403  INFO 2184 --- [           main] o.s.web.context.ContextLoader            : Root WebApplicationContext: initialization completed in 4289 ms
        2020-04-28 16:01:43.314  INFO 2184 --- [           main] o.s.s.concurrent.ThreadPoolTaskExecutor  : Initializing ExecutorService 'applicationTaskExecutor'
        2020-04-28 16:01:43.618  INFO 2184 --- [           main] o.s.b.a.w.s.WelcomePageHandlerMapping    : Adding welcome page template: index
        2020-04-28 16:01:44.216  INFO 2184 --- [           main] o.s.b.w.embedded.tomcat.TomcatWebServer  : Tomcat started on port(s): 9000 (http) with context path ''
        2020-04-28 16:01:44.221  INFO 2184 --- [           main] c.api.downupload.DownuploadApplication   : Started DownuploadApplication in 7.519 seconds (JVM running for 9.191)
Now, it is time to test our REST API endpoints!
Testing with Postman
Uploading file with POST /api/uploadfile

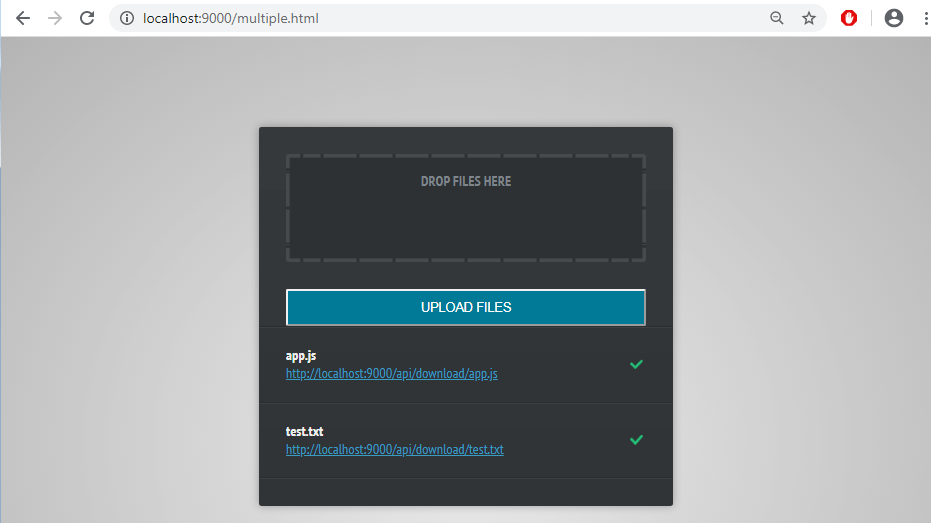
Uploading multiple files with POST /api/uploadfiles

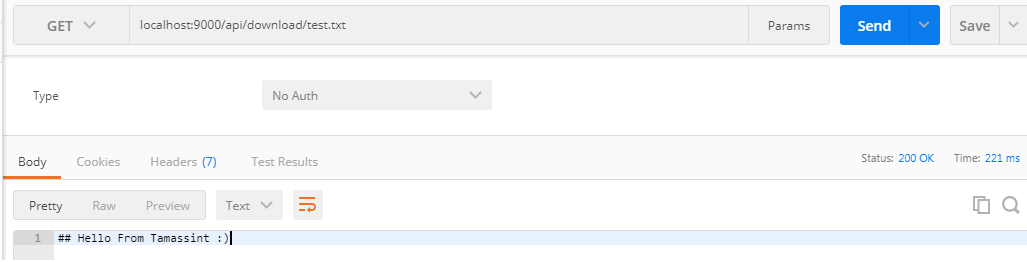
Downloading file with GET /api/download/{filename}
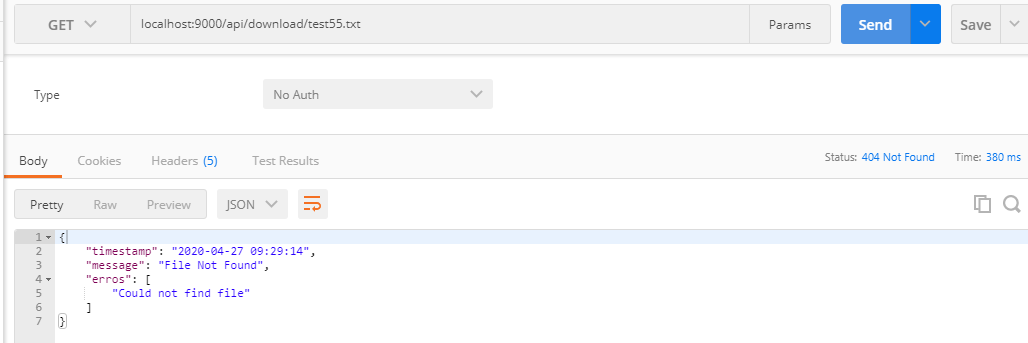
File Not Found Exception
Consuming REST API using jQuery Ajax!
Awesome! Our backend Spring Boot REST API is working fine! Now, let’s develop a simple frontend interface with some AJAX calls to consume our RESTful web services!
In Spring Boot applications, all static resources are located in src/main/resources/static folder!
Let’s get into business!
index.html
<!DOCTYPE html>
<html>
<head>
<meta charset="utf-8"/>
<title>Upload Single File</title>
<link href="http://fonts.googleapis.com/css?family=PT+Sans+Narrow:400,700" rel="stylesheet"/>
<link href="/css/style.css" rel="stylesheet"/>
</head>
<body>
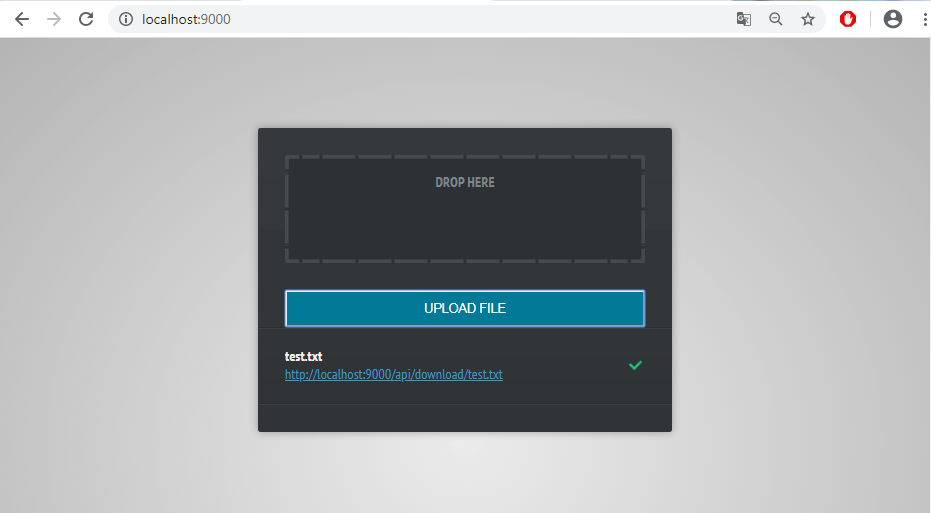
<form id="uploadfile" id="uploadfile" class="upload">
<div id="drop">
Drop Here
<input type="file" name="file"/>
</div>
<button type="submit" class="btn">Upload File</button>
<ul id="uploadresult">
</ul>
</form>
<footer>
<h2><a href="http://devwithus.com"><i>Tutorial BY </i> azhwani - devwithus.com</a></h2>
</footer>
<script src="https://ajax.googleapis.com/ajax/libs/jquery/1.9.1/jquery.min.js"></script>
<script src="/js/app.js"></script>
</body>
</html>
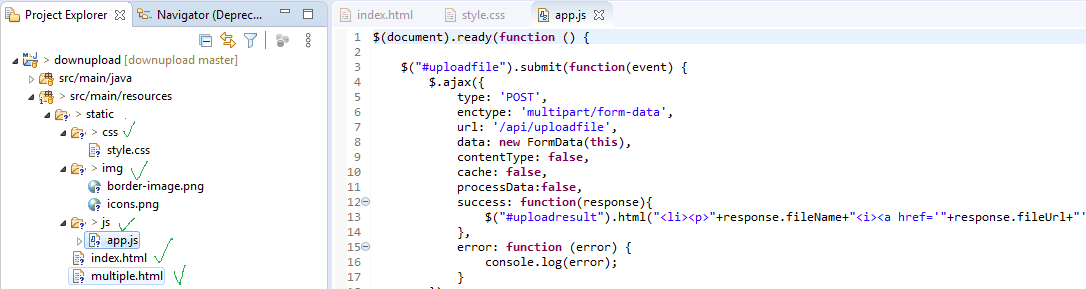
app.js
        $(document).ready(function () {
            /* Upload single File   */
            $("#uploadfile").submit(function(event) {
                $.ajax({
                    type: 'POST',
                    enctype: 'multipart/form-data',
                    url: '/api/uploadfile',
                    data: new FormData(this),
                    contentType: false,
                    cache: false,
                    processData:false,
                    success: function(response){
                        $("#uploadresult").html("<li><p>"+response.fileName+"<i><a href='"+response.fileUrl+"'>"+response.fileUrl+"</a></i></p><span></span></li>");
                    },
                    error: function (error) {
                        console.log(error);
                    }
                });
                event.preventDefault();
            });

            /* Upload multiple Files   */
            $("#uploadmultiple").submit(function(event) {
                $.ajax({
                    type: 'POST',
                    enctype: 'multipart/form-data',
                    url: '/api/uploadfiles',
                    data: new FormData(this),
                    contentType: false,
                    cache: false,
                    processData:false,
                    success: function(response){
                        let content  = '';
                        $.each(response, function( i, v ) {
                            content += "<li><p>"+v.fileName+"<i><a href='"+v.fileUrl+"'>"+v.fileUrl+"</a></i></p><span></span></li>";
                        });
                        $("#uploadresult").html(content);
                    },
                    error: function (error) {
                        console.log(error);
                    }
                });
                event.preventDefault();
            });
        });
style.css
        *{
            margin:0;
            padding:0;
        }

        html{
            background-color:#ebebec;
            background-image:-webkit-radial-gradient(center, #ebebec, #b4b4b4);
            background-image:-moz-radial-gradient(center, #ebebec, #b4b4b4);
            background-image:radial-gradient(center, #ebebec, #b4b4b4);
            min-height:900px;
        }

        body{
            font:15px/1.3 Arial, sans-serif;
            color: #4f4f4f;
        }

        a, a:visited {
            outline:none;
            color:#389dc1;
        }

        a:hover{
            text-decoration:none;
        }

        section, footer, header, aside{
            display: block;
        }

        .btn{
            background-color:#007a96;
            padding:12px 26px;
            color:#fff;
            font-size:14px;
            border-radius:2px;
            cursor:pointer;
            display:inline-block;
            line-height:1;
            text-transform: uppercase;
            width:100%;
        }

        .upload{
            font-family:'PT Sans Narrow', sans-serif;
            background-color:#373a3d;
            background-image:-webkit-linear-gradient(top, #373a3d, #313437);
            background-image:-moz-linear-gradient(top, #373a3d, #313437);
            background-image:linear-gradient(top, #373a3d, #313437);
            width:400px;
            padding:30px;
            border-radius:3px;
            margin:100px auto 100px;
            box-shadow: 0 0 10px rgba(0, 0, 0, 0.3);
        }

        #drop{
            background-color: #2E3134;
            margin-bottom: 30px;
            border: 20px solid rgba(0, 0, 0, 0);
            border-radius: 3px;
            border-image: url('../img/border-image.png') 25 repeat;
            text-align: center;
            text-transform: uppercase;
            font-size:16px;
            font-weight:bold;
            color:#7f858a;
            height:80px;
        }

        #drop > input[type="file"]{
            top: 0;
            right: 0;
            opacity: 0;
            cursor: pointer;
            width:100%;
            height:100%;
        }

        .upload ul{
            list-style:none;
            margin:0 -30px;
            border-top:1px solid #2b2e31;
            border-bottom:1px solid #3d4043;
        }

        .upload ul li{
            background-color:#333639;
            background-image:-webkit-linear-gradient(top, #333639, #303335);
            background-image:-moz-linear-gradient(top, #333639, #303335);
            background-image:linear-gradient(top, #333639, #303335);
            border-top:1px solid #3d4043;
            border-bottom:1px solid #2b2e31;
            padding:15px;
            height: 52px;
            position: relative;
        }

        .upload ul li input{
            display: none;
        }

        .upload ul li p{
            overflow: hidden;
            white-space: nowrap;
            color: #EEE;
            font-size: 16px;
            font-weight: bold;
            position: absolute;
            top: 20px;
            left: 30px;
        }

        .upload ul li i{
            font-weight: normal;
            font-style:normal;
            color:#7f7f7f;
            display:block;
        }

        .upload ul li canvas{
            top: 15px;
            left: 32px;
            position: absolute;
        }

        .upload ul li span{
            width: 15px;
            height: 12px;
            background: url('../img/icons.png') no-repeat;
            position: absolute;
            top: 34px;
            right: 33px;
            cursor:pointer;
        }

        .upload ul li.working span{
            height: 16px;
            background-position: 0 -12px;
        }

        .upload ul li.error p{
            color:red;
        }

        footer{
            background-color: #080808;
            bottom: 0;
            box-shadow: 0 -1px 2px rgba(0,0,0,0.4);
            height: 40px;
            left: 0;
            position: fixed;
            width: 100%;
            z-index: 100000;
        }

        footer h2{
            font-size: 14px;
            font-weight: normal;
            position: absolute;
            top:0;
            left: 50%;
            bottom:0;
            margin-left: -420px;
            padding:13px 20px 0;
            border:1px solid #000;
            border-width:0 1px;
            background-color:rgba(0,0,0,0.6);
            box-shadow:0 0 5px #000 inset;
            line-height: 1;
            margin-top: 0;
        }

        footer h2 a{
            color: #EEEEEE !important;
            text-decoration:none !important;
        }

        footer h2 i{
            font-style:normal;
            color:#888;
        }
Some screenshots:
Conclusion
That’s all my friend! You have learned how to download and upload files using RESTful Spring Boot API.
You can find the complete source code for this tutorial on this Github repository https://github.com/devwithus/upload-file-with-spring-boot
Stay safe and take care!